
Gardening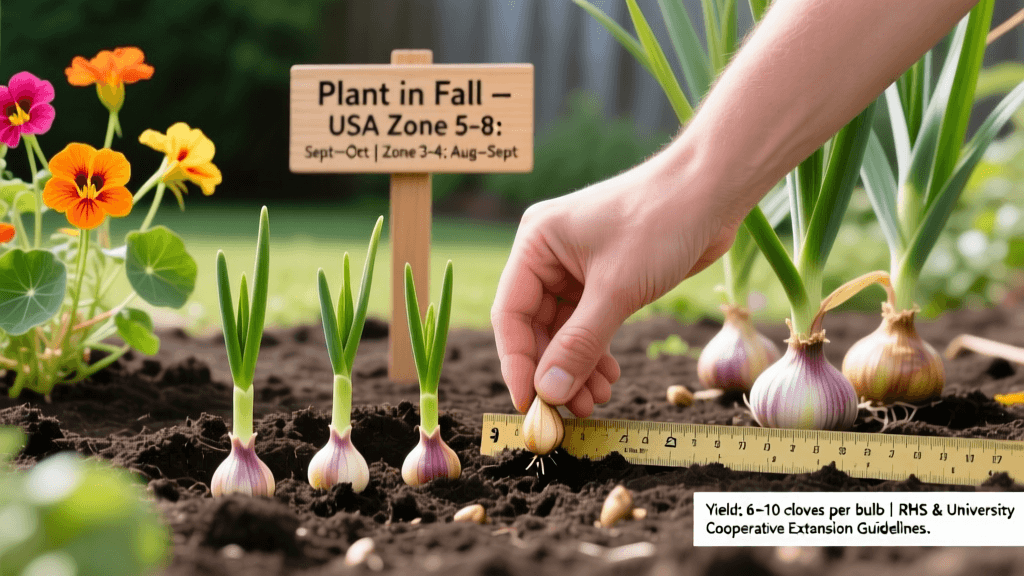
How To Grow Garlic In Your Backyard
Getting Started with Backyard Garlic
Garlic is one of the most rewarding crops a home gardener can grow. A single clove planted in autumn returns a full bulb by midsummer, and the flavor of freshly cured homegrown garlic bears little resemblance to the pale, odorless bulbs that sit in supermarket bins for months. With modest space requirements, low pest pressure, and a long storage life, garlic fits naturally into nearly any backyard garden — whether you have a dedicated raised bed or a narrow strip of soil along a fence line.
Success depends on understanding a few fundamentals: choosing the right type for your climate, planting at the correct time, building soil that drains well, and curing the harvest properly. Each of these steps is well-documented by university extension programs across North America and by the Royal Horticultural Society in the United Kingdom, and the guidance they provide is consistent enough to give any gardener a reliable framework.
Hardneck vs. Softneck: Choosing Your Garlic
All cultivated garlic belongs to Allium sativum, but the two main groups — hardneck and softneck — behave differently in the garden and in the kitchen. Hardneck varieties (A. sativum var. ophioscorodon) produce a rigid central stalk called a scape and typically form 4 to 12 large, easy-to-peel cloves per bulb. They perform best in climates with a cold winter, generally USDA Hardiness Zones 3 through 7, because they need a prolonged vernalization period of at least 40 days below 10 °C (50 °F) to start forming bulbs. Popular hardneck types include Rocambole, Purple Stripe, and Porcelain.
Softneck varieties (A. sativum var. sativum) lack the central stalk, produce more cloves per bulb — sometimes 12 to 20 — and store longer, often 9 to 12 months under ideal conditions. They tolerate milder winters and are the standard commercial type grown in California's San Joaquin Valley, which produces roughly 80 percent of the garlic consumed in the United States. Artichoke and Silverskin are the two main softneck groups. Gardeners in Zones 8 through 10 generally do better with softneck types, though some hardneck cultivars can succeed with pre-chilling.
Elephant Garlic: A Special Case
Elephant garlic (Allium ampeloprasum) is technically a leek relative rather than true garlic, but it is grown in the same way and produces enormous bulbs that can weigh 250 to 500 grams each. Its flavor is milder and less complex than true garlic. It suits Zones 5 through 9 and is a good choice for gardeners who want dramatic visual impact or prefer a subtler taste in cooking.
Soil Preparation and Fertility
Garlic needs well-drained, fertile soil with a pH between 6.0 and 7.0. Heavy clay soils that hold water through winter will rot cloves before they establish roots; sandy soils that drain too quickly will leave plants nutrient-deficient by spring. The ideal growing medium is a loam or sandy loam amended with generous quantities of organic matter.
The University of Minnesota Extension recommends incorporating 2 to 4 inches of compost into the top 6 to 8 inches of soil before planting. A pre-plant fertilizer application of 10-10-10 at a rate of approximately 1 pound per 100 square feet provides a balanced nutrient base. In spring, as foliage begins active growth, a side-dressing of a nitrogen-rich fertilizer — blood meal, feather meal, or a granular 21-0-0 — at 1 pound per 100 square feet encourages the leaf development that ultimately determines bulb size, since each leaf corresponds to one wrapper layer around the bulb.
Raised beds are particularly well-suited to garlic because they warm earlier in spring and drain reliably. A bed depth of at least 12 inches gives roots room to develop without restriction. If your native soil is compacted or poorly drained, a raised bed filled with a custom mix of topsoil, compost, and coarse perlite is worth the initial investment.
Adjusting Soil pH
If a soil test reveals pH below 6.0, apply ground limestone at the rate recommended by your test results — typically 5 to 10 pounds per 100 square feet for soils in the 5.5 to 5.9 range. Lime should be worked into the soil several weeks before planting to allow it to react. Overly alkaline soils above 7.5 can be acidified with elemental sulfur, though this is rarely necessary in most temperate garden soils.
Planting Dates by USDA Zone
Timing matters most in garlic production. Cloves planted too early produce excessive top growth before winter, making plants vulnerable to freeze damage; cloves planted too late fail to establish enough root mass to support vigorous spring growth. The following table summarizes recommended planting windows based on USDA Hardiness Zone data and guidance from the Cornell University Cooperative Extension:
| USDA Zone | Approximate Region | Recommended Planting Window | Best Garlic Type |
|---|---|---|---|
| 3–4 | Northern Minnesota, Montana, northern New England | Late September – early October | Hardneck (Rocambole, Purple Stripe) |
| 5–6 | Ohio, Pennsylvania, Pacific Northwest | Mid-October – early November | Hardneck or softneck |
| 7 | Virginia, Tennessee, coastal Oregon | Late October – mid-November | Softneck or mild hardneck |
| 8–9 | Georgia, Texas, coastal California | November – December | Softneck (Artichoke, Silverskin) |
| 10 | South Florida, Hawaii | December – January (pre-chilled cloves) | Softneck with pre-chilling at 4 °C for 6–8 weeks |
In the United Kingdom, the Royal Horticultural Society advises planting between October and November for most regions, with a second planting window in February for spring-planted garlic using varieties specifically bred for that purpose, such as 'Solent Wight' or 'Picardy Wight' (RHS, 2023).
Planting Technique and Spacing
Break bulbs into individual cloves no more than 24 hours before planting to minimize moisture loss from the exposed basal plate. Discard any cloves that are soft, discolored, or significantly smaller than the others — small cloves produce small bulbs, and diseased cloves introduce pathogens into clean soil. Select the largest, firmest cloves for planting and save the smaller ones for the kitchen.
Plant cloves with the pointed tip facing upward and the flat basal plate facing down, at a depth of 2 inches measured from the top of the clove to the soil surface. In colder zones (3–5), planting slightly deeper — 3 to 4 inches — provides additional insulation against hard freezes. Standard in-row spacing is 6 inches between cloves, with rows 12 inches apart. This spacing yields approximately 65 plants per 32-square-foot raised bed, which is a common 4-by-8-foot configuration.
Mulching After Planting
Apply 3 to 4 inches of straw, shredded leaves, or wood chip mulch immediately after planting. Mulch moderates soil temperature fluctuations, suppresses winter annual weeds, and retains moisture. In Zones 3 and 4, a heavier mulch layer of 6 inches is appropriate. Pull mulch back slightly in early spring as shoots emerge to prevent rot at the crown, then push it back around plants once they are 3 to 4 inches tall.
According to research published by the Pennsylvania State University Extension, mulched garlic plots consistently outperform unmulched plots in bulb size and uniformity, with average bulb diameter increasing by 15 to 20 percent in trials conducted over three growing seasons (Penn State Extension, 2021).
Irrigation and Weed Management
Garlic needs consistent moisture from planting through late spring but must dry down as harvest approaches. A general guideline is 1 inch of water per week from rainfall or irrigation during active growth, tapering to zero in the final 2 to 3 weeks before harvest. Drip irrigation is preferable to overhead watering because it keeps foliage dry and reduces the risk of fungal diseases such as white rot (Sclerotium cepivorum) and botrytis leaf blight.
Weed competition is particularly damaging to garlic because the crop's upright, narrow foliage does not shade the soil effectively. Hand-weeding or shallow cultivation with a hoe should begin as soon as weeds emerge in spring. Avoid deep cultivation, which can damage the shallow feeder roots that spread 12 to 18 inches horizontally from the plant base. Consistent mulching dramatically reduces the weeding workload.
Scapes and the Harvest Decision
Hardneck varieties send up a curling flower stalk — the scape — in late spring or early summer, typically 3 to 4 weeks before bulb harvest. Remove scapes when they have made one full curl by snapping or cutting them just above the uppermost leaf. This redirects the plant's energy from seed production into bulb development and can increase final bulb weight by 20 to 30 percent. Scapes are edible and have a mild garlic flavor; they are excellent sautéed, grilled, or blended into pesto.
Harvest timing makes a real difference. Dig too early and bulbs will be small and poorly wrapped; wait too long and the wrappers deteriorate, reducing storage life. The standard indicator is leaf count: harvest when approximately half the leaves have turned brown and half remain green. Each green leaf corresponds to a wrapper layer on the bulb. A bulb harvested with 5 to 6 green leaves will have 5 to 6 intact wrapper layers, which is ideal for long storage.
In most of Zone 6, this point arrives in mid-July for fall-planted garlic. In Zone 8, harvest typically occurs in late May to early June. Use a garden fork rather than a spade to loosen the soil 4 to 6 inches from the plant before lifting, to avoid slicing through bulbs.
Curing, Storage, and Yield Expectations
Freshly dug garlic must be cured before storage. Lay bulbs in a single layer or hang them in small bundles in a shaded, well-ventilated location with temperatures between 24 and 30 °C (75–86 °F) and relative humidity below 60 percent. Curing takes 3 to 8 weeks depending on bulb size and ambient conditions. The bulb is fully cured when the outer wrappers are papery and dry, the neck is tight and hard, and the roots are brittle.
Store cured garlic at 13 to 18 °C (55–65 °F) in mesh bags, open baskets, or braided strings that allow air circulation. Do not refrigerate garlic intended for long-term storage — temperatures below 10 °C can trigger sprouting. Hardneck varieties stored under these conditions typically last 4 to 6 months; softneck varieties can last 9 to 12 months.
Realistic Yield Figures
Home gardeners can expect a return ratio of roughly 6:1 to 10:1 by weight — meaning each pound of seed garlic planted yields 6 to 10 pounds of cured bulbs under good growing conditions. A 32-square-foot raised bed planted at standard spacing will accommodate approximately 65 cloves and can yield 8 to 12 pounds of cured garlic, enough to supply a household for several months and provide seed stock for the following year's planting.
- Plant cloves 6 inches apart in rows 12 inches apart for standard production.
- Maintain 1 inch of water per week during active growth; stop irrigation 2 to 3 weeks before harvest.
- Remove hardneck scapes at the first full curl to maximize bulb size.
- Harvest when 50 percent of leaves have browned — typically mid-July in Zone 6.
- Cure bulbs for 3 to 8 weeks at 24–30 °C in a shaded, ventilated space before storage.
Common Problems and How to Address Them
Garlic is relatively trouble-free, but a handful of problems appear regularly in home gardens. White rot, caused by the soilborne fungus Sclerotium cepivorum, is the most serious disease threat. It produces white, fluffy mycelium at the bulb base and small black sclerotia that persist in soil for 20 or more years. There is no chemical cure for infected soil; the only management strategy is prevention through crop rotation (avoid planting alliums in the same bed for at least 4 years) and using certified disease-free seed stock.
Onion thrips (Thrips tabaci) cause silvery streaking on leaves and can reduce yields in hot, dry summers. Reflective mulches and insecticidal soap sprays applied at first sign of damage are effective controls. Leek rust (Puccinia allii), which produces orange pustules on foliage, is primarily a cosmetic problem in garlic and rarely affects bulb development significantly, though it is more common in the UK and Pacific Northwest where cool, humid conditions prevail.
- Rotate allium crops on a minimum 4-year cycle to reduce soilborne disease pressure.
- Source seed garlic from reputable suppliers with certified disease-free stock — avoid planting supermarket garlic, which may carry viruses and is often treated to suppress sprouting.
- Test soil pH and fertility before planting and amend based on results rather than guessing.
- Monitor for thrips from June onward in warm climates and intervene early with targeted sprays.
- Keep detailed records of planting dates, varieties, and yields to refine your approach each season.
Sourcing quality seed garlic from established suppliers such as Keene Organics in New Jersey, Filaree Garlic Farm in Washington State, or the Garlic Farm on the Isle of Wight in the UK gives you access to a wide range of tested varieties and ensures you are starting with healthy, virus-indexed stock. The difference in vigor and yield between high-quality seed garlic and grocery-store bulbs is clear and shows up fast in the garden.

