Gardening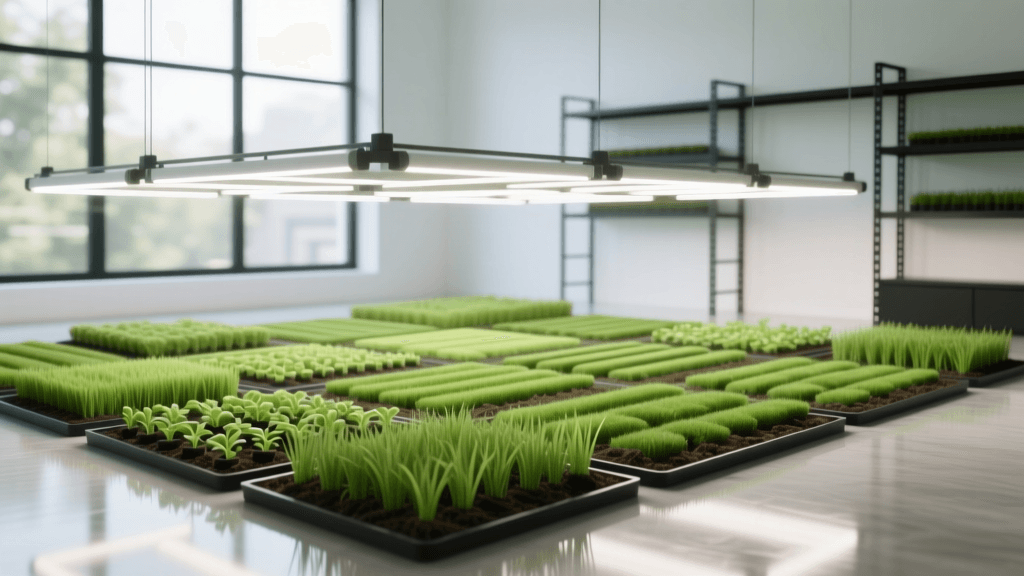
2026 LED Grow Light Schedule For Aesthetic Lawn Plugs
The Secret to Flawless Lawn Striping Starts Indoors
When homeowners envision breathtaking lawn striping and intricate aesthetic garden patterns—like checkerboards, diamonds, or interwoven waves—they often focus entirely on the mowing technique, the roller weight, and the lawn striper attachment. However, the true foundation of a high-contrast, visually striking lawn pattern lies in the cellular density and structural integrity of the grass itself. In 2026, the most dedicated turf enthusiasts and landscaping professionals are turning to a highly controlled indoor environment to start their turfgrass plugs. By utilizing a precise seed starting indoors under LED grow light schedule, you can cultivate uniform, robust grass plugs that are biologically primed to bend cleanly and reflect light brilliantly, creating the ultimate aesthetic outdoor canvas.
Starting your turfgrass or ornamental border seeds indoors allows you to bypass the unpredictability of early spring weather. More importantly, it guarantees that every single plug you transplant into your geometric lawn design is at the exact same stage of maturity. Uniformity is the golden rule of aesthetic landscaping. A single weak or spindly plug can disrupt the visual flow of a checkerboard pattern. According to the University of Minnesota Extension, controlling the light spectrum and photoperiod indoors is the most reliable way to ensure vigorous, uniform seedling development before they ever touch outdoor soil.
The Physics of Aesthetic Patterns: Why Light Quality Matters
To understand why an indoor LED schedule is critical for lawn striping, you must understand the physics of how stripes are formed. Lawn stripes are not created by cutting the grass at different heights; they are an optical illusion created by bending the grass blades in opposite directions. When grass is bent away from you, the broad, waxy top of the blade reflects sunlight, appearing light green or white. When bent toward you, the darker, shadowed underside is visible, creating a dark green stripe.
For this optical illusion to be sharp and high-contrast, the grass blades must possess thick cell walls and high turgor pressure. Grass grown under weak or inconsistent light becomes etiolated—meaning it stretches rapidly, becoming spindly, pale, and structurally weak. When a lawn roller passes over etiolated grass, the blades snap or mat down flat against the soil, completely ruining the 3D aesthetic of the pattern. Conversely, turfgrass grown under a high-PPFD (Photosynthetic Photon Flux Density), blue-spectrum-rich LED schedule develops thick, rigid structural integrity. When rolled by a striper, it bends cleanly at the node and springs back slightly, holding the optical illusion perfectly. Furthermore, modern 2026 LED arrays incorporate UV-A diodes, which trigger the production of protective flavonoids and thicken the leaf cuticle, directly enhancing the light reflectivity required for brilliant lawn stripes.
The Ultimate 2026 Indoor LED Schedule for Turfgrass Plugs
Achieving the perfect plug requires mimicking and optimizing the sun's natural progression. The Penn State Extension emphasizes that turfgrass seedlings require a high Daily Light Integral (DLI) to prevent legginess and encourage deep root establishment. Below is the definitive 2026 LED schedule for starting cool-season grasses (like Kentucky Bluegrass and Perennial Ryegrass) and warm-season grasses (like Bermudagrass and Zoysia) indoors.
Phase 1: Germination and Emergence (Days 1-10)
During the first ten days, your primary goal is to encourage rapid, even germination without shocking the delicate seedlings. Keep your 1020 propagation trays under a humidity dome. Set your full-spectrum LED grow lights to a low intensity of 150 PPFD. The photoperiod should be set to 14 hours on and 10 hours off. A slightly blue-heavy spectrum during this phase helps prevent the seedlings from stretching too quickly toward the light source, ensuring a dense, compact canopy from day one.
Phase 2: Vegetative Growth and Canopy Expansion (Days 11-25)
Once the majority of your seeds have emerged and developed their first true leaves, remove the humidity dome and increase airflow with a gentle oscillating fan. This mechanical stress, known as thigmomorphogenesis, signals the plant to build thicker stems. Increase your LED intensity to 250 PPFD and extend the photoperiod to 16 hours on and 8 hours off. The broader light spectrum, including deep reds, will drive photosynthesis and rapid leaf expansion, which is vital for establishing the dense turf required for seamless aesthetic patterns.
Phase 3: Hardening and Structural Fortification (Days 26-40)
This is the most critical phase for lawn striping preparation. You are now building the cellular rigidity that will allow the grass to hold a stripe. Crank your 2026 smart LED controllers to 400+ PPFD and extend the photoperiod to 18 hours on and 6 hours off. If your LED fixture features independent UV-A and far-red channels, activate them now. The UV-A will thicken the leaf cuticle for maximum light reflectivity, while the far-red will encourage robust root mass development, ensuring your plugs survive the shock of outdoor transplanting into your patterned layout.
2026 LED Grow Light Settings for Plug Trays
To execute this schedule, you need precise control over your lighting environment. The table below outlines the exact metrics you should program into your smart LED controllers for optimal turfgrass plug production.
| Growth Stage | Photoperiod (On/Off) | PPFD (µmol/m²/s) | Spectrum Focus | Canopy Distance |
|---|---|---|---|---|
| Germination (Days 1-10) | 14h / 10h | 150 | Blue-Heavy (6500K) | 24 inches |
| Vegetative (Days 11-25) | 16h / 8h | 250 | Full Spectrum (5000K) | 18 inches |
| Hardening (Days 26-40) | 18h / 6h | 400+ | Full Spectrum + UV-A | 12 inches |
Mapping Indoor Trays to Outdoor Aesthetic Patterns
The beauty of starting seeds indoors under a strict LED schedule is the ability to mathematically plan your outdoor aesthetic patterns. A standard 1020 nursery tray holds exactly 72 individual plug cells. If you are designing a classic checkerboard pattern for a 10-foot by 10-foot focal area in your front yard, and you plan to space your plugs 12 inches apart, you will need exactly 100 plugs to form the alternating 'dark' squares (assuming the 'light' squares are established via a different method or seed blend).
By calculating your exact plug requirements, you can start precisely two 72-cell trays indoors (giving you 144 plugs, allowing for a 20% cull rate of any underperforming seedlings). This mathematical precision ensures that when transplant day arrives, you are not scrambling to fill gaps in your geometric design. Every plug you place in the soil will be uniform in height, color, and structural density, guaranteeing that your lawn striper will glide over the newly established pattern with zero visual interruptions.
Hardening Off for Pattern Transplanting
Before moving your meticulously grown plugs outdoors, they must be hardened off to acclimate to direct solar radiation and wind. Over a period of 7 to 10 days, gradually move your trays outdoors into dappled shade, increasing their sun exposure by one hour each day. Because your 2026 LED schedule included high PPFD and UV-A exposure during Phase 3, your plugs will experience significantly less transplant shock and sun-scald than traditionally grown seedlings. This rapid establishment is crucial; the faster your plugs root into the native soil, the sooner you can begin your first aesthetic mowing and striping routines.
Troubleshooting Common Indoor Seed Starting Issues
Even with the best LED schedules, indoor seed starting can present challenges. Here is how to troubleshoot common issues to protect your aesthetic lawn plans:
- Damping Off Disease: If seedlings suddenly pinch at the soil line and fall over, you have damping off, a fungal issue caused by excess moisture and poor airflow. Solution: Remove humidity domes immediately after germination, introduce an oscillating fan, and water from the bottom of the 1020 tray to keep the soil surface dry.
- Algae Growth on Soil Surface: Green algae competes with young roots and indicates overwatering and high humidity. Solution: Allow the top millimeter of the seed-starting mix to dry out between waterings. A light dusting of cinnamon powder on the soil surface can also act as a natural fungicide.
- Leggy, Pale Seedlings: This means your DLI is too low. The plants are stretching for light, which will ruin their ability to hold a lawn stripe. Solution: Lower your LED fixture closer to the canopy and increase the intensity by 50 PPFD immediately.
- Tip Burn or Bleaching: If the tips of the grass blades turn white or brown during Phase 3, you may be experiencing light burn or nutrient toxicity. Solution: Raise the LED fixture by 4 inches and flush the plug trays with plain, pH-balanced water to remove excess fertilizer salts.
By mastering this 2026 indoor LED grow light schedule, you elevate lawn care from a simple chore to a precise horticultural science. The effort you invest in your indoor propagation setup will pay dividends when you make your first pass with the lawn striper, revealing a flawless, high-contrast aesthetic pattern that will be the envy of the neighborhood.