
Install a Smart Drip Irrigation System for Raised Beds
Why Upgrade to a Smart Drip Irrigation System?
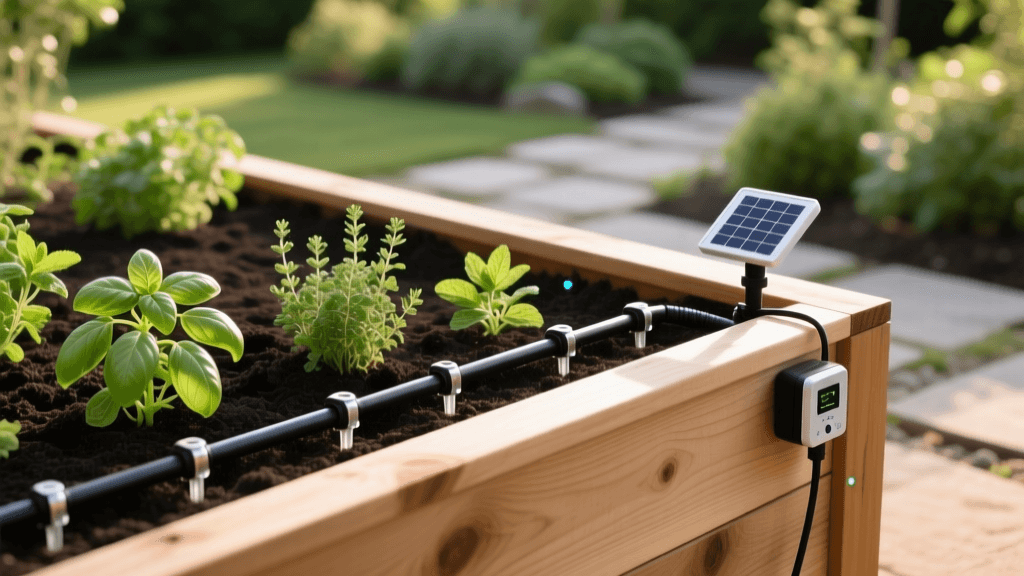
Bridging the gap between indoor smart home technology and outdoor garden-to-table living is one of the most rewarding DIY projects a homeowner can undertake. If you are growing vegetables, herbs, or ornamental plants in raised beds, hand-watering or using traditional oscillating sprinklers is highly inefficient. Sprinklers lose massive amounts of water to wind drift and evaporation, while wetting plant foliage can promote fungal diseases like powdery mildew and blight.
Installing a smart drip irrigation system delivers water directly to the root zone, minimizing waste and maximizing yield. By integrating a Wi-Fi-enabled smart controller, your system will automatically adjust watering schedules based on local weather forecasts, soil moisture levels, and seasonal evapotranspiration rates. This practical how-to guide will walk you through installing a complete smart drip system for standard 4x8-foot raised garden beds, complete with product recommendations, cost estimates, and expert spacing guidelines.
Tools and Materials Required
Before heading to the hardware store or ordering online, gather the following tools and materials. The estimated cost for a complete smart upgrade serving up to four raised beds is between $250 and $350, and the installation typically takes 2 to 3 hours.
- Smart Controller: Rachio 3e or Orbit B-hyve Smart Hose Faucet Timer ($80 - $150). For this guide, we will use a smart hose timer for easy outdoor spigot integration.
- Backflow Preventer: Anti-siphon valve to protect your home's drinking water ($15).
- Filter: 120-mesh screen filter to prevent emitter clogging ($10).
- Pressure Regulator: 25 PSI pressure reducer. Standard home water pressure (50-80 PSI) will blow apart drip fittings ($10).
- Mainline Tubing: 1/2-inch blank polyethylene tubing (100-foot roll) ($30).
- Micro-Tubing: 1/4-inch vinyl tubing (50-foot roll) ($12).
- Emitters: 1 GPH (Gallons Per Hour) PC (Pressure Compensating) button emitters ($15).
- Fittings: 1/2-inch barbed tees, elbows, and end caps ($20).
- Tools: Teflon tape, tubing punch tool, utility knife, and a measuring tape.
Step-by-Step Installation Guide
Step 1: Assemble the Head Assembly
The head assembly connects your outdoor hose spigot to the drip system and conditions the water. Always wrap the male threads of your spigot and fittings with 3 to 4 layers of Teflon tape (plumber's tape) to prevent leaks. Screw the components together in this exact order:
- Smart Hose Timer: Attach directly to the spigot.
- Backflow Preventer: Ensures contaminated garden water does not siphon back into your home's plumbing.
- 120-Mesh Filter: Catches microscopic debris that could clog the tiny holes in your drip emitters.
- 25 PSI Pressure Regulator: Steps down the high household water pressure to a gentle 25 PSI, which is the optimal operating pressure for 1/2-inch drip lines.
- Tubing Adapter: A 3/4-inch female hose thread to 1/2-inch barbed connector to attach the mainline tubing.
Step 2: Lay the Mainline Tubing
Unroll your 1/2-inch polyethylene tubing and let it sit in the sun for about 30 minutes. The heat will soften the plastic, removing the memory of the coil and making it much easier to lay flat along the edges of your raised beds. Run the mainline along the top inside edge of the wooden or stone raised bed frame. Secure the tubing every 3 feet using metal or plastic landscape stakes. Use barbed tees to split the line if you are running parallel lines down the length of a wide bed.
Step 3: Punch Holes and Insert Emitters
Using a specialized drip tubing punch tool, pierce the 1/2-inch mainline exactly where you want to deliver water. For most raised bed vegetables, you will use 1/4-inch micro-tubing to bridge the gap from the mainline on the edge of the bed to the center of the plant. Cut the micro-tubing to length using a utility knife, attach a barbed connector to one end, and push it into the punched hole. Attach a 1 GPH pressure-compensating emitter to the other end and place it at the base of the plant.
Step 4: Cap the Ends and Test the System
At the end of every 1/2-inch tubing run, attach a barbed end cap or fold the tubing over and secure it with a figure-8 end closure. Turn on your outdoor spigot and manually trigger a watering cycle from your smart controller app. Walk the entire system, checking for leaks at the barbed fittings and ensuring every emitter is dripping steadily. If a fitting leaks, push the tubing further onto the barb until it seats past the ridges.
Step 5: Program Your Smart Controller
Connect your smart hose timer to your home's 2.4GHz Wi-Fi network. Input your specific garden details into the app: select 'Drip Irrigation' as the zone type, choose 'Raised Bed Vegetable Garden' as the vegetation type, and set your soil type (usually a mix of loam and compost). The smart algorithm will now use local weather station data to skip watering when rain is forecasted and increase run times during heatwaves.
Emitter Selection and Spacing Guide
Choosing the right emitter and spacing is critical for uniform soil moisture. Below is a comparison chart to help you match the emitter type to your specific raised bed crops.
| Emitter Type | Flow Rate | Best For | Spacing Recommendation |
|---|---|---|---|
| Button Emitters (PC) | 1.0 GPH | Tomatoes, Peppers, Shrubs | 1 per plant, placed at root ball |
| Drip Tape | 0.4 GPH per emitter | Carrots, Radishes, Leafy Greens | Emitters pre-spaced every 8 inches |
| Micro-Sprayers | 10.0 GPH | Strawberries, Groundcovers | 1 per 3-foot radius |
| Adjustable Drippers | 0 - 15 GPH | Mixed beds, Containers | Adjust based on plant maturity |
Note: Pressure Compensating (PC) emitters are highly recommended for raised beds, as they deliver the exact same amount of water regardless of elevation changes or the length of the tubing run.
Seasonal Maintenance and Winterization
To ensure your smart drip system lasts for years, seasonal maintenance is non-negotiable. Follow these steps to protect your investment:
- Spring Flush: Before planting, remove all end caps and turn on the system for 2 minutes to flush out any sediment or algae that accumulated over the winter.
- Filter Cleaning: Once a month, unscrew the 120-mesh filter screen and rinse it with a hose nozzle to remove hard water scale and debris.
- Winterization (Freezing Climates): If you live in a region with hard freezes, you must winterize the system. Disconnect the smart timer, backflow preventer, and filter, and store them indoors. Open all end caps on the 1/2-inch tubing to allow any remaining water to drain out. Do not use compressed air to blow out drip lines, as the high pressure can rupture the micro-tubing and emitters.
Authoritative Insights on Water Efficiency
Transitioning to drip irrigation is not just a convenience; it is a scientifically backed method for conserving municipal water resources while increasing agricultural yields. According to the University of California Division of Agriculture and Natural Resources (UC ANR), drip irrigation systems operate at an application efficiency of 90% or higher, compared to just 50% to 70% for traditional sprinkler systems.
'Drip irrigation minimizes water loss due to evaporation and runoff. By applying water slowly and directly to the root zone, the soil maintains an optimal moisture-to-air ratio, which promotes vigorous root growth and reduces the incidence of soil-borne and foliar diseases.' - UC ANR Water Management and Efficiency Guidelines
By combining the 90% efficiency of drip lines with the weather-adaptive intelligence of a smart controller, homeowners can reduce their outdoor landscape water usage by up to 50% annually. This seamless integration of smart home technology and practical gardening ensures your raised beds thrive with minimal manual intervention, giving you more time to enjoy the harvest.

