
How to Install a Smart Sprinkler Controller for Water Savings
Why Upgrade to a Smart Sprinkler Controller?
Traditional irrigation timers operate on rigid schedules, watering your lawn whether it is raining, windy, or perfectly moist. This outdated approach not only wastes a precious natural resource but also inflates your monthly utility bills and promotes shallow root growth and fungal diseases in your turf. Upgrading to a smart sprinkler controller bridges the gap between modern smart home technology and energy-efficient landscaping. These Wi-Fi-enabled devices use real-time local weather data, soil moisture levels, and evapotranspiration (ET) rates to automatically adjust your watering schedule. According to the U.S. Environmental Protection Agency (EPA), replacing a standard clock timer with a WaterSense labeled smart irrigation controller can save the average home nearly 7,600 gallons of water annually. This practical how-to guide will walk you through the exact steps to safely remove your old timer, wire a new smart controller, and optimize your zones for maximum garden-to-table yields and lush lawn health.
Tools and Materials Required
Before you begin the installation process, gather the necessary tools and materials. Most smart controllers are designed for DIY installation and can be swapped out in under an hour. Here is what you will need:
- Smart Irrigation Controller: Popular EPA WaterSense-certified models include the Rachio 3 (approx. $229), Orbit B-hyve Smart (approx. $119), or Rain Bird ST8I-2.0 (approx. $159).
- Smartphone or Tablet: Required for downloading the manufacturer app and connecting to your home Wi-Fi network.
- Flathead and Phillips Screwdrivers: For removing the old faceplate and loosening terminal screws.
- Wire Strippers and Cutters: In case you need to trim frayed 18-gauge irrigation wires.
- Power Drill and Wall Anchors: If you are mounting the new unit in a different location or if the new backplate requires different anchor points.
- Painter's Tape and a Marker: Essential for labeling your zone wires before disconnecting them.
- Voltage Tester: To ensure the power is completely off before handling exposed wires.
Step-by-Step Installation Guide
Step 1: Power Down and Document the Existing Wiring
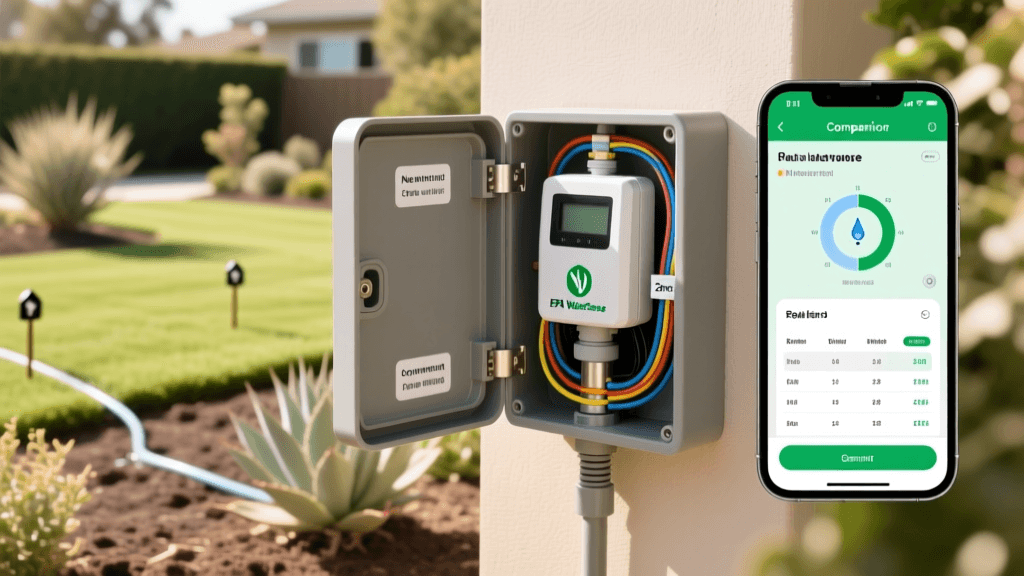
Safety is your first priority. Locate your irrigation system's dedicated circuit breaker in your main electrical panel and switch it to the OFF position. Alternatively, if your old controller is plugged into a standard outdoor GFCI outlet, simply unplug it. Once the power is severed, use a voltage tester on the terminal block to confirm no current is flowing. Next, open the faceplate of your existing controller. Before touching a single wire, take a high-resolution photograph of the wiring terminal block with your smartphone. This visual backup is crucial. After taking the photo, use small pieces of painter's tape to label each wire according to its terminal number (e.g., Zone 1, Zone 2, Common, Master Valve).
Step 2: Disconnect and Prepare the Wires
Using your flathead screwdriver, loosen the terminal screws and gently pull the wires free. Inspect the exposed copper ends of your 18-gauge irrigation wires. If they are corroded, bent, or frayed, use your wire strippers to snip off the damaged portion and strip back about half an inch of the insulation to reveal clean, shiny copper. Twist the exposed strands tightly together so they will easily slide into the new controller's terminal slots without splaying out and causing a short circuit.
Step 3: Mount the New Smart Controller Backplate
Remove the old controller box from the wall. Most smart controllers feature a sleek, low-profile backplate. Hold the new backplate against the wall, ensuring it is close enough to your existing irrigation wires to reach without stretching. Use a level to mark your drill holes. If you are drilling into drywall or stucco, insert the provided plastic wall anchors before driving the mounting screws. Secure the backplate firmly to the wall, leaving the front face of the controller unattached for now.
Step 4: Reconnect the Wiring to the Smart Terminals
Refer to the photograph you took in Step 1 and the labels you applied. Insert the 'Common' wire (usually white or black, but always verify) into the terminal marked 'C' or 'COM' on your new smart controller. Next, insert each zone wire into its corresponding numbered terminal (1, 2, 3, etc.). If your system includes a master valve or a pump start relay, connect that wire to the 'M' or 'MV' terminal. Tighten the screws securely, giving each wire a gentle tug to ensure a solid connection. Finally, tuck the excess wire neatly into the wall cavity or the designated wire channel at the bottom of the unit.
Step 5: Power Up, Connect to Wi-Fi, and Configure Zones
Restore power at the circuit breaker or plug the transformer into the GFCI outlet. The smart controller should boot up, displaying an LED indicator or welcome screen. Download the manufacturer's app on your smartphone. Important: Most smart irrigation devices require a 2.4GHz Wi-Fi network, not a 5GHz network. Ensure your phone is connected to your 2.4GHz band during the setup process. Follow the in-app prompts to connect the controller to your Wi-Fi. Once online, the app will guide you through mapping your yard. You will input the plant type (e.g., cool-season turf, vegetable garden, drought-tolerant shrubs), soil type (clay, loam, or sand), and sprinkler head type (rotor, spray, or drip) for each zone.
Smart Controller Comparison Chart
Choosing the right hardware is just as important as the installation. Below is a comparison of the top EPA WaterSense-certified smart controllers on the market to help you decide which fits your landscape's specific needs.
| Model | Estimated Price | Max Zones | Weather Intelligence | Best Application |
|---|---|---|---|---|
| Rachio 3 Smart Sprinkler | $229 | 8 or 16 | Hyper-local weather, freeze, wind, and rain skips | Complex landscapes and smart home enthusiasts |
| Orbit B-hyve Smart | $119 | 6 or 12 | WeatherSense technology, basic rain/freeze delays | Budget-conscious DIYers and standard lawns |
| Rain Bird ST8I-2.0 | $159 | 8 | Automatic seasonal adjust, rain sensor compatible | Existing Rain Bird systems and simple setups |
Optimizing for Water Efficiency and Plant Health
Installing the hardware is only half the battle; proper configuration is where the true water savings and garden-to-table benefits are realized. The University of Florida IFAS Extension emphasizes that matching irrigation run times to your soil's infiltration rate is critical to preventing runoff. For example, clay soils absorb water very slowly. If you have clay soil and spray heads, you must configure your smart controller to use 'cycle and soak' settings. This divides a long watering session into shorter bursts with resting periods in between, allowing the water to penetrate deeply into the root zone rather than pooling on the surface and washing away valuable topsoil and fertilizers.
Smart controllers that utilize evapotranspiration (ET) data can reduce outdoor water use by 20 to 50 percent compared to traditional clock timers, significantly protecting local watersheds while maintaining optimal turf health. — U.S. Environmental Protection Agency (EPA) WaterSense Program
Furthermore, integrate your smart controller with your broader smart home ecosystem. Platforms like Apple HomeKit, Google Home, or Amazon Alexa allow you to trigger irrigation schedules based on geofencing or seasonal routines. For your garden-to-table raised beds, consider adding a soil moisture sensor to the specific drip-irrigation zone. While the smart controller uses weather data to predict moisture needs, a physical probe buried in your tomato or pepper beds provides ground-truth data, ensuring your vegetables receive the exact hydration required for robust fruit production without risking root rot.
Seasonal Maintenance and Winterization
To protect your investment and ensure longevity, seasonal maintenance is required. In late autumn, before the first hard freeze, you must winterize your irrigation system. This involves blowing out the lines with an air compressor to prevent frozen water from cracking your PVC pipes and sprinkler valves. Once the lines are clear, use your smart controller's app to put the system into 'Standby' or 'Winter Mode.' Do not simply unplug the device, as this will erase your customized zone maps and Wi-Fi credentials. Leaving it plugged in but in standby mode ensures it can download firmware updates over the winter, preparing it for a seamless spring activation.
In the spring, perform a visual audit of your yard. Turn on each zone manually via the app and walk the perimeter. Look for geysers (indicating broken sprinkler heads), misting (indicating high water pressure), or dry spots (indicating poor head-to-head coverage). Adjust the physical nozzles as needed, then let your smart controller take over the scheduling. By combining precise hardware installation with intelligent, data-driven scheduling, you transform your outdoor space into a highly efficient, eco-friendly oasis that supports both pristine lawn care and bountiful garden harvests.

