Landscaping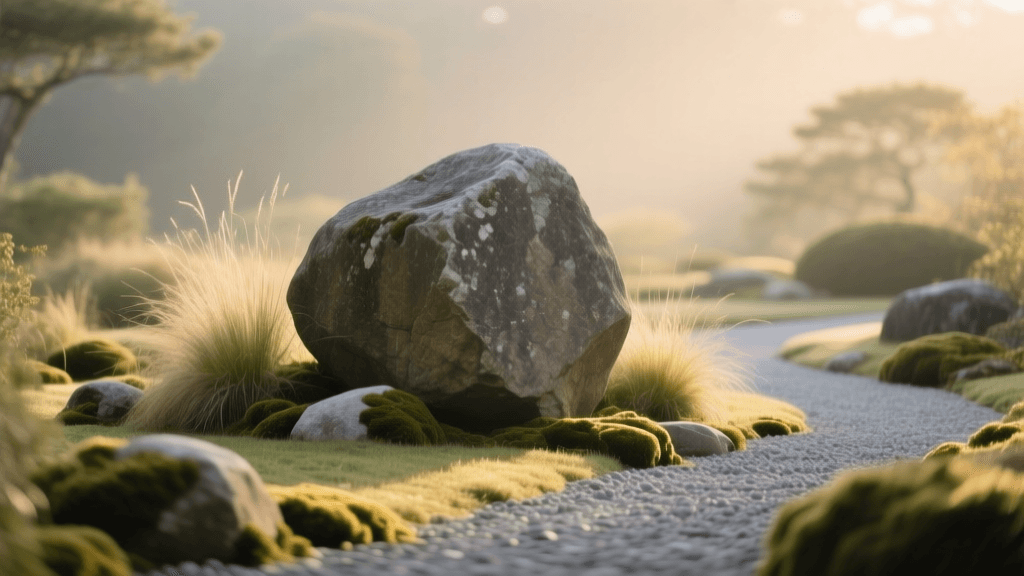
Landscape Boulder Placement for Garden Photography 2026
The Art of the Boulder: Merging Hardscaping with Lens Craft
In the world of modern landscape design, a boulder is never just a rock; it is an anchor for visual storytelling. As garden photography and digital documentation continue to evolve in 2026, the way we place and capture hardscaping elements has become just as important as the physical installation itself. High-resolution mirrorless sensors and advanced drone mapping now allow landscape architects and garden enthusiasts to capture micro-textures and sweeping spatial relationships with unprecedented clarity. However, a stunning photograph begins long before the shutter clicks—it starts with intentional, photogenic boulder placement.
Whether you are building a portfolio for your landscaping business, documenting a multi-year garden transformation, or simply wanting to capture the beauty of your outdoor sanctuary, treating your landscape boulders as photographic focal points will elevate your work. This guide explores the intersection of heavy hardscaping and delicate lens craft, providing actionable strategies for selecting, placing, and documenting boulder features in 2026.
Selecting the Right Boulder for Photogenic Focal Points
Not all rocks photograph equally. The mineral composition, weathering patterns, and structural integrity of a boulder dictate how it interacts with natural light. When sourcing materials from your local landscape supplier, look beyond mere size and consider the "photographic weight" of the stone.
- Granite: With its speckled quartz and feldspar inclusions, granite catches the light beautifully during the golden hour. The crystalline structure creates micro-highlights that modern 60MP+ camera sensors pick up with stunning clarity.
- Basalt: Dark, dense, and often featuring smooth or columnar fracturing, basalt is ideal for moody, high-contrast minimalist designs. It absorbs light, making it a perfect backdrop for vibrant green moss or bright flowering perennials.
- Sandstone: Known for its warm, striated layers, sandstone provides a natural leading line for the eye. Its porous nature also makes it a prime candidate for lichen and moss colonization, which adds incredible texture for macro photography.
According to design principles outlined by the University of Minnesota Extension, selecting materials that contrast with their surrounding environment is key to establishing a strong focal point. In photography, this contrast translates directly to visual depth and subject separation.
Placement Strategies for the Perfect Frame
The most common mistake in amateur hardscaping is "dropping" a boulder onto the surface of the lawn or garden bed, making it look like a stranded asteroid. For a natural, photogenic result, you must employ the "iceberg rule."
The Iceberg Rule and Base Preparation
Bury at least one-third of the boulder's vertical height below the soil grade. This grounds the stone, making it appear as though it is a natural geological outcropping that has been there for millennia. From a documentation standpoint, burying the base eliminates the awkward shadow gap that often ruins the realism of hardscape photography. To ensure proper drainage and prevent frost heave in colder climates, excavate the hole and lay a 4-inch base of compacted crushed gravel before setting the stone.
Compositional Alignment
When placing the boulder, physically look through your camera viewfinder or use a smartphone with a grid overlay. Position the boulder along the intersections of the rule of thirds rather than dead center. Angle the most striking face of the rock—often the side with the deepest striations or best moss coverage—slightly toward the primary vantage point or pathway. As noted by Better Homes & Gardens, integrating surrounding plantings like creeping thyme or ornamental grasses softens the transition between stone and soil, providing a lush foreground that enhances depth of field in your images.
Data Table: Boulder Types and Photographic Characteristics
Use the following chart to match your hardscaping material with the best photographic techniques and lighting conditions for your 2026 garden projects.
| Boulder Type | Texture & Color Profile | Light Interaction | Best Photographic Application |
|---|---|---|---|
| Granite | Speckled, coarse, grey/pink | Reflects specular highlights | Golden hour wide-angle shots; high-contrast B&W |
| Basalt | Smooth/columnar, dark charcoal | Absorbs light, deep shadows | Moody zen gardens; backdrop for bright foliage |
| Sandstone | Striated, warm earth tones | Diffuses light softly | Overcast days; macro photography of layered grain |
| Limestone | Pitted, pale grey/cream | High albedo, brightens frames | Alpine rock gardens; twilight and blue hour shoots |
Documenting the Installation Process
In 2026, the process of creating the landscape is just as valuable as the final result. Clients and social media audiences love behind-the-scenes documentation. Heavy machinery, rigging, and the raw earth-moving phase provide a dramatic narrative arc for your garden's story.
Time-Lapse and Drone Mapping
Set up a weather-sealed action camera or a dedicated time-lapse rig on a sturdy tripod at a high vantage point to capture the multi-day installation. For aerial documentation, modern drones like the DJI Air 3S, with its advanced omnidirectional obstacle sensing, allow you to safely navigate tight garden canopies and capture top-down orthomosaic maps of the boulder placement. Note: Always ensure compliance with local airspace regulations and consult the Federal Aviation Administration (FAA) guidelines before operating drones for residential documentation.
Ground-Level Rigging Shots
Use a wide-angle lens (such as a 16-35mm f/2.8) to get low to the ground and capture the immense scale of the boulder as it is lowered into its trench by an excavator. The tension of the synthetic slings and the raw power of the machinery create compelling, dynamic images that highlight the effort behind the artistry.
Lighting and Seasonal Documentation
A true garden focal point changes character as the earth tilts on its axis. Documenting your boulder placement requires a commitment to seasonal photography.
- Spring: Focus on the contrast between the rigid, ancient stone and the delicate, ephemeral blooms of spring bulbs like snowdrops or crocuses pushing up through the mulch. Use a macro lens (e.g., 90mm or 100mm) to isolate these details with a shallow depth of field (f/2.8).
- Summer: The harsh midday sun can flatten the texture of your boulders. Stick to the "blue hour" just before sunrise or after sunset, using a portable LED light panel to paint the rock's crevices with soft, directional light, emphasizing its three-dimensional form.
- Autumn: Capture the boulder surrounded by fallen foliage. The warm reds and oranges of Japanese maple leaves resting against cool grey granite create a classic, highly engaging color palette.
- Winter: Snow accumulation in the striations and pocks of limestone or sandstone provides natural leading lines. Expose your camera +1 EV (exposure value) to prevent the snow from rendering as muddy grey.
Macro Photography and Lichen Cultivation
One of the most rewarding aspects of long-term landscape documentation is tracking the biological colonization of your hardscaping. Over time, windblown spores will settle into the porous surfaces of your boulders, resulting in vibrant patches of lichen and moss. In 2026, focus-stacking techniques built directly into modern camera bodies and editing software allow you to capture edge-to-edge sharpness on these incredibly detailed micro-landscapes. By placing a boulder in a partially shaded, moisture-retentive area of the garden, you actively encourage this growth, turning your hardscape focal point into a living, breathing subject that rewards close-up photographic exploration for years to come.
Conclusion
Landscape boulder placement is a permanent commitment to your garden's ecosystem and aesthetic. By approaching the selection and installation process with a photographer's eye, you ensure that your hardscaping not only serves as a beautiful physical anchor but also as a captivating visual subject. Whether you are utilizing cutting-edge 2026 drone technology to map the spatial flow or kneeling in the dirt with a macro lens to capture the first signs of moss, documenting your boulder focal points transforms a simple landscaping project into an enduring work of art.