Lawn Care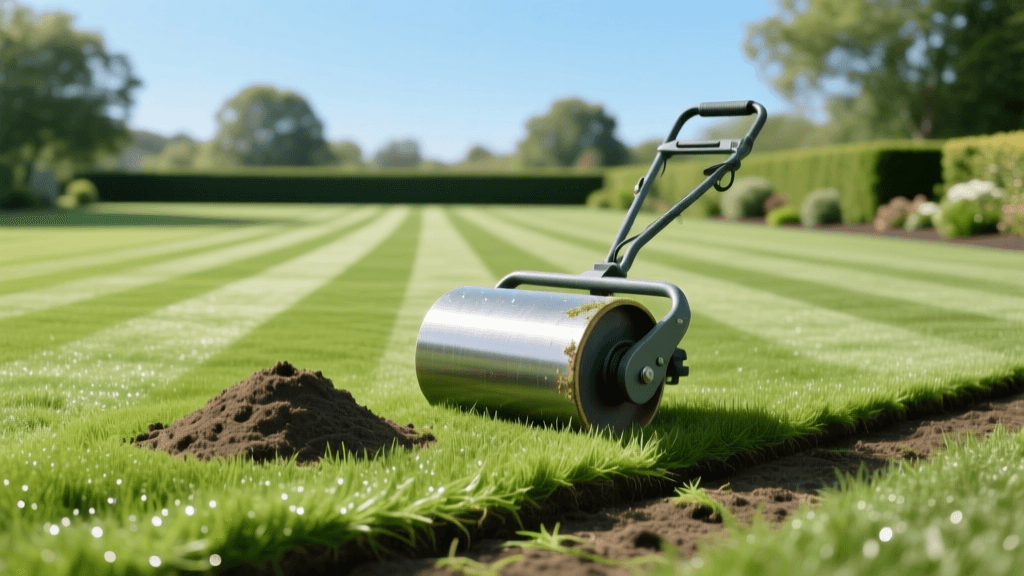
2026 Lawn Roller Guide: Sod, Molehills & Mowing Patterns
The Secret to Stadium-Quality Mowing Patterns
When homeowners envision a pristine, golf-course-style lawn with crisp checkerboards and alternating stripes, they often focus entirely on the mower. They invest in high-end zero-turns, premium striping kits, and precise cutting heights. However, as we navigate the 2026 landscaping season, turf professionals emphasize a fundamental truth: you cannot create a flawless mowing pattern on an uneven canvas. The true foundation of advanced mowing techniques lies beneath the surface, and the unsung hero of this process is the humble lawn roller. Whether you are establishing new sod or repairing the chaotic aftermath of mole tunnels, understanding how to properly use a lawn roller is the critical first step in achieving the perfectly level grade required for elite mowing patterns.
The Physics of Striping: Why a Level Canvas Matters
To understand why lawn rolling is a vital mowing preparation technique, you must first understand the physics of lawn striping. Striping is an optical illusion created by bending grass blades in opposite directions. When you mow away from yourself, the grass bends forward, exposing the darker, waxy underside of the blade. When you mow toward yourself, the grass bends backward, reflecting light off the brighter top surface. This contrast creates the signature stripes.
If your soil is undulating due to poor sod establishment or raised molehills, your mower deck will bounce and tilt. This inconsistency causes the grass to bend at erratic angles, completely destroying the light reflection necessary for crisp lines. Furthermore, a bouncing mower deck will inevitably scalp high spots, leaving ugly brown patches that ruin the visual continuity of your pattern. According to turfgrass experts at the University of Minnesota Extension, proper soil preparation and leveling are non-negotiable steps for a healthy, uniform lawn that can withstand advanced mowing techniques.
Lawn Roller Use for Sod Establishment
Laying new sod is an investment, and rolling it is the insurance policy that ensures your money isn't wasted. When sod is harvested and rolled up, the soil beneath it is often loose and uneven. If you simply lay the sod and begin mowing, air pockets will form between the sod roots and the native soil. These air pockets dry out the roots rapidly and cause the sod to sink unevenly over time, creating a bumpy, nightmare surface for future mowing patterns.
Step-by-Step Sod Rolling Technique
- Timing is Everything: Roll the sod immediately after installation and watering. The soil should be moist but not saturated. If the ground is muddy, the roller will sink and create deep ruts that will ruin your mowing canvas for years.
- Weight Management: For sod establishment, use a lightweight poly roller. Fill the roller drum with water only one-quarter to one-third full. The goal is to press the roots firmly into the soil to eliminate air pockets, not to compact the earth.
- The Overlap Pattern: Push or tow the roller in straight, overlapping lines, much like your mowing pattern. Avoid making tight, sharp turns while the roller is heavy, as this will tear the delicate new sod and create divots that your mower blades will later catch.
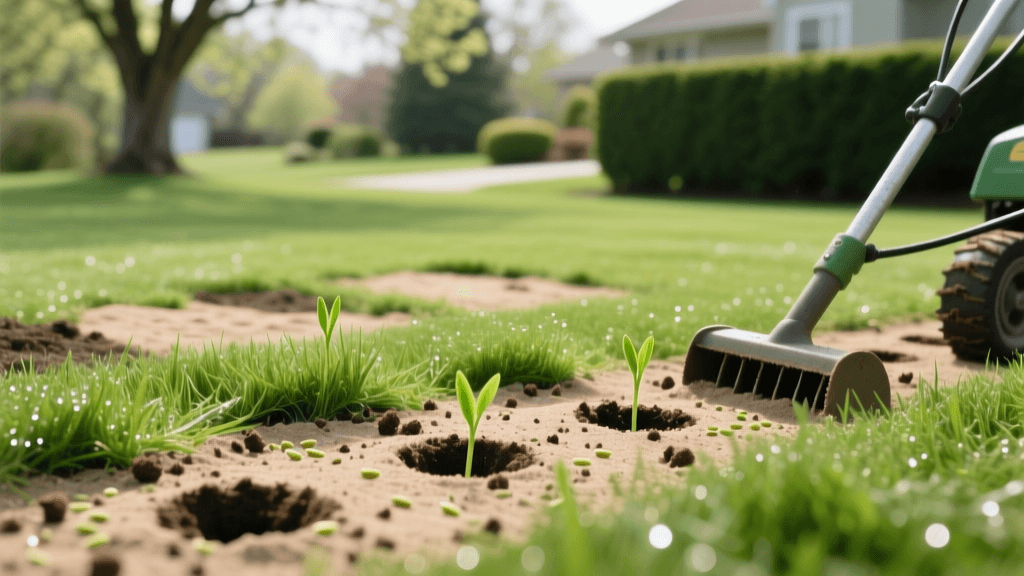
Flattening Molehills to Protect Your Mower and Patterns
Moles are the ultimate enemy of lawn aesthetics and mower maintenance. As they tunnel just beneath the surface in search of earthworms, they push soil upward, creating unsightly mounds. Mowing over a fresh molehill is disastrous; it instantly dulls your mower blades, scatters heavy dirt across the lawn (which can smother surrounding grass), and leaves a depressed crater that disrupts your striping pattern.
While the University of Minnesota Extension notes that trapping is the most effective long-term solution for mole control, the physical repair of the lawn requires a roller. Once the mole activity has ceased, the raised tunnels and mounds must be flattened to restore the level grade.
The Molehill Repair Protocol
- Break Down the Mound: Use a steel garden rake or a shovel to break apart the dense clay and soil of the molehill. Spread the loose soil evenly into the surrounding low areas and the depressed tunnel lines.
- Adjust Roller Weight: Increase the water weight in your lawn roller to about half-full. You need more downward force to collapse the subterranean tunnels and press the redistributed soil firmly into place.
- Cross-Rolling: Roll the affected area in a north-south direction, and then roll it again in an east-west direction. This cross-hatch pattern ensures that the tunnels are collapsed from multiple angles, preventing the soil from settling unevenly after the next heavy rain.
2026 Lawn Roller Comparison Chart
Choosing the right equipment is essential for maintaining the delicate balance between leveling the soil and avoiding harmful compaction. Below is a comparison of the most popular roller types available on the market in 2026, specifically tailored for homeowners focused on mowing perfection.
| Feature | Poly Roller (e.g., Brinly-Hardy PRC-24BH) | Steel Roller (e.g., Agri-Fab 18-Inch Push) |
|---|---|---|
| Empty Weight | ~28 lbs (Easy to maneuver empty) | ~85 lbs (Heavy, difficult to transport) |
| Max Filled Weight | ~270 lbs (Water or sand) | ~230 lbs (Water or sand) |
| Best Use Case | Sod establishment, spring molehill repair, seed pressing | Flattening severe frost heave, heavy clay soil leveling |
| 2026 Avg. Price | $160 - $220 | $250 - $320 |
| Rust & Dent Risk | Zero rust risk; high UV resistance in 2026 models | Prone to rust if stored wet; dents on rocks |
The Compaction Caveat: Balancing Rolling with Aeration
While a smooth surface is mandatory for crisp mowing patterns, over-rolling is a common mistake that can destroy your lawn's health. Excessive weight or rolling on wet soil causes severe compaction. Compacted soil restricts oxygen and water flow to the roots, leading to thin, weak grass that will not hold a stripe well, no matter how good your mower is. If you must roll heavily to fix extensive mole damage, plan to follow up with core aeration in the early fall. Core aeration pulls small plugs of soil from the ground, relieving the compaction caused by the roller and allowing the turf to thicken up for the next mowing season.
Post-Rolling Mowing Techniques for Perfect Stripes
Once you have used the lawn roller to establish your sod or flatten molehills, you must adjust your mowing techniques to capitalize on the newly leveled surface. Wait at least two weeks after rolling new sod before attempting heavy striping, allowing the roots to anchor deeply. When you do begin mowing, set your deck height to a minimum of 3.5 inches. Taller grass blades are heavier and hold the bent position much better than short blades, resulting in darker, more dramatic stripes.
Equip your mower with a high-quality rear roller striping kit. As you mow your first pass, look straight ahead at a fixed point on the horizon to ensure your line is perfectly straight. The newly rolled, level soil will allow your mower deck to glide smoothly without bouncing, ensuring that the striping kit bends every single blade of grass at the exact same angle. When you turn for the next pass, make a wide, sweeping U-turn rather than a tight zero-turn pivot, protecting the freshly established sod edges and maintaining the pristine, stadium-quality canvas you worked so hard to create.