Lawn Care
2026 Lawn Roller Guide: Sod Paths & Molehill Repair For Raised Beds
The Intersection of Lawn Care and Raised Bed Gardening
Raised bed vegetable gardening has evolved significantly by 2026, moving beyond simple wooden boxes to integrated, landscape-level designs. While most gardeners focus intently on the soil chemistry, compost blends, and crop rotation within the beds themselves, the spaces between and around these structures are often neglected. This oversight leads to two major issues: muddy, compacted walkways that make harvesting a chore, and subterranean pest activity—specifically moles—that can undermine the structural integrity of your raised beds. This is where traditional lawn care equipment, specifically the lawn roller, becomes an indispensable tool for the modern vegetable gardener.
Using a lawn roller in a raised bed garden is not about maintaining a sprawling suburban lawn; it is about precision ground preparation and perimeter maintenance. Whether you are establishing durable, permeable sod pathways between your cedar or galvanized steel beds, or you need to collapse invasive mole tunnels that threaten to sink your garden borders, mastering the lawn roller is essential for a productive and aesthetically pleasing 2026 garden layout.
Why Sod Pathways Elevate Your Raised Bed Garden in 2026
In recent years, the trend of using gravel or wood chips for raised bed pathways has shifted. While useful, gravel migrates into the garden beds, and wood chips break down rapidly, requiring annual replenishment and potentially tying up soil nitrogen. In 2026, the gold standard for high-traffic garden pathways is living sod, specifically low-growing, drought-tolerant blends like microclover and fine fescue. These blends provide a permeable surface that reduces rainwater runoff, cools the garden microclimate during peak summer heat, and offers a clean, mud-free surface for wheelbarrows and garden carts.
However, laying sod in the narrow corridors between raised beds requires meticulous soil preparation. If the subgrade is uneven, the sod will dry out in high spots and drown in low spots. A lawn roller is critical for creating a perfectly level, firm subgrade before the sod arrives, and for ensuring intimate root-to-soil contact immediately after installation. According to the University of Minnesota Extension, proper soil firming before sodding prevents subsequent settling, which is especially crucial when working in the confined spaces adjacent to raised bed walls where soil erosion can expose the bed's foundation.
Choosing the Right Lawn Roller for Garden Perimeters and Paths
Not all lawn rollers are suited for the tight spaces and delicate ecology of a vegetable garden. Heavy, tractor-pulled steel rollers used for agricultural pastures will compact your garden subgrade too deeply and are impossible to maneuver between 4-foot-wide raised beds. For raised bed vegetable gardening, you need maneuverability, adjustable weight, and rust resistance. Below is a comparison of the most effective roller types for garden use in 2026.
| Roller Type | Best Use Case in Raised Bed Gardens | Pros | Cons |
|---|---|---|---|
| Push Poly Roller (Water-Filled) | Sod pathways between beds; light molehill repair | Rust-proof, lightweight when empty, adjustable weight via water fill, easy to maneuver in tight 2-foot paths. | UV degradation over time if left in direct sun; max weight usually caps around 250 lbs. |
| Steel Push Roller | Heavy molehill repair; compacting gravel borders | Extremely durable, high weight capacity (up to 400 lbs), smooth finish on soil. | Prone to rust if exposed to garden moisture and fertilizers; very heavy to transport. |
| Tow-Behind Drag Roller | Large perimeter lawns surrounding the garden area | Covers large areas quickly, excellent for initial site grading before bed construction. | Useless between raised beds; requires a riding mower or ATV; high risk of damaging bed corners. |
For the dedicated raised bed gardener, a UV-stabilized polyethylene push roller is the optimal choice for 2026. It allows you to adjust the weight by simply adding or removing water, giving you the flexibility to lightly press sod into place without crushing the delicate soil structure near your vegetable roots.
Step-by-Step: Establishing Sod Pathways Between Raised Beds
Creating a pristine, durable sod pathway between your raised beds requires a methodical approach. Follow these steps to ensure your pathways remain level and lush throughout the growing season.
1. Subgrade Preparation and Initial Rolling
Remove any existing weeds, gravel, or debris from the pathway area. Use a garden rake to grade the soil so it sits approximately one inch below the top edge of your raised bed walls. This ensures that when the sod is laid, the pathway will be flush with the bed, making it easy to slide tools or a wheelbarrow across the threshold. Fill your poly roller halfway with water and make two passes over the bare soil. This reveals any low spots or hidden air pockets that need to be filled before the sod arrives.
2. Laying the Sod
When your microclover or fescue sod arrives, lay it in a staggered brick pattern to prevent continuous seams that can split under foot traffic. Press the edges tightly together, but avoid overlapping. Use a sharp landscaping knife to trim the sod precisely along the timber, cedar, or metal edges of your raised beds.
3. The Final Roll and Hydration
Once the sod is laid, fill your lawn roller to about two-thirds capacity. Push the roller over the new pathways in a grid pattern (north-south, then east-west). This step is non-negotiable; it eliminates air pockets beneath the sod that would otherwise cause the roots to dry out and die within 48 hours. Immediately after rolling, water the pathways deeply. As noted by Penn State Extension, maintaining consistent moisture in the top two inches of soil is vital for the first two weeks of establishment, but the prior rolling ensures that water penetrates the root zone rather than pooling in hidden subsurface voids.
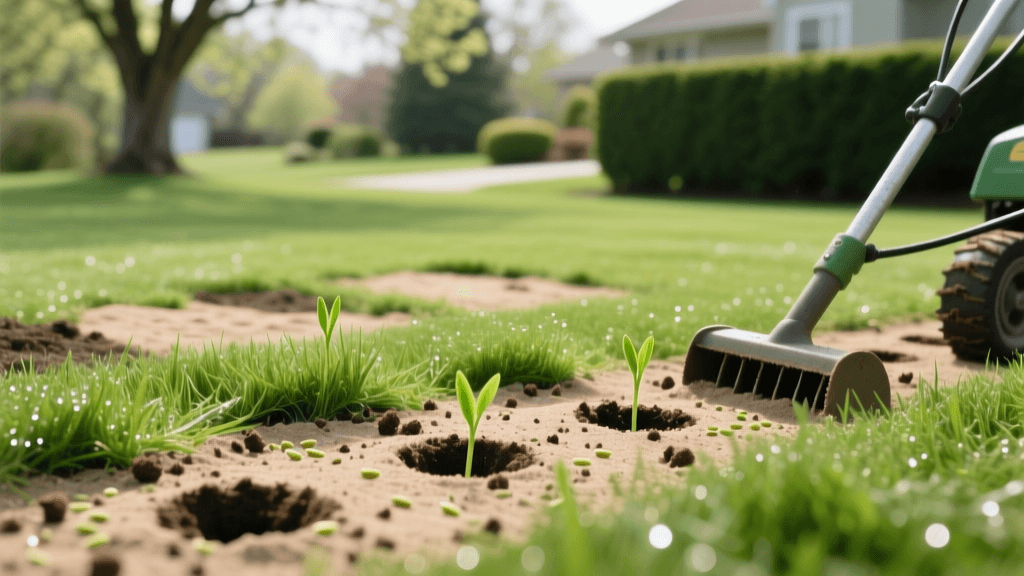
Tackling Molehills: Repairing Tunnels Near Your Vegetable Beds
Moles are a unique challenge in raised bed vegetable gardens. While they do not eat your vegetables—they are strict insectivores that feed on earthworms and grubs—they are highly attracted to the loose, moist, organic-rich soil that surrounds and underpins raised beds. Their tunneling activity creates molehills that smother adjacent pathways and, more dangerously, creates subsurface voids that can cause the retaining walls of your raised beds to lean, crack, or collapse entirely.
Collapsing Tunnels with a Lawn Roller
When you discover a fresh molehill near your garden beds, the immediate physical repair involves collapsing the tunnel system to discourage the mole from reusing it. Wait for a day when the soil is slightly moist but not waterlogged. Use a rake to scatter the loose dirt from the molehill over the surrounding area. Then, take your water-filled lawn roller and make several heavy passes directly over the tunnel line. The localized weight of the roller will crush the shallow tunnels (usually 2 to 4 inches below the surface), forcing the mole to abandon that specific route.
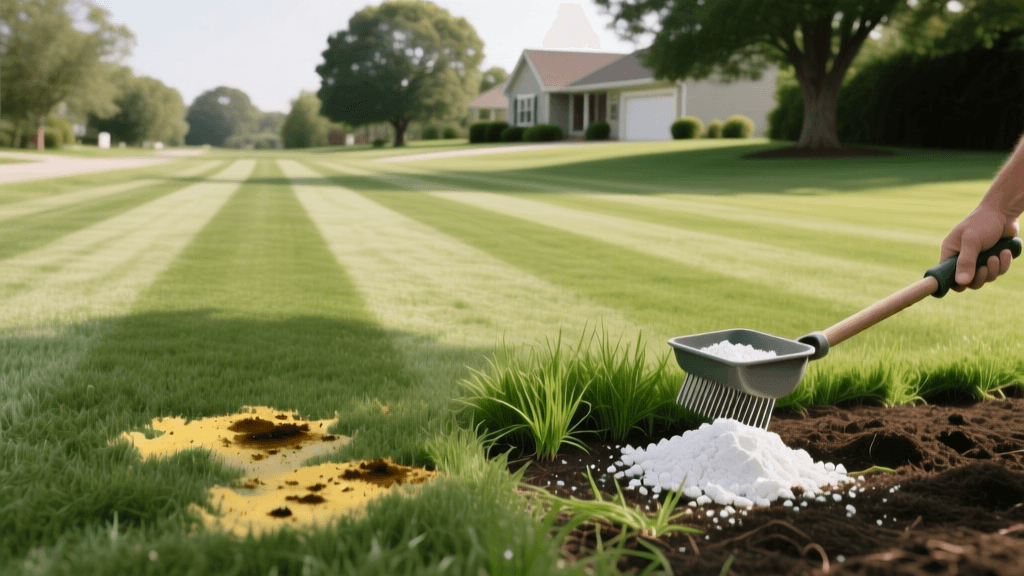
Safe Mole Deterrents for Edible Gardens
Because you are growing food, chemical mole poisons (rodenticides) are strictly off-limits due to the risk of secondary poisoning to beneficial garden predators like owls, hawks, and neighborhood cats, as well as the risk of soil contamination. According to the Clemson University Home & Garden Information Center, castor oil-based repellents are a safe, effective alternative for edible landscapes. After rolling and collapsing the tunnels, apply a botanical castor oil granule or liquid spray over the repaired area and the perimeter of the raised beds. The castor oil coats the earthworms and grubs in the soil, making them unpalatable to the moles and encouraging them to forage outside your garden perimeter. Combine this with solar-powered sonic spikes placed at the corners of your raised beds for a comprehensive, eco-friendly 2026 pest management strategy.
Maintenance Schedule for 2026
To keep your raised bed perimeters and sod pathways in peak condition, integrate the lawn roller into your seasonal garden maintenance routine:
- Early Spring (March/April): After the winter freeze-thaw cycle, the soil between raised beds often heaves. Use a lightly filled roller to smooth out frost heave on your sod pathways before the spring planting rush begins.
- Mid-Summer (July): Monitor the perimeter walls of your raised beds for signs of sinking or leaning, which indicate subsurface tunneling. Immediately roll the affected borders and apply castor oil deterrents.
- Late Fall (November): After clearing your beds of spent summer crops and adding a thick layer of compost for the winter, give the adjacent sod pathways a final, heavy roll to prepare them for winter dormancy and prevent ice-damage tearing.
By treating the spaces between your raised beds with the same care and precision as the vegetables inside them, you create a cohesive, highly functional garden ecosystem. The humble lawn roller, when applied strategically for sod establishment and molehill repair, bridges the gap between traditional lawn care and intensive vegetable gardening, ensuring your 2026 harvest is supported by a beautiful, stable, and pest-resistant foundation.