Landscaping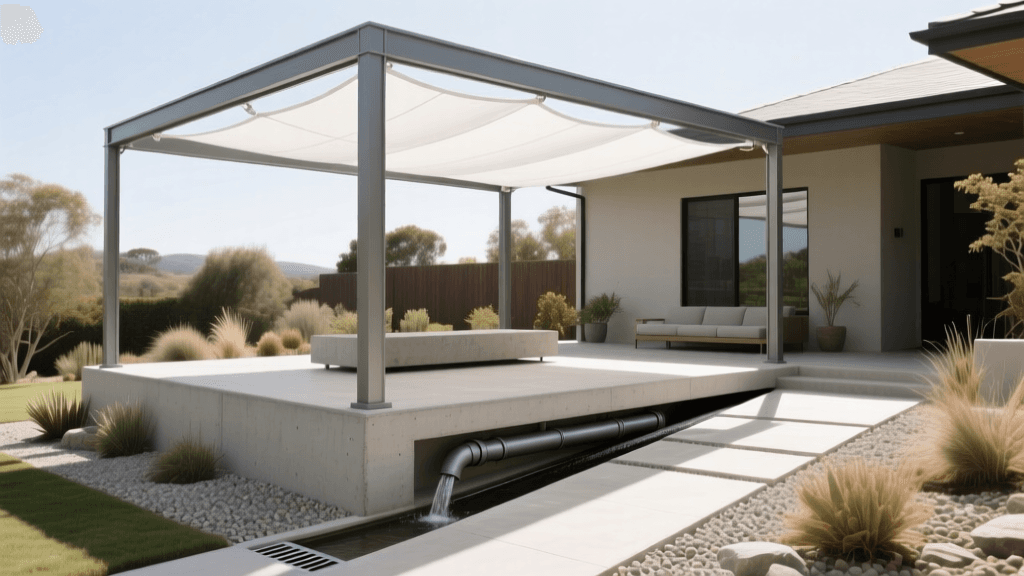
2026 Pergola Sunbrella Sail and Drainage Pipe Guide
Introduction: The Intersection of Shade and Subsurface Water
Building a pergola equipped with a Sunbrella shade sail canopy is one of the most popular outdoor living upgrades in 2026. These structures provide exceptional UV protection, aesthetic elegance, and a comfortable retreat during the hottest months. However, many homeowners and DIY landscapers overlook a critical component of the build: subsurface water management. When you introduce a large, tensioned fabric canopy over a hardscaped or landscaped area, you are essentially building a giant umbrella. During heavy rainstorms, the water runoff from the Sunbrella sail concentrates heavily at the lowest tension points and edges, dumping gallons of water directly onto the ground below.
If your pergola footings are not integrated with a proper landscape drainage pipe system, this concentrated runoff can lead to severe soil erosion, hydrostatic pressure against your concrete footings, and eventual structural instability. Furthermore, if you are digging new post holes in a yard that already contains subsurface corrugated pipes or French drains, striking an existing line can flood your yard and cost thousands in repairs. This comprehensive guide will walk you through the essential strategies for combining pergola construction, Sunbrella shade sails, and landscape drainage pipes to ensure your outdoor oasis remains dry, stable, and beautiful for decades.
Why Drainage Matters for Sunbrella Sail Pergolas in 2026
Modern shade sail hardware and fabrics have evolved significantly. According to the official Sunbrella shade guidelines, while the fabric is highly water-resistant and designed to shed moisture, it is not entirely waterproof. In a torrential downpour, water will mist through the weave, but the vast majority will cascade off the sloped edges. In 2026, local building codes and landscaping best practices heavily emphasize managing stormwater at the source to prevent municipal sewer overload and neighborhood flooding.
When a pergola's wooden or metal posts are set in concrete, the surrounding soil needs to remain stable. If the Sunbrella sail funnels rainwater directly toward a post base, the soil can become oversaturated. In climates with freezing winters, this trapped water freezes and expands, causing frost heave that can lift the pergola post out of alignment, warping the steel turnbuckles and tearing the shade sail. Integrating a landscape drainage pipe network around the perimeter of your pergola footings captures this runoff and safely channels it away from the structure.
Mapping Existing Landscape Drainage Pipes Before Digging
Before you break ground for your pergola footings, you must understand what lies beneath your topsoil. Many modern homes feature complex subsurface drainage networks, including 4-inch corrugated pipes, SDR 35 PVC lines, and gravel-filled French drains designed to pull water away from the home's foundation. Digging a 3-foot deep post hole directly through an active landscape drainage pipe will compromise your entire yard's grading.
- Call 811: Always contact your local utility marking service at least a few days before digging. While they primarily mark public utilities, some regions will also flag major private storm drains.
- Probe the Soil: Use a 3/8-inch steel soil probe to gently test the ground where your pergola posts will sit. If you hit a hollow plastic cylinder, you have likely found a corrugated drainage pipe.
- Trace the Downspouts: Look at your home's gutter downspouts. In 90% of cases, they tie into a solid PVC or corrugated landscape drainage pipe that runs through the yard. Map this trajectory to ensure your pergola footings do not intersect it.
If an existing pipe is in the direct path of your desired pergola layout, you have two choices: reroute the pergola design, or excavate the pipe, cut it, and install a sweeping 90-degree PVC bypass around the new concrete footing.
Routing Rainwater Runoff from the Sunbrella Canopy
To protect your pergola, you must anticipate where the Sunbrella sail will shed water. A properly installed shade sail should never be perfectly flat; it requires a minimum slope of 15 to 20 degrees to prevent water pooling in the center, which can stretch the fabric and collapse the pergola beams. Because of this slope, water will aggressively sheet off the lowest corner or edge.
According to stormwater management principles outlined by Penn State Extension, capturing concentrated runoff before it saturates the topsoil is vital for property health. To achieve this, install a 12x12 inch plastic catch basin directly beneath the lowest point of the Sunbrella sail's runoff trajectory. From this catch basin, you will connect a solid landscape drainage pipe to carry the water away from the pergola and your home's foundation.
Sizing Your Corrugated and PVC Drainage Pipes
Choosing the right pipe material in 2026 depends on the load-bearing requirements of your landscape and the volume of water the Sunbrella sail will displace.
- 4-Inch Solid PVC (Schedule 40 or SDR 35): Best for runs that pass directly under pergola footings, walkways, or high-traffic areas. It is crush-resistant and prevents root intrusion.
- 4-Inch N-12 Corrugated Pipe: Excellent for long, sweeping runs through garden beds where the pipe will be buried under 12 inches of soil and mulch. It is flexible and cost-effective but should not be placed directly under heavy concrete footings.
- Perforated Pipe with Sock: Only use this if you are building a French drain envelope around the pergola footings to lower the local water table. Never use perforated pipe to transport runoff from a catch basin, as it will leak water back into the soil you are trying to protect.
Step-by-Step: Installing Perimeter Drainage Around Footings
Integrating the drainage pipe system during the pergola construction phase is infinitely easier than retrofitting it later. Follow these steps to ensure a dry, stable foundation for your Sunbrella sail canopy.
Step 1: Dig the Trench and Footings Simultaneously
Excavate your pergola post holes to the required depth (usually 36 to 48 inches, depending on your local frost line). Simultaneously, dig a drainage trench that is 12 inches wide and 18 inches deep, running parallel to the pergola's perimeter and passing within 12 inches of each post hole.
Step 2: Establish the Correct Slope
A landscape drainage pipe must maintain a minimum slope of 1/8 inch per foot to ensure gravity moves the water efficiently. Use a laser level or a string line to grade the bottom of your trench away from the pergola and toward your designated discharge area, such as a pop-up emitter in a lower part of the yard or a dry creek bed.
Step 3: Lay the Gravel Bed and Pipe
Add 2 inches of washed 3/4-inch gravel to the trench. Lay your solid PVC or corrugated drainage pipe on top of the gravel. If you are using a catch basin to capture the Sunbrella sail's runoff, glue or snap the basin into the start of the pipe run.
Step 4: Create a Gravel Envelope for the Footings
Before pouring concrete for your pergola posts, line the bottom of the post hole with 4 inches of gravel. This creates a mini French drain at the base of the footing. If hydrostatic pressure builds up under the concrete, the water will push into the gravel and migrate toward your perimeter landscape drainage pipe, preventing the concrete from cracking.
Step 5: Backfill and Protect
Cover the drainage pipe with more gravel, leaving about 4 inches of space from the surface. Lay a layer of permeable landscape fabric over the gravel to prevent soil and mulch from clogging the pipe system. Finally, backfill with topsoil and finish your landscaping around the pergola base.
2026 Material and Cost Breakdown
Budgeting accurately is essential for any hardscaping project. Below is a comparison of average 2026 retail costs for the drainage materials required to protect a standard 12x12 foot pergola with a Sunbrella shade sail.
| Material | Specification | Estimated 2026 Cost | Best Use Case |
|---|---|---|---|
| Solid PVC Pipe | 4-inch SDR 35 (per 10ft) | $18.50 | Under hardscapes, near heavy footings |
| Corrugated Pipe | 4-inch N-12 (per 10ft) | $9.75 | Long garden bed runs, soft soil |
| Catch Basin | 12x12 inch with grate | $38.00 | Directly under Sunbrella sail low-point |
| Pop-Up Emitter | 4-inch with elbow | $14.25 | Discharge point at end of trench |
| Landscape Fabric | Non-woven permeable (3x50ft) | $65.00 | Wrapping gravel trenches to prevent clogs |
| Washed Gravel | 3/4-inch crushed (per ton) | $55.00 | Base for pipes and footing envelopes |
Protecting Wood and Metal from Hydrostatic Pressure
Even with a perfectly sloped Sunbrella shade sail and a robust landscape drainage pipe network, the immediate area around your pergola posts requires special attention. In 2026, the industry standard for wooden pergolas is to use hot-dipped galvanized or powder-coated steel post bases that elevate the wood at least one inch above the concrete. This prevents wicking, where the wood absorbs moisture directly from the wet concrete or surrounding splash-back.
Furthermore, as noted by experts at the University of Minnesota Extension, managing yard drainage is not just about moving water away from the house; it is about preserving the integrity of all landscape structures. By ensuring your drainage pipe daylight point (the exit) is clear of debris and protected by a grate or pop-up emitter, you guarantee that the water captured from your shade sail does not back up into the system during late-autumn leaf falls or spring thaws.
Conclusion
A pergola topped with a tensioned Sunbrella shade sail is a stunning addition to any property, offering a perfect blend of architectural form and functional shade. However, the true longevity of this structure relies entirely on what happens below the surface. By carefully mapping existing utilities, installing appropriately sized landscape drainage pipes, and capturing concentrated canopy runoff in strategic catch basins, you safeguard your investment against erosion, frost heave, and wood rot. Plan your drainage strategy before you mix the first batch of concrete, and your outdoor living space will remain a dry, pristine sanctuary for years to come.