Gardening
2026 Windowsill Microgreens: Seed Tray Kit Drainage Pipe Hack
The Rise of Windowsill Microgreens in 2026
As urban gardening continues to evolve in 2026, growing microgreens on a windowsill with a seed tray kit has become one of the most popular ways to harvest fresh, nutrient-dense greens year-round. Whether you are cultivating spicy radish shoots, nutty sunflowers, or tender pea tendrils, the windowsill offers prime natural light and easy access. However, as more gardeners transition to high-density indoor planting, a common and devastating issue arises: poor drainage. Standard seed tray kits, while convenient, often sit completely flat against the windowsill, leading to water pooling, stagnant moisture, and the dreaded damping-off disease.
To combat this, innovative indoor gardeners are borrowing a technique from outdoor landscaping. By integrating small-diameter landscape drainage pipe into your windowsill seed tray kit setup, you can create an advanced sub-irrigation and overflow manifold. This DIY hack elevates your growing medium, ensures perfect airflow beneath the roots, and completely eliminates the risk of waterlogged soil. In this comprehensive guide, we will explore how to repurpose landscape drainage pipe to build the ultimate 2026 windowsill microgreens system.
The Hidden Danger: Shallow Tray Waterlogging
When you grow microgreens on a windowsill, you are typically using shallow 10x20 seed trays filled with only an inch or two of growing medium, such as coconut coir or hemp grow mats. In container horticulture, shallow depths create what is known as a 'perched water table.' Because the soil column is so short, gravity cannot pull the excess water down and away from the root zone effectively. The bottom inch of your seed tray kit becomes a saturated sponge.
According to research on controlled environment agriculture, excess moisture at the base of microgreen roots is the primary catalyst for Pythium and other waterborne pathogens. When your seed tray sits flat on a wooden or stone windowsill, the drainage holes at the bottom are effectively sealed off, trapping water inside. This is where the landscape drainage pipe becomes a game-changer for your indoor garden.
The Landscape Drainage Pipe Solution
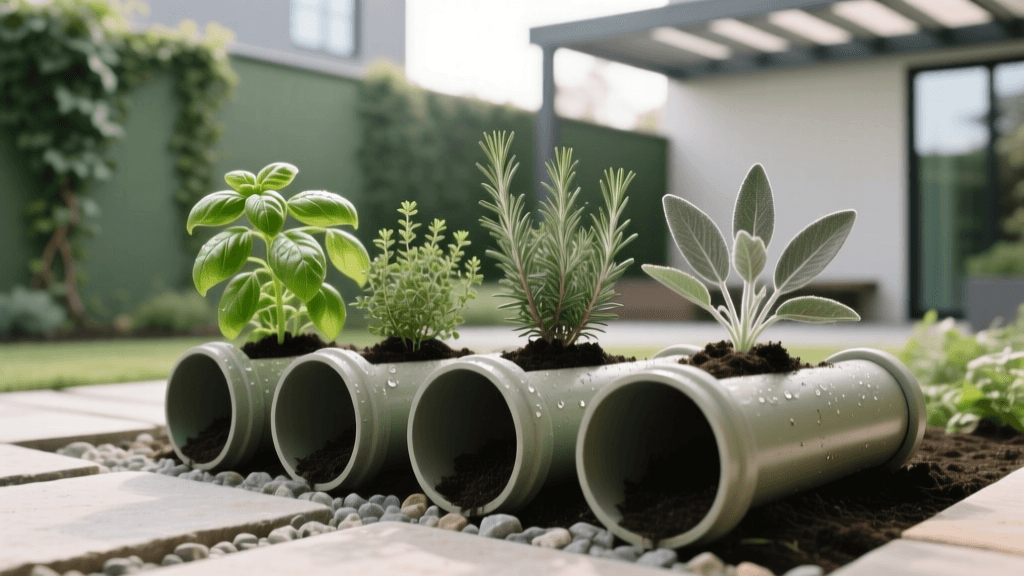
Landscape drainage pipe—typically used in outdoor French drains, yard runoff management, and foundation waterproofing—is usually made from flexible corrugated plastic or rigid PVC. For a windowsill microgreens setup, we use a 3-inch or 4-inch diameter perforated corrugated landscape drainage pipe. By cutting this pipe into sections and placing it inside a solid bottom tray, you create an elevated plenum. The top seed tray (the one with drainage holes) rests on top of these sturdy pipe sections.
This setup provides three massive benefits for your 2026 windowsill garden:
- Elevated Airflow: The corrugated ridges of the landscape drainage pipe allow ambient air to circulate under the seed tray, preventing mold growth on the windowsill.
- Water Reservoir & Wicking: The hollow interior of the pipe acts as a reservoir. You can fill the bottom tray with water, and the hemp mats in the top tray will wick moisture upward via capillary action, keeping the soil perfectly moist without being soggy.
- Structural Support: Heavy-duty landscape pipe can easily support the weight of a fully saturated 10x20 seed tray kit, ensuring your windowsill setup remains stable and level.
Materials Needed for Your 2026 Drainage Hack
To build this advanced windowsill system, you will need a few specific items. Fortunately, these are widely available at any local garden center or hardware store in 2026.
- Seed Tray Kit: Two 10x20 heavy-duty seed trays. One without holes (for the base/reservoir) and one with holes (for the planting medium). The 2026 Bootstrap Farmer Pro-Trays are highly recommended for their rigid rims.
- Landscape Drainage Pipe: A 10-foot section of 3-inch or 4-inch corrugated perforated landscape drainage pipe (brands like NDS or Advanced Drainage Systems work perfectly).
- End Caps or Silicone Sealant: To seal the ends of the cut pipe sections if you want to use them as isolated water reservoirs.
- Growing Medium: 2026 premium hemp grow mats or a sterile coconut coir blend.
- Microgreen Seeds: Untreated, high-germination seeds (sunflower, radish, or broccoli).
- Hacksaw or Heavy-Duty Shears: For cutting the corrugated pipe to size.
Step-by-Step Assembly Guide
Step 1: Cut the Landscape Drainage Pipe
Measure the interior width of your bottom seed tray (the one without holes). Using your hacksaw or heavy-duty shears, cut three sections of the 3-inch corrugated landscape drainage pipe. Each section should be approximately 9 inches long. These three horizontal 'logs' will span the width of the tray, providing a stable tripod-like base for your planting tray.
Step 2: Prepare the Pipe Sections
Because you are using perforated pipe, water will naturally flow into and out of the corrugated ridges. If you want to create a passive sub-irrigation system where the pipe holds water, use waterproof silicone sealant or specialized PVC end caps to seal both ends of each 9-inch pipe section. If you prefer a pure drainage and airflow manifold, leave the ends open and the perforations exposed.
Step 3: Assemble the Base
Place the three cut sections of landscape drainage pipe horizontally into the bottom seed tray (no holes). Space them evenly: one near the top edge, one dead center, and one near the bottom edge. This ensures the weight of the wet soil is distributed evenly, preventing the top tray from bowing in the middle.
Step 4: Stack and Plant
Take your top seed tray (the one with drainage holes) and rest it directly on top of the three landscape drainage pipe sections. It should sit about 3 inches above the windowsill surface. Line the top tray with your hemp grow mat or coconut coir. As noted by Penn State Extension, selecting a well-draining, sterile media is critical for microgreen success, and the elevated pipe system will maximize the performance of your chosen medium.
System Comparison: Standard vs. Pipe-Enhanced
How does this landscape drainage pipe hack compare to simply setting your seed tray kit flat on the windowsill? The data from indoor growing trials clearly shows the advantages of elevated drainage.
| Feature | Standard Flat Tray Setup | Drainage Pipe Elevated Setup |
|---|---|---|
| Root Zone Airflow | Poor (Blocked by windowsill) | Excellent (360-degree circulation) |
| Risk of Damping-Off | High (Stagnant water pools) | Very Low (Excess water drains away) |
| Windowsill Damage Risk | Moderate (Condensation/leaks) | None (Contained in bottom tray) |
| Watering Method | Top-watering only | Top-watering or Bottom-wicking |
| Setup Cost (2026) | $15 - $20 (Tray kit only) | $25 - $30 (Tray kit + pipe) |
Top Microgreens for the Drainage Manifold System
While almost any microgreen will benefit from the superior drainage provided by the landscape pipe manifold, some varieties are particularly responsive to this high-oxygen root environment.
- Sunflower Microgreens: Sunflowers have robust taproots that are highly susceptible to rot if left in standing water. The elevated pipe system keeps their roots moist but oxygenated, resulting in thicker, crunchier stems.
- Radish Microgreens: Varieties like China Rose or Daikon grow incredibly fast. They require heavy watering but demand immediate drainage. The corrugated pipe setup allows you to water aggressively without fear of waterlogging.
- Pea Tendrils: Peas are heavy drinkers and benefit immensely from the bottom-wicking capability of the pipe reservoir. You can fill the bottom tray with a nutrient solution, and the peas will draw up exactly what they need.
Ongoing Maintenance and Harvesting
Maintaining your 2026 windowsill microgreens system is remarkably easy once the landscape drainage pipe base is assembled. When watering, simply pour water directly into the top tray. The excess will flow through the drainage holes and into the corrugated pipe reservoir below. If the bottom tray begins to fill past the halfway mark of the pipe, simply lift the top tray off and dump the excess water to prevent mosquito breeding or stagnation.
Lighting is also crucial. While a south-facing windowsill provides great natural light in the summer, winter months in 2026 still require supplemental lighting. Clip-on, full-spectrum LED grow bars can be attached directly to the window frame above the tray. Ensure you rotate the tray 180 degrees every two days so the microgreens grow straight rather than leaning toward the glass.
Harvesting typically occurs between days 7 and 14, depending on the variety. Use a clean, sharp pair of ceramic scissors to cut the greens just above the grow mat. Because your landscape drainage pipe kept the base dry and clean, you will find that your harvested microgreens require far less washing and are free from soil splatter and mold spores.
Conclusion
Growing microgreens on a windowsill with a seed tray kit is one of the most rewarding indoor gardening projects you can undertake. By thinking outside the box and incorporating heavy-duty landscape drainage pipe into your setup, you solve the most common pitfalls of indoor growing: poor drainage, root rot, and stagnant air. This inexpensive, highly effective 2026 hack ensures your windowsill garden remains a lush, productive, and mold-free oasis all year long. As Michigan State University Extension frequently advises, mastering water management is the true secret to consistent microgreen yields, and this drainage pipe manifold puts you in complete control.