
Gardening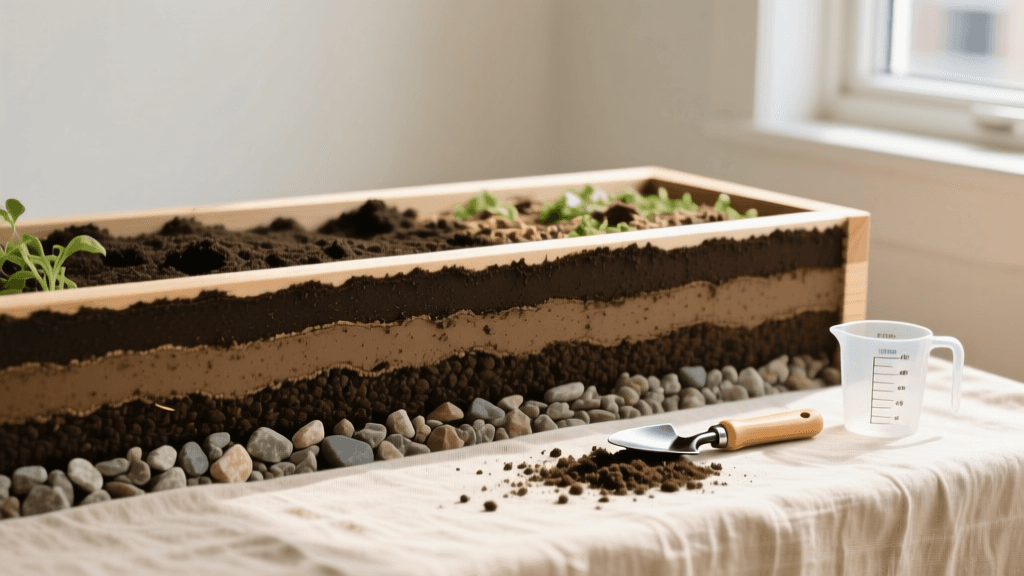
Expert Raised Bed Soil Mixes and Layering Best Practices
The Foundation of High-Yield Raised Beds
Building a raised bed is only the first step in your gardening journey; the true secret to a bountiful harvest lies beneath the surface. As a senior horticulturist, I have seen countless gardeners invest hundreds of dollars in beautiful cedar or galvanized steel raised beds, only to fill them with dense, compacted dirt that stifles root growth. Expert raised bed gardening requires a fundamental shift in how we think about soil. Unlike in-ground gardens, raised beds are essentially large container environments. They demand a soil mix that provides exceptional drainage, high porosity for root expansion, and a rich reservoir of slow-release nutrients.
In this comprehensive guide, we will break down the exact soil formulations, layering techniques, and maintenance best practices used by commercial market gardeners and university extension experts to maximize vegetable yields while minimizing long-term costs.
The Core Raised Bed Soil Formula
The most common mistake beginners make is purchasing cheap topsoil or garden soil bags from big-box stores and dumping them into a raised bed. These products are often heavy, clay-based, and prone to severe compaction when confined in a wooden or metal frame. Instead, experts rely on a specialized soilless or semi-soilless mix.
The gold standard for raised bed soil is a variation of the famous Mel's Mix developed by Square Foot Gardening pioneer Mel Bartholomew, though modern soil science has refined it to address sustainability and cost. The ideal modern ratio is 40% Compost, 40% Aeration/Drainage, and 20% Moisture Retention.
Ingredient Breakdown and Sourcing
| Component | Role in Soil | Recommended Materials | Approx. Cost (per cu. ft.) |
|---|---|---|---|
| Compost (40%) | Nutrients & Microbiology | Worm castings, mushroom compost, homemade compost | $1.50 - $3.00 |
| Aeration (40%) | Drainage & Root Oxygen | Coarse vermiculite, perlite, pumice, coarse sand | $2.00 - $4.50 |
| Moisture (20%) | Water Retention & Structure | Coco coir (preferred), sphagnum peat moss | $1.00 - $2.50 |
Expert Tip: The Coco Coir Advantage
While sphagnum peat moss has been the traditional choice for moisture retention, it is highly acidic (pH 3.0-4.0) and requires heavy liming to balance. Furthermore, peat harvesting raises significant environmental concerns. Coco coir, a byproduct of coconut processing, is the expert's choice. It has a near-neutral pH (5.5-6.5), wets much easier than peat, and is a renewable resource. Always purchase compressed coco coir bricks and hydrate them in a wheelbarrow before mixing to ensure even distribution.
Understanding Cation Exchange Capacity (CEC) in Raised Beds
One of the most overlooked metrics in home gardening is Cation Exchange Capacity, or CEC. In simple terms, CEC measures the soil's ability to hold onto essential nutrients (like calcium, magnesium, and potassium) and prevent them from washing away during heavy rains or frequent watering. Because raised beds drain much faster than in-ground gardens, they are highly susceptible to nutrient leaching.
To maximize CEC in a soilless raised bed mix, experts rely heavily on humus and worm castings. While standard compost provides a good baseline, incorporating 10% vermicompost (worm castings) into your compost fraction dramatically increases the soil's CEC. Worm castings are coated in beneficial microbes and humic acids that bind to nutrient ions, holding them in the root zone until the plant's root hairs release acidic exudates to trade for them. This biological exchange mechanism is why gardens fed with worm castings rarely suffer from nutrient burn or leaching deficiencies.
The Bottom-Layering Technique (Modified Hugelkultur)
Filling a raised bed that is 18 to 36 inches deep entirely with premium soil mix can cost upwards of $300 to $500 per bed. To reduce costs without sacrificing plant health, expert gardeners utilize a bottom-layering technique inspired by the traditional German Hugelkultur method. Since most annual vegetable roots only penetrate the top 8 to 12 inches of soil, the bottom third of your raised bed can be filled with bulk organic matter that will slowly decompose, act as a moisture sponge, and feed the soil food web over several years.
How to Layer a Deep Raised Bed
- Bottom Layer (Bottom 30-40%): Large rotting logs, thick branches, and woodchips. Avoid using allelopathic woods like black walnut or cedar, which can inhibit plant growth.
- Middle Layer (Next 20%): Leaves, grass clippings, straw, and small twigs. This layer breaks down faster and bridges the gap between the woody base and the premium topsoil.
- Top Layer (Top 40-50%): Your premium 40/40/20 soil mix. This is the active root zone where your vegetables will thrive.
Timing Note: If you are building beds in the fall for spring planting, this layering method is ideal. The winter freeze-thaw cycles and microbial activity will begin breaking down the middle layer, settling the bed perfectly by April.
Authoritative Insights on Soil Biology
According to the Cornell University College of Agriculture and Life Sciences, the physical structure of container and raised bed soils is just as critical as its chemical nutrient profile. Their extension guidelines emphasize that container media must have high air-filled porosity to compensate for the lack of natural soil structure. By incorporating coarse aeration materials like perlite or pumice, you maintain an oxygen-rich environment that prevents anaerobic conditions and root rot, which are common in poorly draining raised beds.
The key to successful raised bed gardening is understanding that you are creating a localized, high-intensity growing environment. Investing in initial soil structure and organic matter will pay dividends in water conservation and disease resistance for years to come. — Dr. Linda Chalker-Scott, Extension Horticulturist, Washington State University.
Annual Maintenance and Top-Dressing Best Practices
Even the best soil mix will deplete its nutrients and physically shrink as organic matter oxidizes and decomposes. Expert gardeners never let a raised bed sit bare and neglected during the off-season.
The Fall Top-Dressing Protocol
- Clear Debris: Remove spent summer crops, but leave the roots of nitrogen-fixing legumes (like beans and peas) in the ground to decompose and return nitrogen to the soil.
- Test the Soil: Use a reliable mail-in soil test (such as those offered by your local university extension) every two years to check pH and baseline N-P-K levels.
- Amend and Top-Dress: Add a 2-inch layer of fresh compost across the surface. Sprinkle with a balanced organic granular fertilizer (like Espoma Garden-tone 3-4-4) at a rate of 3 lbs per 50 square feet.
- Protect the Soil: Plant a winter cover crop like crimson clover or winter rye, or apply a thick layer of shredded leaf mulch to prevent winter erosion and nutrient leaching.
Common Mistakes to Avoid
- Adding Native Clay Soil: Never mix heavy in-ground clay soil into your raised bed. It will destroy the porosity of your engineered mix and turn into concrete when dry.
- Over-Tilling: Raised beds do not require rototilling. Tilling destroys the delicate fungal hyphae networks (mycorrhizae) that help plant roots absorb phosphorus and water. Use a broadfork or hand trowel to gently incorporate amendments.
- Ignoring the Mulch Layer: Exposed soil loses moisture rapidly and invites weed seeds. Always maintain a 1-to-2-inch layer of organic mulch (straw, shredded leaves, or arborist woodchips) around the base of your mature plants.
Conclusion
Mastering raised bed soil is an exercise in patience and biology. By investing in a high-quality, well-aerated initial mix, utilizing cost-saving bottom-layering techniques, and committing to annual organic top-dressing, you will build a living soil ecosystem. This expert approach not only reduces your long-term input costs but also guarantees the robust, disease-resistant, and high-yielding harvests that make home gardening so deeply rewarding.

