
Build a Viral Salsa Garden With Smart Drip Irrigation
The Viral 'Salsa Garden' Trend Explained
Over the past year, the garden-to-table 'Salsa Garden' has taken over social media feeds, Pinterest boards, and home landscaping blogs. The concept is brilliantly simple: dedicate a single raised bed to growing all the fresh ingredients needed to make homemade salsa. This typically includes Roma tomatoes, jalapeño peppers, red onions, cilantro, and garlic. Not only does this trend promote sustainable, organic eating, but it also serves as a beautiful, functional focal point in your outdoor living space.
However, the secret to a truly successful, high-yield salsa garden isn't just about picking the right seeds; it is about mastering moisture. Tomatoes and peppers are notoriously susceptible to fungal diseases like early blight and powdery mildew when their leaves are consistently wet. Overhead watering is a recipe for disaster. This is where the integration of smart home technology meets traditional gardening. By installing a smart drip irrigation system, you can deliver water directly to the root zone, conserve water, and automate your garden-to-table harvest.
The Secret Weapon: Smart Drip Irrigation
Drip irrigation is the gold standard for raised bed vegetable gardening. According to Penn State Extension, drip systems apply water slowly and directly to the soil, reducing evaporation and minimizing weed growth by keeping the pathways dry. When you pair a drip system with a smart hose timer, you elevate your garden into the modern era of energy-efficient landscaping.
Smart controllers use local weather data, soil moisture estimates, and seasonal adjustments to water your plants only when necessary. The EPA WaterSense program notes that smart irrigation controllers can save the average home nearly 7,600 gallons of water annually. For a salsa garden, this means your tomatoes get the deep, infrequent watering they crave to develop robust root systems, while you save time and money.
Top Smart Hose Timers Compared
Most DIY raised beds are connected to standard outdoor spigots rather than underground sprinkler valves. Therefore, a smart hose faucet timer is the most practical choice. Here is a comparison of the top trending models for home gardeners:
| Smart Timer Model | Estimated Cost | Weather Intelligence | Best Feature |
|---|---|---|---|
| Orbit B-hyve Smart Hose Timer | $55 - $70 | Yes (WeatherSense tech) | Easy dial interface and reliable Bluetooth/Wi-Fi hub |
| Rachio Smart Hose Timer | $90 - $110 | Yes (Hyperlocal weather) | Seamless app integration and leak detection alerts |
| WYZE Sprinkler Controller | $50 - $65 | Yes (Skip rain features) | Budget-friendly with 8-zone capability for multiple beds |
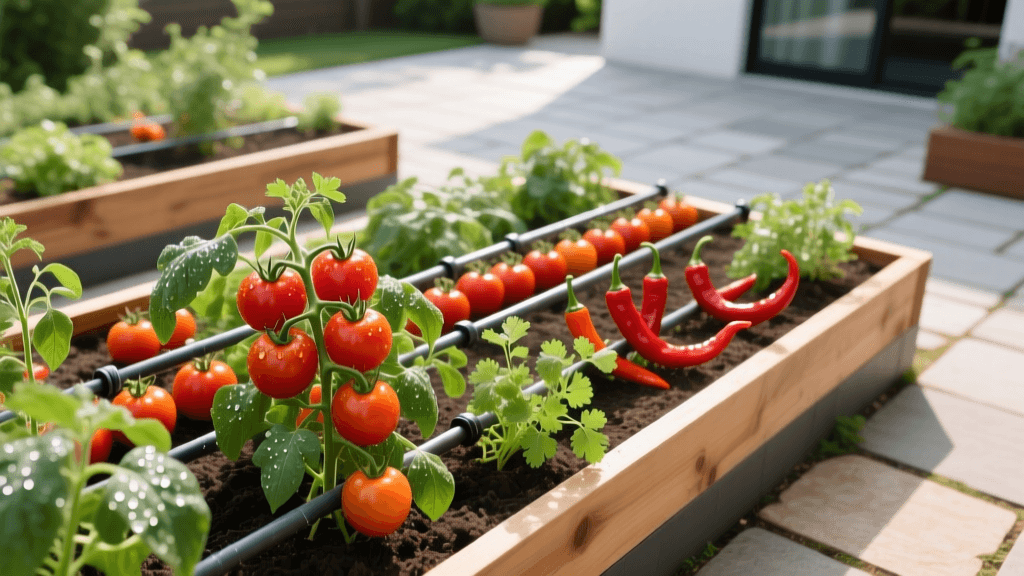
Step-by-Step: Installing Smart Drip Lines for Raised Beds
To build this system for a standard 4x8-foot raised bed, you will need a few specific components. Budget approximately $60 to $90 for the irrigation hardware, excluding the smart timer.
Materials and Cost Breakdown
- Smart Hose Timer: $55 - $110 (e.g., Orbit B-hyve)
- Pressure Regulator (25 PSI): $12 (Crucial for preventing blown emitters)
- Mesh Filter (120 mesh): $10 (Prevents clogged drip lines)
- 1/2-inch Poly Tubing (50 ft): $15 (Mainline water delivery)
- 1/4-inch Drip Tubing with 6-inch Emitters (50 ft): $18 (Targeted root watering)
- Punch Tool and Barbed Connectors: $15
Installation Steps
- Connect to the Spigot: Attach your smart timer directly to the outdoor faucet. Next, screw on the 120-mesh filter, followed by the 25 PSI pressure regulator. This sequence is vital; the filter protects the timer and regulator from sediment, while the regulator ensures the water pressure is safe for drip lines.
- Lay the Mainline: Run the 1/2-inch poly tubing along the perimeter of your 4x8-foot raised bed. Secure it with garden staples every two feet to prevent it from shifting as the soil settles.
- Punch and Connect: Using your punch tool, create holes in the 1/2-inch mainline every 12 inches. Insert barbed connectors and attach the 1/4-inch drip tubing.
- Snake the Drip Lines: Lay the 1/4-inch drip tubing (which has built-in emitters every 6 inches) in parallel rows across the width of the bed. Space these rows about 8 to 10 inches apart to ensure even soil saturation.
- Cap the Ends: Use end caps or figure-8 clamps to seal the ends of both the 1/2-inch and 1/4-inch lines. Turn on the spigot, run a manual test via your smart app, and check for leaks.
Planting Your Salsa Garden for Maximum Yield
Once your irrigation is dialed in, it is time to plant. Proper spacing and companion planting are essential for a thriving garden-to-table setup. The Old Farmer's Almanac heavily emphasizes companion planting to naturally deter pests and improve soil health without chemical fertilizers.
Spacing and Companion Planting Guide
- Roma Tomatoes (2-3 plants): Plant these at the back (north side) of the bed so they don't shade smaller plants. Space them 24 inches apart. Install heavy-duty tomato cages immediately to support their growth.
- Jalapeño Peppers (2 plants): Place these in the middle of the bed, spaced 18 inches apart. Peppers love the heat and benefit from the slight windbreak provided by the tomato cages.
- Red Onions (10-15 sets): Plant onion sets along the front border. Onions are fantastic companions because their strong scent deters aphids and spider mites from attacking your tomatoes and peppers.
- Cilantro (Direct Sow): Scatter cilantro seeds in the partial shade created by the tomato plants. Cilantro bolts (goes to seed) quickly in high heat, so the afternoon shade from the tomatoes will extend your harvest window.
- Garlic (4-5 cloves): Tuck garlic cloves into the corners of the bed. Garlic acts as a natural fungicide and pest repellent, protecting the entire salsa garden ecosystem.
Pro Tip: Set your smart timer to water at 5:00 AM. Early morning watering ensures the soil is moist before the heat of the day, reducing evaporation and giving plant leaves time to dry off in the morning sun, further preventing fungal issues.
Soil Preparation and Mulching
For a raised bed salsa garden, native dirt will not suffice. You need a loose, nutrient-dense, well-draining mix. The viral 'Mel's Mix' recipe is highly recommended for this setup: combine 1/3 blended compost, 1/3 peat moss (or coco coir for a more sustainable option), and 1/3 coarse vermiculite. This mixture holds moisture beautifully while allowing excess water to drain away from the delicate tomato roots.
After planting and laying your drip lines, cover the exposed soil with a 2-inch layer of organic straw or shredded leaf mulch. Mulch acts as an insulator, keeping the soil temperature stable and preventing the smart drip system's water from evaporating before it reaches the deep root zones.
Maintenance and Harvesting Tips
With your smart drip system handling the hydration, your maintenance routine becomes incredibly simple. Check your smart app weekly to ensure the weather intelligence is skipping watering on rainy days. Every two weeks, feed your salsa garden with an organic liquid fertilizer high in potassium and phosphorus (such as a 2-4-4 NPK ratio) to encourage heavy fruit production rather than just leafy growth.
Harvest your Roma tomatoes when they are uniformly red and slightly soft to the touch. Pick jalapeños when they are a deep, glossy green, or let them turn red for a sweeter, spicier kick. Snip cilantro from the outside in, and pull your red onions when their tops begin to yellow and fall over. By combining the viral appeal of a dedicated salsa garden with the water-saving precision of smart home irrigation, you create an outdoor living feature that is as technologically advanced as it is delicious.

