
Planning a Smart, Energy-Efficient Patio Garden Layout
Introduction: Bridging Indoor Comfort and Outdoor Sustainability
The modern patio is no longer just a slab of concrete with a few folding chairs; it is a fully integrated extension of your indoor living space. However, bridging the gap between indoor comfort and outdoor resilience requires careful planning, especially when incorporating smart home technology and energy-efficient landscaping. Designing a smart, energy-efficient patio garden allows you to enjoy a lush, garden-to-table outdoor kitchen and lounge area without driving up your utility bills or wasting precious natural resources.
This comprehensive planning guide will walk you through the essential phases of designing an eco-friendly, tech-enabled outdoor oasis. From mapping microclimates and installing permeable hardscaping to integrating smart irrigation controllers and low-voltage LED lighting, you will learn how to create a sustainable outdoor living space that functions beautifully year-round.
Phase 1: Site Analysis and Microclimate Mapping
Before purchasing a single smart sensor or patio paver, you must understand the unique environmental conditions of your backyard. A microclimate is a localized set of atmospheric conditions that differ from the surrounding areas. Mapping these zones is critical for plant survival and energy efficiency.
Tracking Sun and Wind Patterns
Spend a weekend observing your patio space at different times of the day. Note where the harsh afternoon sun hits, as this will dictate where you need to install shade sails or plant deciduous trees for passive solar cooling. Conversely, identify the shaded, damp corners that are perfect for moisture-loving ferns or a garden-to-table herb spiral. According to the Colorado State University Extension, understanding your yard's microclimates and grouping plants with similar water and light needs—a practice known as hydrozoning—can reduce outdoor water usage by up to 50%.
- Zone A (Full Sun, High Traffic): Ideal for permeable pavers, the main dining area, and drought-tolerant ornamental grasses.
- Zone B (Partial Shade, Prep Area): Perfect for the outdoor kitchen, garden-to-table prep station, and leafy greens like lettuce and spinach.
- Zone C (Deep Shade, Lounge): Best for comfortable seating, smart ambient lighting, and shade-tolerant groundcovers like creeping thyme.
Phase 2: Sustainable Hardscaping and Drainage Planning
Energy-efficient landscaping extends beneath your feet. Traditional concrete patios create heat islands and contribute to stormwater runoff, which can overwhelm municipal drainage systems and erode your garden beds. When planning your layout, prioritize permeable surfaces.
Consider using permeable interlocking concrete pavers (PICP), such as Belgard Aquabricks (approximately $8 to $12 per square foot). These pavers allow rainwater to percolate through the joints and into a gravel sub-base, naturally filtering the water and recharging the local groundwater table. Not only does this protect your garden from waterlogging, but it also keeps the patio surface significantly cooler during peak summer months, reducing the ambient temperature of your outdoor living area and lowering the cooling load on your home's adjacent interior rooms.
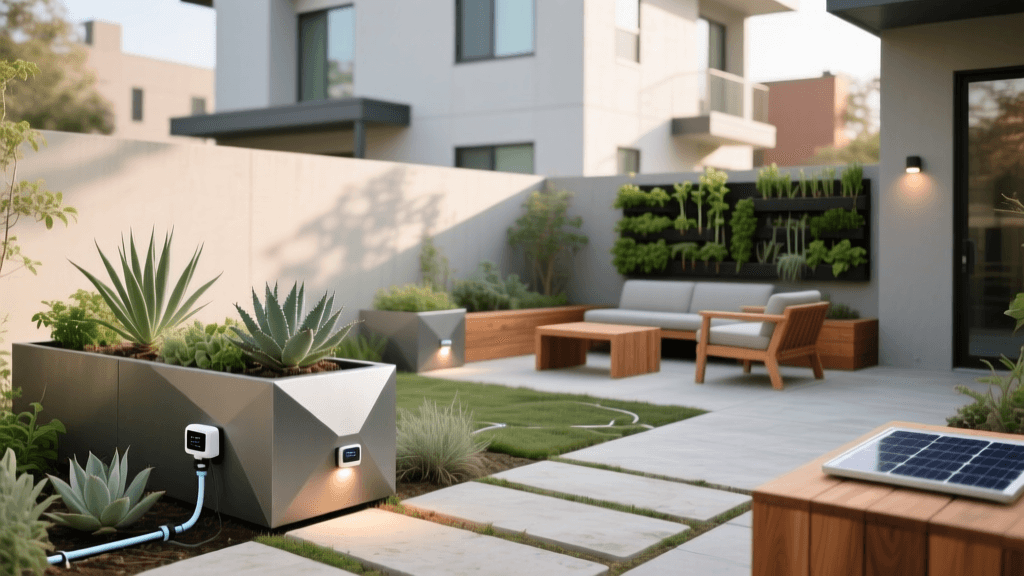
Phase 3: Smart Irrigation Design for Patio Containers and Raised Beds
Patio gardens often rely on raised beds and large containers, which dry out much faster than in-ground garden beds. Traditional sprinklers are highly inefficient for these setups, losing massive amounts of water to wind drift and evaporation. The solution is a hidden, smart-controlled drip irrigation system.
Calculating Your Drip Irrigation Needs
For raised cedar beds and large ceramic patio planters, use pressure-compensating drip tubing, such as Netafim Techline CV (approx. $0.45 per foot). This tubing features built-in emitters spaced 12 inches apart, delivering water directly to the root zone at a rate of 0.6 Gallons Per Hour (GPH) per emitter. To calculate your requirements, multiply the number of emitters by the GPH to ensure you do not exceed your zone's flow capacity.
Selecting a Smart Irrigation Controller
To automate this system, replace your traditional timer with an EPA WaterSense-certified smart controller. These devices connect to your home Wi-Fi and use local weather data to automatically skip watering when rain is in the forecast.
According to the EPA's WaterSense program, smart irrigation controllers can save the average home nearly 15,000 gallons of water annually, making them one of the most impactful energy-efficient landscaping upgrades you can install.
Phase 4: Low-Voltage and Smart Lighting Layout
Lighting transforms a patio from a daytime retreat into an evening sanctuary. However, outdated halogen outdoor fixtures consume excessive electricity and require frequent bulb replacements. Planning a low-voltage LED lighting layout integrated with smart home systems provides unparalleled ambiance and energy savings.
Transformer Sizing and Cable Planning
Low-voltage landscape lighting requires a transformer to step down your home's 120V current to a safe 12V. When planning your layout, add up the total wattage of all your planned LED fixtures. For example, if you plan to install ten 4-watt LED path lights and four 5-watt smart uplights, your total wattage is 60 watts. Industry best practices dictate adding a 20% buffer to prevent overloading the transformer, meaning you would need a transformer rated for at least 72 watts (a standard 100-watt or 150-watt transformer is ideal for future expansion).
Smart Fixture Integration
For smart integration, consider the Philips Hue Outdoor Pathway Lights (approx. $60 each) or hardwired smart relays like the Shelly 1 connected to standard 12V LED transformers. This allows you to set geofenced routines where your patio lights automatically turn on as you pull into the driveway, or shift to a warm, dim amber hue after 10 PM to minimize light pollution and protect local nocturnal pollinators.
Phase 5: The Garden-to-Table Prep Zone
A truly functional patio garden bridges the gap between the yard and the kitchen. Dedicate a 4x8-foot section of your layout to a garden-to-table prep station. Install a weatherproof stainless steel prep table adjacent to a dedicated 'cut-and-come-again' herb and salad green raised bed. By placing the prep station within three steps of the harvesting zone, you minimize the time delicate greens spend in transit, preserving their nutritional value and flavor. Incorporate a small, recirculating solar-powered water feature nearby to provide the soothing sound of running water while masking neighborhood noise.
Material and Tech Comparison Chart
To help you budget and select the right technology for your smart patio garden, refer to the comparison table below detailing top-tier smart irrigation controllers and lighting options.
| Product Category | Model / Brand | Est. Cost | Key Features & Efficiency |
|---|---|---|---|
| Smart Controller | Rachio 3 (8-Zone) | $230 | EPA WaterSense certified, hyper-local weather intelligence, seamless app integration. |
| Smart Controller | Orbit B-hyve XR | $180 | Indoor/outdoor rated, weather-based scheduling, budget-friendly smart alternative. |
| Path Lighting | Philips Hue Calla | $110 / pair | 16 million colors, smart home ecosystem integration, ultra-low LED wattage. |
| Drip Tubing | Netafim Techline CV | $0.45 / ft | Pressure-compensating, check-valve equipped, prevents drainage and water waste. |
| Hardscaping | Belgard Permeable Pavers | $9.00 / sq ft | Reduces heat island effect, manages stormwater runoff, durable interlocking design. |
Project Timeline and Implementation Strategy
Executing this design does not require a professional landscaping crew if you are willing to tackle a DIY approach over a few weekends. Here is a practical timeline for bringing your smart patio garden to life:
- Weekend 1: Demolition and Hardscaping. Remove old concrete or turf. Excavate to a depth of 8 inches, lay a geotextile fabric, add a crushed stone base, and install your permeable pavers. This establishes the foundation and drainage plan.
- Weekend 2: Raised Beds and Irrigation. Assemble your cedar raised beds and position your large patio containers. Run the main poly tubing from your smart controller to the zones. Punch in your Netafim drip lines and test the system for leaks before covering the lines with mulch.
- Weekend 3: Lighting and Planting. Trench shallow 6-inch lines for your low-voltage lighting cables. Mount the transformer near a GFCI outlet, connect your LED fixtures, and configure your smart routines via your smartphone. Finally, plant your hydrozoned garden-to-table herbs and ornamentals.
Conclusion
Planning a smart, energy-efficient patio garden is an investment in both your property value and your environmental footprint. By taking the time to map your microclimates, utilizing permeable hardscaping, and integrating EPA-certified smart irrigation and low-voltage LED lighting, you create an outdoor living space that is as intelligent as it is beautiful. Whether you are harvesting fresh basil for a summer dinner or enjoying the soft glow of smart pathway lights on a cool autumn evening, your thoughtfully designed patio garden will provide a sustainable sanctuary for years to come.

