
Smart Irrigation Setup: Expert Tips for Home Lawns
Transforming your outdoor space into a lush, thriving oasis does not require wasting thousands of gallons of water. As homeowners increasingly seek to bridge the gap between sustainable living and modern convenience, smart irrigation systems have emerged as a cornerstone of energy-efficient landscaping. Upgrading from a traditional dial timer to a smart irrigation controller is one of the most impactful DIY garden projects you can undertake. It not only protects your landscape from overwatering but also significantly reduces your monthly utility bills.
However, simply buying a smart controller and plugging it in is not enough to achieve optimal results. True efficiency requires a holistic approach that combines smart technology with proper zoning, upgraded hardware, and strategic scheduling. In this comprehensive guide, we will explore expert tips and best practices for setting up a smart irrigation system that keeps your lawn and garden perfectly hydrated while conserving our most precious resource.
The Hidden Cost of Traditional Timers
Traditional irrigation timers operate on a fixed schedule, blindly watering your lawn whether it is experiencing a torrential downpour or a severe drought. This outdated approach leads to massive water waste. According to the Environmental Protection Agency (EPA) WaterSense program, a typical home with an automatic landscape irrigation system can waste up to 25,000 gallons of water annually if the system is not properly managed or maintained. By upgrading to a WaterSense-labeled smart irrigation controller, the average home can save nearly 7,600 gallons of water annually, translating to noticeable savings on your water bill.
Smart controllers replace guesswork with data. By leveraging real-time weather data or on-site soil conditions, these devices automatically adjust watering schedules to deliver the exact amount of moisture your landscape needs, precisely when it needs it.
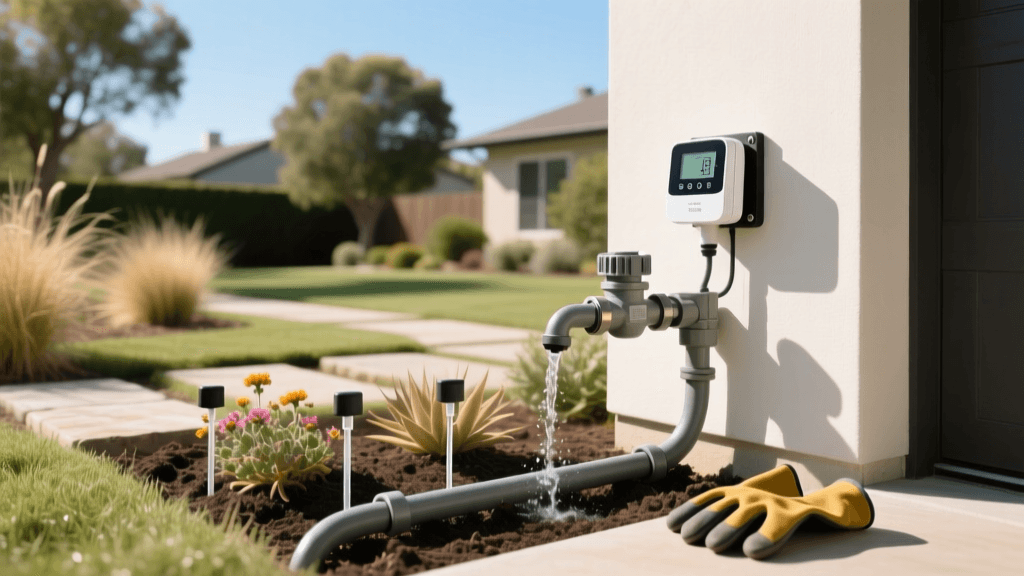
Choosing the Right Smart Controller: Weather vs. Soil
The first step in your upgrade is selecting the right brain for your irrigation system. Smart controllers generally fall into two categories: Evapotranspiration (ET) weather-based controllers and soil moisture sensor controllers. Understanding the difference is crucial for matching the technology to your specific landscape needs.
| Feature | Weather-Based (ET) Controllers | Soil Moisture Sensor Controllers |
|---|---|---|
| How It Works | Uses local weather station data (temperature, humidity, wind, solar radiation) to calculate water loss and adjust schedules. | Uses physical probes buried in the root zone to measure actual volumetric water content in the soil. |
| Best For | Large lawns, varied microclimates, and homeowners who want set-and-forget convenience via Wi-Fi. | High-clay soils, shaded areas, and specific garden beds where local weather data might not reflect ground truth. |
| Average Cost | $150 - $300 (e.g., Rachio 3, Hunter Hydrawise) | $120 - $250 (plus $40-$80 per soil sensor probe) |
| Installation | Simple indoor garage/wall mount; requires strong Wi-Fi signal. | Requires trenching and burying sensor probes at root depth (6-12 inches). |
Expert Tip: For most residential properties, a Wi-Fi-enabled weather-based controller like the Rachio 3 or Hunter Pro-C2 with Hydrawise offers the best balance of cost, ease of installation, and water savings. If you have heavy clay soil that drains poorly, supplement your smart controller with a soil moisture sensor to prevent root rot.
Hydrozoning: The Foundation of Efficient Watering
A smart controller cannot fix a poorly designed irrigation layout. The most critical best practice in water-efficient landscaping is hydrozoning—the practice of grouping plants with similar water, sun, and soil requirements into distinct irrigation zones.
According to the University of California Agriculture and Natural Resources (UC ANR), grouping plants with similar water needs into distinct hydrozones can reduce landscape water use by up to 30% while significantly improving plant health and vigor.
Never put your thirsty Kentucky Bluegrass lawn on the same valve as your drought-tolerant succulents or deep-rooted shade trees. When setting up your smart controller, map out your yard and assign zones based on the following hydrozone categories:
- High Water Use (Zone 1): Turfgrass lawns, annual flower beds, and vegetable gardens. These require frequent, deep watering.
- Moderate Water Use (Zone 2): Shrubs, hydrangeas, and non-native perennials. These benefit from less frequent but longer soakings.
- Low Water Use (Zone 3): Native plants, established trees, and xeriscape elements. These require minimal supplemental irrigation once established.
By configuring your smart controller to treat each hydrozone independently, you ensure that your lawn gets the 1 to 1.5 inches of water it needs per week, while your native beds receive only the 0.5 inches they require.
Upgrading Nozzles and Drip Emitters
Your smart controller is only as efficient as the hardware delivering the water. Traditional spray nozzles are notorious for high evaporation rates, wind drift, and uneven coverage. Upgrading your emission devices is a vital companion project to your controller installation.
1. Switch to Multi-Stream Rotating Nozzles
Replace standard fixed-spray nozzles with multi-stream rotating nozzles, such as the Hunter MP Rotator or Rain Bird R-VAN. These nozzles deliver water at a much slower rate (approximately 0.4 inches per hour compared to 1.5 inches per hour for standard sprays). This slow application rate allows water to penetrate the soil rather than running off into the street, which is especially crucial for sloped lawns or compacted clay soils. Expect to spend about $5 to $8 per nozzle, a small investment that yields massive water savings.
2. Convert Shrub and Garden Beds to Drip Irrigation
Spray heads in garden beds waste water by watering the leaves (promoting fungal diseases) and the empty spaces between plants. Convert these zones to drip irrigation using Rain Bird Xeri-Drip or Netafim drip lines. Use 1-gallon-per-hour (GPH) pressure-compensating emitters for individual shrubs, and inline drip tubing with 12-inch emitter spacing for dense groundcovers. Drip irrigation operates at 90% efficiency, compared to the 65% efficiency of traditional overhead sprays.
Expert Installation and Calibration Steps
When installing your new smart controller, follow these expert calibration steps to ensure peak performance from day one:
- Conduct a Catch Cup Test: Before programming, place 5 to 10 flat-bottomed catch cups (or tuna cans) evenly across your lawn zones. Run the zone for 15 minutes and measure the water in each cup. This tells you the exact precipitation rate of your sprinklers, allowing you to input accurate data into your smart app.
- Optimize Run Times with Cycle and Soak: If your catch cup test reveals that your soil absorbs water slower than your sprinklers apply it, use the 'Cycle and Soak' feature on your smart app. This splits a 20-minute watering session into three 7-minute bursts, separated by 30-minute soak periods, eliminating runoff entirely.
- Set Seasonal Shifts: While smart controllers adjust daily, ensure you set the baseline seasonal shift. In early spring, set the baseline to 50% of peak summer watering. Let the algorithm scale it up as evapotranspiration rates rise in July.
- Time it Right: Program your system to water in the early morning, ideally between 4:00 AM and 6:00 AM. Watering during this window minimizes wind interference and evaporation while allowing grass blades to dry before nightfall, preventing turf diseases like brown patch.
Smart Home Integration and Automation
To truly bridge the gap between indoor smart home technology and outdoor landscaping, integrate your irrigation system with your existing smart home ecosystem. Modern controllers like the Rachio and B-hyve integrate seamlessly with platforms like Amazon Alexa, Google Home, and Apple HomeKit.
For advanced users, utilizing IFTTT (If This Then That) or native smart home routines can unlock incredible automation. For example, you can create a routine that automatically pauses your irrigation system if your smart weather station detects high wind speeds (which cause severe water drift). You can also link your smart irrigation to your home's geofencing, ensuring the system only runs when you are home, or pausing it if you are on vacation to prevent mid-cycle leaks from going unnoticed.
Furthermore, integrating a smart water shut-off valve (like the Flo by Moen) with your irrigation system provides an extra layer of protection. If the system detects a pressure drop indicative of a broken underground pipe, it can automatically shut off the main water supply and send an alert to your smartphone, saving your landscape from erosion and your wallet from catastrophic water bills.
Conclusion
Upgrading to a smart irrigation system is a premier home and garden project that pays dividends in both environmental conservation and financial savings. By combining a high-quality weather-based controller with strategic hydrozoning, high-efficiency rotating nozzles, and precise calibration, you elevate your landscape maintenance from a guessing game to an exact science. Embrace these expert best practices, and your lawn will remain the envy of the neighborhood while your water bill drops to a fraction of its former cost.

