
Designing a Smart Outdoor Kitchen and Patio Layout
The Vision: Bridging Indoor Comfort and Outdoor Utility
The modern home landscape is no longer just a plot of grass; it is an extension of the indoor living space. Designing a smart outdoor kitchen and patio layout requires a delicate balance of aesthetics, functionality, and environmental stewardship. By integrating garden-to-table cooking areas, energy-efficient landscaping, and smart home technology, homeowners can create a seamless transition between the interior kitchen and the backyard garden. This guide explores the architectural planning, material selection, and technological integration necessary to build a climate-resilient, high-utility outdoor living space.
Step 1: Strategic Zoning for the Garden-to-Table Workflow
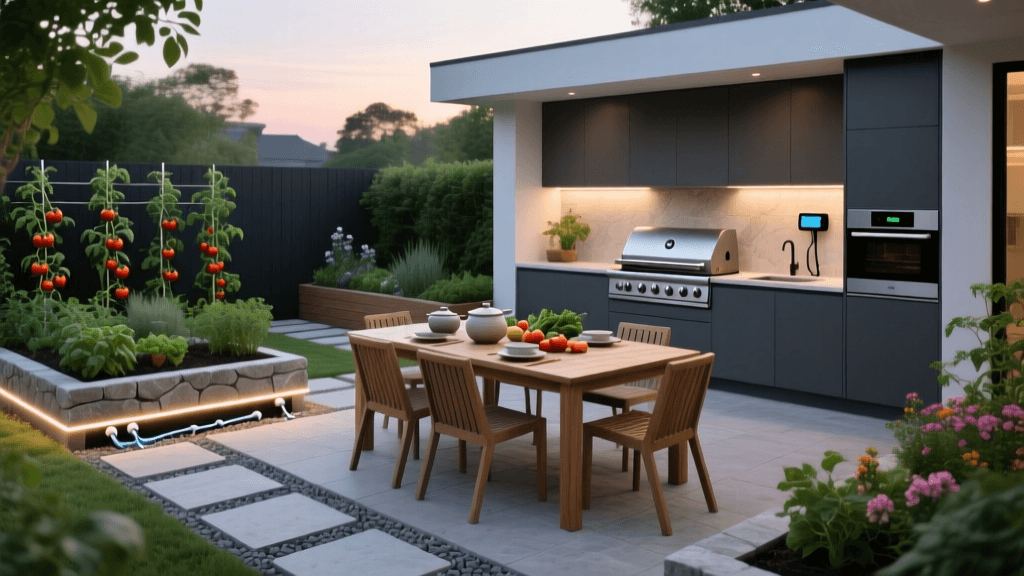
A successful outdoor kitchen relies on the same ergonomic principles as an indoor culinary space, adapted for the elements. When planning your layout, divide the patio into three distinct zones to optimize the garden-to-table workflow. This prevents cross-traffic and ensures that the cook can harvest, prep, and serve without traversing the entire yard.
The Three Primary Zones
- The Harvest and Prep Zone: Located adjacent to the raised culinary herb and vegetable beds. This area requires a dedicated stainless steel prep counter, a deep basin sink for washing root vegetables and leafy greens, and immediate access to the smart-irrigated garden beds.
- The Cooking and Heat Zone: Positioned safely away from high-traffic walkways and combustible materials. This zone houses the primary heat sources, such as a built-in gas grill, a Kamado-style ceramic smoker, or a wood-fired pizza oven. Ensure a minimum clearance of 36 inches on all sides for safety and ventilation.
- The Dining and Social Zone: The transition space bridging the patio to the broader lawn. This area features weather-resistant dining furniture, overhead smart lighting, and a clear line of sight to both the cooking area and the garden beds.
Step 2: Energy-Efficient Hardscaping with Permeable Pavers
The foundation of any enduring patio is its hardscape. Traditional poured concrete creates massive impermeable surfaces that contribute to stormwater runoff and the urban heat island effect. For an energy-efficient and ecologically responsible design, permeable interlocking concrete pavers (PICP) are the superior choice. According to the University of California Agriculture and Natural Resources (UC ANR) extension, permeable pavements can reduce surface runoff by up to 80 percent while filtering pollutants and recharging local groundwater tables. Furthermore, lighter-colored pavers reflect solar radiation, keeping the patio surface significantly cooler during peak summer months and reducing the ambient temperature for your outdoor dining area.
Hardscape Material Comparison
| Material | Permeability | Heat Reflectance | Estimated Cost per Sq Ft | Lifespan |
|---|---|---|---|---|
| Poured Concrete | Low | Medium | $8 - $15 | 20-30 Years |
| Standard Brick | Low | Low | $10 - $18 | 25-40 Years |
| Permeable Pavers | High | High | $12 - $22 | 30-50 Years |
| Decomposed Granite | High | Medium | $4 - $8 | 5-10 Years |
Step 3: Smart Irrigation Integration for Culinary Herb Beds
The garden-to-table concept relies on the consistent health of your culinary plants. However, traditional sprinkler systems waste immense amounts of water through evaporation and wind drift. The EPA WaterSense program reports that upgrading to a Weather-Based Irrigation Controller (WBIC) paired with drip irrigation can save the average home up to 15,000 gallons of water annually. When designing your patio layout, integrate the smart irrigation system directly into the hardscape planning phase. Run mainline PVC piping beneath the permeable paver base before laying the sand and gravel bedding layers.
Recommended Smart Irrigation Setup
- Smart Controller: The Rachio 3 Smart Sprinkler Controller utilizes local weather data and soil moisture sensors to automatically adjust watering schedules, preventing overwatering during unexpected rain events.
- Drip Distribution: Use Netafim Techline drip tubing with built-in pressure-compensating emitters spaced 12 inches apart. Bury these lines 2 inches beneath the mulch in your raised cedar beds to deliver water directly to the root zones of tomatoes, basil, and peppers.
- Hydrozoning: Group plants with similar water requirements on the same valve. Keep drought-tolerant Mediterranean herbs like rosemary and thyme on a separate, less frequent schedule than water-heavy crops like cucumbers and lettuce.
Step 4: Smart Lighting and Ambiance Planning
Proper lighting extends the utility of your outdoor kitchen well into the evening while enhancing security and highlighting your garden-to-table beds. Avoid harsh, high-voltage floodlights that contribute to light pollution and disrupt local wildlife. Instead, design a layered, low-voltage LED lighting plan controlled by a smart transformer.
- Task Lighting: Install under-cabinet LED strip lights (rated for damp locations) above the prep counters to ensure safe knife work and food handling after dusk.
- Path and Hardscape Lighting: Use low-glare, recessed hardscape lights integrated into the retaining walls or patio steps to define the perimeter without creating trip hazards.
- Garden Accent Lighting: Utilize adjustable LED spotlights to uplight architectural plants or illuminate the raised beds, allowing you to monitor plant health and enjoy the garden aesthetics at night.
- Smart Integration: Connect the low-voltage transformer to a smart home hub, allowing you to set schedules based on local sunset times or trigger voice-activated lighting scenes for dinner parties.
Budgeting and Project Timeline
Planning a comprehensive outdoor living space requires a realistic understanding of costs and phased construction. Rushing the process often leads to poor drainage or compromised smart-home wiring. Below is a generalized budget and timeline for a 400-square-foot smart outdoor kitchen and patio integration.
| Project Phase | Estimated Duration | Cost Range (400 Sq Ft) |
|---|---|---|
| Design and Permitting | 2-4 Weeks | $500 - $1,500 |
| Site Prep and Base | 1-2 Weeks | $2,000 - $4,000 |
| Hardscape Installation | 2-3 Weeks | $5,000 - $9,000 |
| Kitchen and Utilities | 2-4 Weeks | $8,000 - $15,000 |
| Smart Irrigation and Lighting | 1 Week | $1,500 - $3,000 |
Conclusion
Designing a smart outdoor kitchen and patio layout is a transformative investment in your home and lifestyle. By prioritizing permeable hardscapes, strategic zoning, and intelligent water and lighting management, you create a space that is as ecologically responsible as it is beautiful. The integration of smart home technology ensures that your garden-to-table beds thrive with minimal effort, allowing you to focus on what truly matters: enjoying the harvest and sharing meals in your personalized outdoor sanctuary.

