
Viral Smart Irrigation Hacks for Raised Garden Beds
The Viral Trend: Automating Raised Bed Irrigation
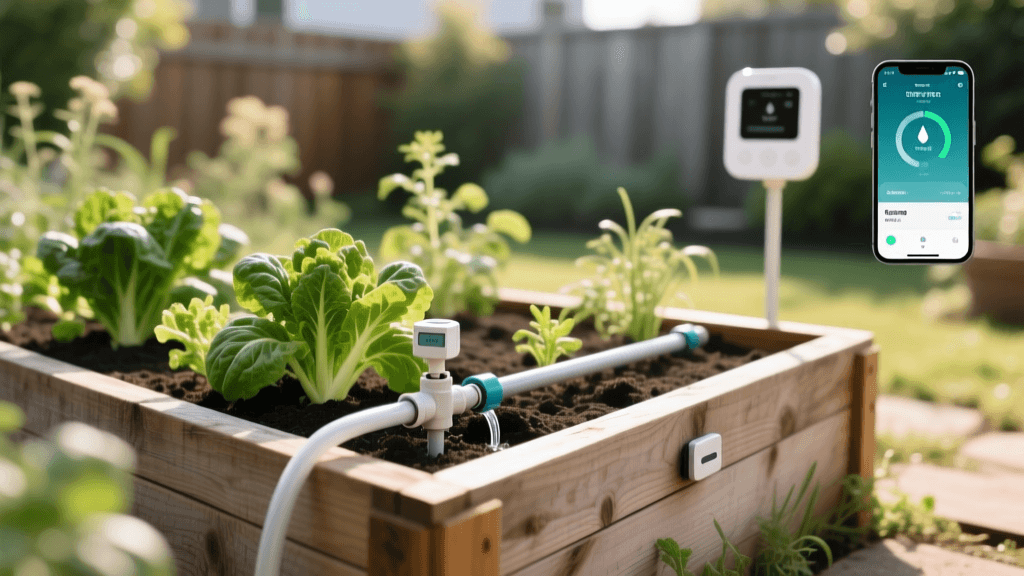
If you have spent any time on TikTok, Instagram Reels, or YouTube Shorts lately, you have likely noticed a massive surge in 'smart garden' setups. Homeowners and urban farmers are showcasing lush, overflowing raised garden beds that seem to water themselves. The secret? A combination of hidden drip irrigation lines and smart hose timers controlled directly from a smartphone. This viral trend bridges the gap between high-tech smart home integration and classic garden-to-table growing, proving that you do not need a massive agricultural budget to automate your backyard harvest. In this guide, we break down the exact products, measurements, and scheduling hacks the pros use to build these trending systems, ensuring your vegetables get the precise hydration they need while you sleep.
Why Smart Drip Irrigation is Taking Over Home Gardens
Traditional overhead watering with a hose or sprinkler is incredibly inefficient. Water evaporates before it reaches the root zone, and wet foliage invites fungal diseases like powdery mildew and blight. According to the Environmental Protection Agency (EPA) WaterSense program, smart irrigation controllers can save the average home nearly 7,600 gallons of water annually by adjusting watering schedules based on local weather conditions and soil moisture needs. When you pair a smart controller with a drip irrigation system, you are looking at peak efficiency. Drip systems deliver water directly to the base of the plant, minimizing evaporation and runoff.
The Core Components of a Viral-Worthy Setup
To replicate the setups you see trending online, you need to move beyond basic soaker hoses, which degrade quickly and offer uneven water distribution. Here is the exact shopping list for a standard 4x8-foot raised bed:
- Smart Hose Timer: The brain of the operation (e.g., Orbit B-hyve or Rachio Smart Hose Timer).
- Backflow Preventer & Pressure Regulator: Essential for keeping your drinking water safe and reducing household water pressure (typically 40-60 PSI) down to a safe 25 PSI for drip lines.
- 1/2-Inch Poly Tubing (Mainline): The primary artery that runs along the edge of your raised bed.
- 1/4-Inch Drip Tape or Micro-Tubing: The secondary lines that run directly over the soil surface.
- Barbed Connectors, Tees, and End Caps: For securing the layout.
- Landscape Staples: U-shaped metal pins to hold the tubing flat against the soil.
Step-by-Step: Building the Ultimate Smart Drip System
Building this system is a highly satisfying weekend DIY project that typically takes less than two hours from unboxing to first test run.
Step 1: Map Your Raised Beds and Calculate Flow
Before cutting any tubing, map out your garden. A standard 4x8-foot raised bed requires about 32 feet of mainline tubing if you are ringing the perimeter, plus internal drip lines. For deep-rooted crops like tomatoes and peppers, use inline drip tubing with emitters spaced every 6 inches, emitting 0.9 Gallons Per Hour (GPH). For shallow-rooted greens like lettuce and carrots, use drip tape.
Step 2: Lay the Mainline and Drip Tape
Connect your smart timer to the outdoor spigot, followed by the backflow preventer, filter, and pressure regulator. Attach the 1/2-inch poly tubing and run it along the back or side of your raised bed. Use a standard hole punch tool to create insertion points for your 1/4-inch barbed connectors. Run the 1/4-inch drip lines across the width of the bed, spacing them 12 inches apart. Secure everything with landscape staples every 18 inches to prevent the lines from shifting when the water pressure kicks in.
Step 3: Connect the Smart Hose Timer and App
Download the companion app for your smart timer. The viral hack here is to enable the weather intelligence feature. This allows the timer to automatically skip watering if rain is in the forecast or if the soil moisture index is already saturated.
Smart Hose Timer Comparison Chart
Not all smart timers are created equal. When building a system meant to go viral for its reliability and ease of use, choosing the right controller is paramount. Below is a comparison of the top three smart hose timers currently dominating the home garden market.
| Feature | Orbit B-hyve XD | Rachio Smart Hose Timer | Melnor AquaTimer |
|---|---|---|---|
| Connectivity | Wi-Fi + Bluetooth | Wi-Fi | Bluetooth Only |
| Weather Intelligence | Yes (EPA WaterSense Certified) | Yes (Hyperlocal Weather) | No |
| Valves Supported | Up to 6 (with hub) | Up to 4 (with hub) | 1 to 4 (depending on model) |
| Estimated Cost | $110 - $130 | $150 - $170 | $40 - $80 |
| Best For | Multi-zone raised bed arrays | Premium smart home integration | Budget-friendly single beds |
Pro-Tips from the Pros: Maximizing Efficiency
Going viral on social media is one thing, but keeping your plants alive and thriving requires horticultural science. According to experts at Penn State Extension, the placement of drip emitters is critical for encouraging deep, drought-resistant root growth. They recommend placing emitters near the plant's drip line (the outer edge of the leaf canopy) rather than directly at the base of the stem. This encourages roots to spread outward and downward in search of moisture, creating a much stronger, more resilient plant.
Timing and Scheduling Hacks
The biggest mistake beginners make is watering in the middle of the day. The viral smart garden hack is to schedule your irrigation cycles for 4:00 AM. Watering in the pre-dawn hours allows moisture to penetrate deeply into the soil profile before the sun has a chance to evaporate it. Furthermore, instead of one long 30-minute watering session, program your smart timer for 'cycle and soak' intervals: three 10-minute sessions spaced an hour apart. This prevents water from pooling on the surface and running off, which is especially common in raised beds filled with peat-heavy or hydrophobic soil mixes.
Mulching: The Unsung Hero of the Viral Setup
You will rarely see bare soil in a trending garden video. After your drip lines are pinned down, cover them with 2 to 3 inches of organic mulch, such as shredded leaves, straw, or arborist wood chips. Mulch hides the plastic tubing from camera view, but more importantly, it reduces surface evaporation by up to 70%, keeps the soil temperature stable, and suppresses weeds that would otherwise compete with your vegetables for water and nutrients.
Cost Breakdown: Is the Viral Setup Worth It?
Many assume that smart irrigation requires a professional landscaping budget. However, a DIY setup for a standard backyard garden is surprisingly affordable. Here is a realistic cost breakdown for automating two 4x8-foot raised beds:
- Smart Hose Timer (Single Zone): $60
- Pressure Regulator & Filter Kit: $25
- 100 ft of 1/2-inch Poly Tubing: $30
- 100 ft of 1/4-inch Drip Tape: $20
- Fittings, Punch Tool, and Staples: $25
- Total Estimated Cost: $160
Considering that a single season of hand-watering can waste thousands of gallons of water—and the time commitment of standing in the yard with a hose for 20 minutes every evening—the return on investment is realized in both utility savings and personal time. Plus, the increased crop yield from consistent, stress-free hydration easily pays for the system in the form of free, garden-to-table produce.
Winterization and Seasonal Maintenance
To ensure your viral setup survives the winter, you must properly winterize the system. Before the first hard freeze, disconnect the smart timer, backflow preventer, and pressure regulator, and store them indoors. Open all manual valves and end caps on your drip lines to let gravity drain the remaining water. If you live in a climate with severe freezing temperatures, use a portable air compressor set to a low PSI (under 20 PSI) to blow out the residual water from the 1/2-inch mainlines. Leaving water inside the lines will cause the plastic to crack and split, ruining your hard work.
Final Thoughts
The trend of automating raised garden beds with smart irrigation is more than just a fleeting social media fad; it is a practical, sustainable approach to modern home gardening. By leveraging smart hose timers, precision drip tape, and weather-responsive scheduling, you can transform your backyard into a highly efficient, low-maintenance food-producing oasis. Whether you are growing heirloom tomatoes for summer salads or crisp lettuce for autumn harvests, taking the guesswork out of watering ensures your garden thrives season after season. Grab your tubing, download the app, and get ready to build the smartest garden on your block.

