
Gardening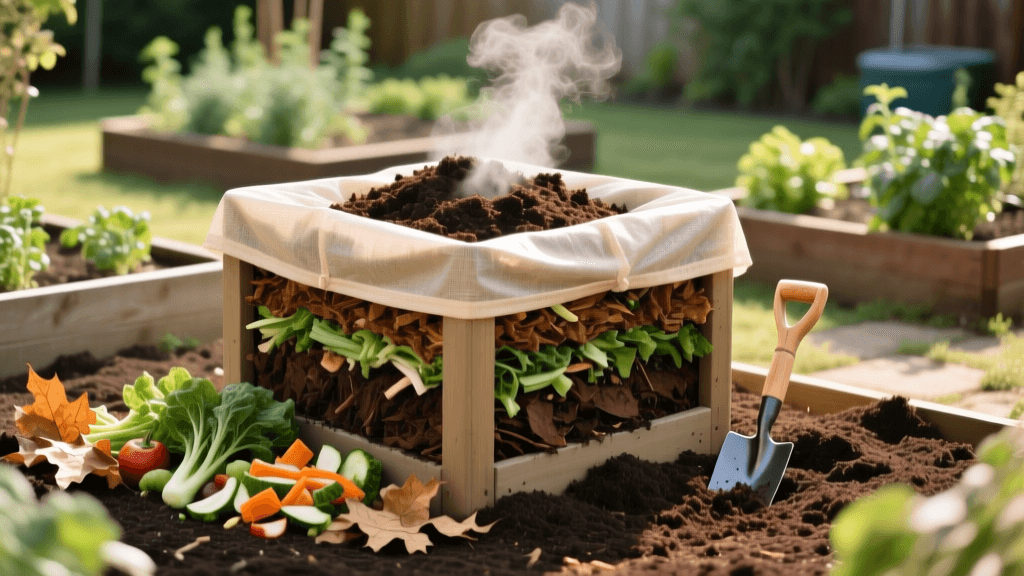
Backyard Composting Mistakes: Fixes for Smells, Pests, and Slow Decay
The Art and Science of Backyard Composting
Composting is often described as nature's way of recycling, transforming kitchen scraps and yard waste into a rich, dark, earthy-smelling soil amendment. However, many home gardeners treat their compost bin like a magical garbage disposal, tossing in random organic materials and expecting perfect humus a few weeks later. When the pile fails to heat up, starts smelling like ammonia, or attracts unwanted wildlife, frustration sets in.
The truth is that successful composting is a biological process driven by billions of microorganisms. These microbes require a specific balance of food, water, and oxygen to thrive. According to the Environmental Protection Agency (EPA), properly managed composting not only reduces household waste but also suppresses plant diseases and reduces the need for chemical fertilizers. Yet, without understanding the underlying mechanics, it is remarkably easy to make critical errors.
In this guide, we will break down the five most common backyard composting mistakes and provide actionable, science-backed fixes to get your pile cooking again.
Mistake 1: Ignoring the Carbon-to-Nitrogen (C:N) Ratio
The most frequent cause of a failing compost pile is an imbalance of 'greens' and 'browns.' Microorganisms require carbon for energy and nitrogen for protein synthesis and reproduction. If your pile is too heavy on nitrogen-rich greens (like fresh grass clippings and vegetable scraps), it will become a slimy, foul-smelling mess. If it is too heavy on carbon-rich browns (like dry leaves and twigs), the decomposition process will grind to a complete halt.
The Fix: Aim for a 30:1 Ratio
The Cornell Waste Management Institute recommends a target C:N ratio of roughly 30:1 for optimal hot composting. While you do not need to calculate this down to the exact gram, following a volumetric rule of thumb will save your pile:
- Add 3 parts Browns to 1 part Greens: For every bucket of kitchen scraps or fresh grass clippings you add, cover it with three buckets of dry, carbon-rich materials.
- Excellent Browns (Carbon): Shredded corrugated cardboard, dry autumn leaves, straw, pine needles, and sawdust (use sparingly).
- Excellent Greens (Nitrogen): Fruit and vegetable peels, coffee grounds, tea bags, and fresh plant trimmings.
Pro Tip: Keep a dedicated bin of dry leaves or shredded paper next to your compost tumbler or bin. Every time you dump your kitchen scrap bucket, immediately cover it with a thick layer of browns to maintain the ratio and deter fruit flies.
Mistake 2: Mismanaging Moisture Levels
Microbes need water to transport nutrients and facilitate cellular processes. A compost pile that is too dry will simply preserve the organic matter rather than decompose it. Conversely, a pile that is too wet will fill the air pockets with water, driving out oxygen and creating anaerobic conditions that lead to putrid, rotten-egg odors.
The Fix: The Wrung-Out Sponge Test
Your compost should ideally maintain a moisture content between 40% and 60%. The easiest way to test this without expensive laboratory equipment is the 'wrung-out sponge' test.
- If it is too dry: The material will feel dusty and crumbly. Use a garden hose with a spray nozzle to gently water the pile as you turn it. Aim for a uniform dampness, not a muddy soup.
- If it is too wet: Squeeze a handful of compost (wearing gloves). If water drips out freely, it is too wet. Immediately mix in highly absorbent, dry brown materials like shredded newspaper, dry peat moss, or wood shavings to wick away the excess moisture.
Mistake 3: Starving the Pile of Oxygen
Hot composting relies on aerobic bacteria, which require a steady supply of oxygen to break down organic matter efficiently and generate the high temperatures (130°F to 160°F) needed to kill weed seeds and pathogens. When a pile is left unturned, the center becomes compacted, oxygen is depleted, and anaerobic bacteria take over, producing methane and hydrogen sulfide gases.
The Fix: Strategic Aeration and Bulking Agents
To keep oxygen flowing through the core of your pile, you must physically introduce air.
- Turn the Pile: Use a pitchfork or a specialized compost aerator tool to turn the pile every 3 to 7 days during the active heating phase. Move the outer, cooler materials to the center, and bring the hot center materials to the outside.
- Use Bulking Agents: When building your pile, mix in structural materials that resist compaction. Wood chips, small twigs, and chopped corn cobs create permanent air channels within the pile, allowing passive airflow even between turnings.
- Size Matters: For a pile to retain enough heat while allowing airflow, the ideal minimum dimensions are 3 feet wide by 3 feet long by 3 feet high (1 cubic yard).
Mistake 4: Inviting Pests with the Wrong Ingredients
One of the fastest ways to abandon composting is to wake up to a bin raided by raccoons, rats, or neighborhood dogs. Pests are highly opportunistic and are drawn to the scent of proteins, fats, and dairy products.
The Fix: Strict Dietary Restrictions and Physical Barriers
The University of California Agriculture and Natural Resources division strongly advises against composting animal products in standard backyard bins. To pest-proof your compost:
- Never Add: Meat, bones, fish, dairy products (cheese, milk, butter), oils, grease, or pet waste (dog/cat feces can contain harmful parasites and pathogens).
- Bury Your Scraps: When adding fresh kitchen greens, dig a small trench in the center of the pile, deposit the scraps, and bury them under at least 8 to 10 inches of brown material or finished compost. This acts as a bio-filter to trap odors.
- Hardware Cloth: If rodents are a persistent issue, line the bottom and lower sides of your wooden compost bin with 1/4-inch galvanized hardware cloth. This prevents burrowing while still allowing beneficial earthworms and soil microbes to enter.
Mistake 5: Failing to Shred and Chop Materials
Tossing whole watermelons, intact branches, or unshredded newspapers into a bin guarantees a frustratingly slow decomposition process. Microbes can only attack organic matter from the outside in. The less surface area exposed, the longer the breakdown will take.
The Fix: Increase the Surface Area
Before adding materials to your bin, take a few extra minutes to process them:
- Chop Kitchen Scraps: Roughly chop large fruit rinds, melons, and cabbages with a kitchen knife or machete before tossing them in.
- Mow Over Leaves: Instead of bagging dry autumn leaves, run your lawnmower over them once or twice. Shredded leaves break down in a fraction of the time and are less likely to mat together into impenetrable, water-shedding layers.
- Shred Cardboard: Corrugated cardboard is an excellent brown material, but it must be stripped of plastic tape and torn into 1-inch strips or run through a heavy-duty paper shredder.
Composting Troubleshooting Chart
Use the table below to quickly diagnose and correct issues as they arise in your compost bin or tumbler.
| Symptom | Probable Cause | Immediate Fix |
|---|---|---|
| Foul, rotten egg or ammonia odor | Too much nitrogen (greens); lack of oxygen; too wet | Turn the pile aggressively; mix in 2 parts dry shredded cardboard or straw; leave lid off to dry slightly. |
| Pile is cool and not breaking down | Too much carbon (browns); too dry; pile is too small | Add nitrogen-rich greens (grass clippings, blood meal); water evenly; ensure pile is at least 3x3x3 feet. |
| Swarm of fruit flies | Exposed kitchen scraps; pile is too wet | Bury new scraps under 10 inches of browns; cover the top of the pile with a layer of dry soil or finished compost. |
| Wood ashes or lime added; smells like ammonia | High pH causing nitrogen to off-gas as ammonia | Stop adding ashes or lime; mix in acidic browns like pine needles or oak leaves to buffer the pH. |
| Center of pile is dry and ashy | Fire ash buildup or severe lack of moisture | Douse the center with water while turning; ensure you are not adding excessive fireplace ash (limit to 1 cup per layer). |
Conclusion: Patience and Observation
Composting is a forgiving process. Even if you make mistakes, organic matter will eventually decompose—it might just take two years instead of two months. By correcting these five common errors—balancing your C:N ratio, managing moisture, ensuring aeration, excluding pests, and increasing surface area—you transition from a passive waste hoarder to an active soil builder. Observe your pile regularly, use your senses to check for earthy smells and sponge-like moisture, and enjoy the incredible reward of harvesting your own black gold for your vegetable and flower gardens.

