
Gardening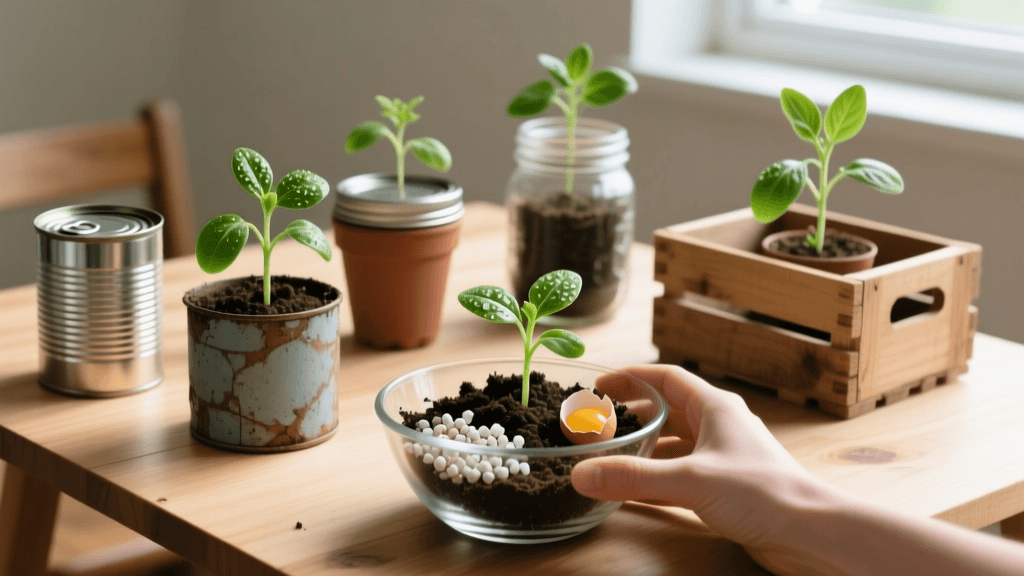
Budget DIY Container Gardening: Upcycling & Soil Mix
The Rising Cost of Gardening and the DIY Alternative
Container gardening is one of the most accessible ways to grow fresh vegetables, herbs, and vibrant flowers, especially for those with limited yard space or poor native soil. However, a quick trip to the local garden center can quickly derail a tight budget. Between purchasing decorative ceramic or plastic pots, bagged potting soil, specialized fertilizers, and starter plants, the costs can easily exceed hundreds of dollars before you even plant your first seed. Fortunately, gardening does not have to be an expensive hobby. By embracing budget-friendly DIY solutions, you can upcycle household items into highly functional planters and mix your own premium potting soil for a fraction of the retail price.
According to the University of Minnesota Extension, container gardening offers unparalleled control over soil quality and sunlight exposure, making it an ideal method for maximizing yields in small spaces. When you combine this flexibility with frugal, upcycled materials, you create a sustainable, highly productive garden that costs almost nothing to establish. In this comprehensive guide, we will explore how to source free containers, properly prepare them for planting, and formulate a high-performance DIY potting mix that rivals expensive commercial blends.
Sourcing Free and Low-Cost Containers
The most significant upfront cost in container gardening is the vessels themselves. While glazed terracotta and resin planters are aesthetically pleasing, they are entirely unnecessary for growing healthy plants. Plants care about root volume, drainage, and soil quality—not the exterior decor of their home.
The Magic of Food-Grade Buckets
Five-gallon food-grade plastic buckets are the undisputed champions of budget container gardening. These buckets are incredibly durable, UV-resistant, and provide ample depth for deep-rooting crops like tomatoes, peppers, and eggplants. You can often acquire these buckets for free or for a nominal fee (usually under $2) from local bakeries, restaurants, delis, or grocery stores. These businesses receive ingredients like frosting, pickles, sauces, and dough in these buckets and typically pay to have them hauled away as waste. Always ask for buckets that previously held food-safe items, and avoid buckets that were used for industrial chemicals, paint, or cleaning supplies.
Thrift Store and Garage Sale Treasures
For shallow-rooted herbs, leafy greens, and alpine strawberries, look no further than your local thrift store, flea market, or garage sale. Excellent upcycled container options include:
- Enamel Colanders: Built-in drainage makes these perfect for lettuce and spinach.
- Large Tin Cans: Ideal for individual herb plants like basil, cilantro, and parsley.
- Wooden Wine Crates: Excellent for larger, shallow plantings when lined with landscaping fabric.
- Old Gutters: Can be mounted on fences to create vertical strawberry or herb gardens.
- Plastic Storage Totes: Opaque totes can be cut down to create wide, raised-bed-style container gardens for root vegetables like carrots and radishes.
Preparing Upcycled Containers for Planting
Before you add soil to your upcycled finds, you must ensure they are safe and properly configured to support plant life. The most critical factor in container gardening is drainage. Without adequate escape routes for excess water, roots will quickly succumb to rot and fungal diseases.
Drilling Drainage Holes
Every container must have drainage holes at the bottom. For plastic buckets and totes, use a power drill equipped with a 1/2-inch spade bit or hole saw to create four to six evenly spaced holes in the base. For metal tin cans or enamel colanders, use a stepped drill bit or a hammer and a large masonry nail to puncture the bottom. If you are using wooden crates or wine boxes, line the interior with permeable landscaping fabric to prevent the soil from washing out through the slats while still allowing water to drain freely.
Sanitizing Second-Hand Pots
When reusing containers that previously held soil or were purchased from a thrift store, it is vital to sanitize them to eliminate lingering pathogens, fungal spores, or pest eggs. The University of Wisconsin-Madison Extension recommends washing used containers with a solution of one part household bleach to nine parts water. Scrub the interior thoroughly, let the solution sit for ten minutes, and rinse extremely well with clean water before adding your fresh DIY soil mix.
The Ultimate Budget DIY Potting Soil Mix
Store-bought potting soil is heavy, expensive, and often degrades in quality over time. Premium bagged mixes can cost upwards of $15 to $25 per cubic foot. By sourcing raw ingredients in bulk, you can mix a superior, well-aerated, and moisture-retentive growing medium for pennies on the dollar.
The 3-Part Budget Soil Recipe
This classic, budget-friendly soil recipe is heavily inspired by traditional square-foot gardening mixes but optimized for cost-efficiency. You will need three primary ingredients, mixed in equal parts by volume (1:1:1 ratio):
- Coconut Coir (Moisture Retention): Instead of buying expensive bales of peat moss, purchase compressed coconut coir bricks. Coir is a sustainable byproduct of the coconut industry, and a single $15 brick expands to yield roughly 8 to 10 gallons of fluffy, moisture-retentive base material. Simply soak the brick in a wheelbarrow or large tote with warm water for 30 minutes before use.
- Coarse Perlite or Rice Hulls (Aeration and Drainage): Plant roots require oxygen just as much as they require water. Perlite provides essential air pockets in the soil. If perlite is too expensive in your area, parboiled rice hulls are an incredibly cheap, renewable alternative that offers identical drainage benefits and slowly breaks down to feed the soil.
- Compost (Nutrients and Biology): This is the engine of your soil. Instead of buying bagged compost, check with your local municipal waste management facility or city dump. Many cities offer free or heavily discounted compost made from local yard waste to residents. Sift this compost through a 1/4-inch hardware cloth screen to remove large twigs and debris before adding it to your mix.
Cost Breakdown: Store-Bought vs. DIY Soil
To illustrate the massive savings generated by mixing your own soil, consider the cost comparison below for producing roughly 15 gallons of potting mix (enough to fill three 5-gallon buckets).
| Soil Type | Ingredients Required | Estimated Total Cost | Cost Per Gallon |
|---|---|---|---|
| Premium Store-Bought Potting Mix | Three 16-quart bags | $35.00 - $45.00 | $2.33 - $3.00 |
| Budget DIY Coir/Compost Mix | 1 Coir Brick, 1 bag Perlite, Free Municipal Compost | $12.00 - $16.00 | $0.80 - $1.06 |
As the data demonstrates, the DIY approach cuts your soil expenses by more than 60%. Furthermore, the raw materials left over from your initial purchase can be stored dry and used for years to come, compounding your savings over subsequent gardening seasons.
Best Crops for Upcycled Container Gardens
Not all vegetables thrive in the same size containers. Matching the crop to the volume of your upcycled vessel is crucial for a bountiful harvest.
- 5-Gallon Buckets: Indeterminate tomatoes, bell peppers, cucumbers, bush beans, and dwarf fruit trees. Ensure you install a cheap bamboo stake or a DIY trellis made from cattle panels to support heavy vining crops.
- Shallow Tins and Colanders (1-2 Gallons): Basil, thyme, oregano, chives, radishes, and loose-leaf lettuce. These crops have shallow root systems and dry out quickly, making them perfect for smaller, repurposed kitchen items.
- Storage Totes and Wine Crates (10+ Gallons): Carrots, potatoes, garlic, and dense plantings of Swiss chard or kale. The wide surface area mimics a traditional raised bed, allowing for intensive, square-foot-style planting.
Budget-Friendly Fertilizer and Maintenance
Container plants rely entirely on the nutrients you provide, as their roots cannot wander into the surrounding earth to forage for food. While your DIY compost provides a great baseline of nutrition, heavy feeders like tomatoes and peppers will require supplemental feeding mid-season.
Rather than purchasing expensive liquid synthetic fertilizers, utilize budget-friendly organic alternatives. The Environmental Protection Agency (EPA) highly encourages home composting and the use of organic matter to enrich soil ecosystems. You can brew your own compost tea by steeping a few shovelfuls of compost in a bucket of water for 48 hours, stirring occasionally, and using the nutrient-rich liquid to water your plants. Additionally, saving and crushing eggshells provides a slow-release source of calcium, which is vital for preventing blossom end rot in tomatoes and peppers. Used coffee grounds can be lightly sprinkled on the soil surface to add nitrogen and deter certain pests, though they should be used sparingly to avoid altering the soil pH too drastically.
Conclusion
Building a thriving, abundant garden does not require a massive financial investment or an expansive backyard. By viewing everyday waste items like food-grade buckets, tin cans, and wooden crates as valuable gardening resources, you can drastically reduce your overhead costs. When paired with a highly effective, homemade potting soil mix utilizing coconut coir, perlite, and free municipal compost, your upcycled containers will outperform expensive store-bought setups. Embrace the DIY ethos, get creative with your container sourcing, and enjoy the deeply satisfying, budget-friendly harvest that follows.

