
Landscaping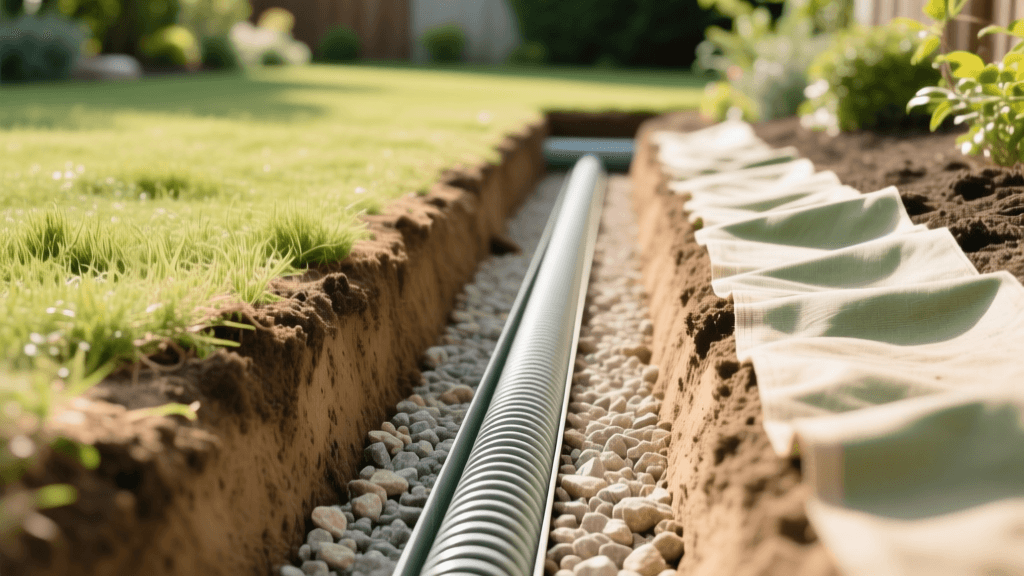
How to Build a French Drain for Yard Drainage Issues
Understanding the French Drain System
Standing water in your yard is more than just a nuisance; it is a significant threat to your home's foundation, your lawn's root systems, and your overall landscape design. When heavy rains saturate the soil, hydrostatic pressure builds up against basement walls, and grass roots suffocate from lack of oxygen. A French drain is a highly effective, time-tested landscaping solution designed to intercept groundwater and surface runoff, channeling it safely away from vulnerable areas.
At its core, a French drain consists of a gently sloped trench filled with gravel and a perforated pipe. Unlike solid pipes that only move water from a single entry point, a French drain captures water along its entire length. As water percolates through the soil and into the gravel bed, it seeps into the pipe and flows via gravity to a designated discharge area, such as a storm drain, a dry well, or a lower-lying portion of your property. This practical how-to guide will walk you through the exact steps, materials, and measurements required to install a professional-grade French drain in your own yard.
Tools and Materials Required
Before breaking ground, gather all necessary tools and materials. Having everything on hand will save you time and ensure the trench does not sit open and exposed to the elements longer than necessary.
- Tools: Spade shovel, trenching shovel, wheelbarrow, string line, line level, tape measure, utility knife, and a tamper.
- Pipe: 4-inch perforated drainage pipe (PVC or flexible corrugated).
- Gravel: 3/4-inch washed crushed stone (do not use pea gravel or unwashed stone).
- Fabric: Non-woven geotextile landscape fabric (minimum 3-ounce weight).
- Hardware: Landscape fabric staples, pipe fittings, and a pop-up emitter or splash block for the exit point.
Step-by-Step Installation Guide
Step 1: Plan the Route and Calculate the Slope
The success of a French drain relies entirely on gravity. You must identify where the water is pooling and determine the best path to divert it to a safe discharge zone. Once the route is mapped, you must calculate the slope. The industry standard for drainage pipe is a minimum 1% grade, which translates to a 1-inch drop for every 8 feet of pipe length.
Use wooden stakes and a string line with a line level to mark your route and verify the slope. Crucial Safety Step: Before you dig, call 811 (the national 'Call Before You Dig' hotline) at least a few days in advance. This free service will have local utility companies mark underground gas, water, and electrical lines to prevent catastrophic accidents.
Step 2: Dig the Trench
Using your spade and trenching shovel, dig a trench that is approximately 12 inches wide and 18 to 24 inches deep. The depth may vary depending on your specific water table and frost line, but 18 inches is generally sufficient for managing surface and shallow subsurface water. As you dig, continually check your string line to ensure you are maintaining the 1% downward slope toward the discharge point. Pile the excavated soil on a tarp to make backfilling and cleanup easier later.
Step 3: Line the Trench and Add Base Gravel
Line the entire trench with your non-woven geotextile landscape fabric. Leave at least 12 inches of excess fabric hanging over both sides of the trench; you will use this to wrap the gravel later. The fabric acts as a filter, preventing fine soil particles and clay from migrating into the gravel and clogging the pipe over time.
Once the fabric is in place, shovel a 2-inch to 3-inch base layer of 3/4-inch washed crushed stone into the bottom of the trench. Use a tamper to compact this base layer slightly, ensuring a stable bed for the pipe while maintaining your calculated slope.
Step 4: Lay the Perforated Pipe
Place your 4-inch perforated pipe on top of the gravel base. There is a common myth in landscaping that the holes in the pipe should face upward. However, civil engineers and drainage experts recommend placing the holes facing downward. When water rises from the saturated soil into the gravel bed, it easily enters the bottom of the pipe. If the holes face up, water must fill the trench to the top of the pipe before entering, and sediment falling through the gravel is more likely to drop directly into the pipe, causing clogs.
Connect pipe sections using appropriate couplings, and ensure the final exit point daylighting above ground is fitted with a pop-up emitter or a splash block to prevent erosion at the discharge zone.
Step 5: Cover, Fold, and Backfill
With the pipe in place, cover it with another 3 to 5 inches of washed gravel. The gravel should sit a few inches below the ground surface. Now, take the excess landscape fabric hanging over the edges and fold it over the top of the gravel, creating a complete 'burrito' wrap. Secure the overlapping fabric with landscape staples.
Finally, backfill the remaining few inches of the trench with the native soil you excavated earlier. If the drain is located in a lawn area, you can top-dress with topsoil and lay sod or scatter grass seed over the trench to seamlessly blend it back into your landscape.
Pipe Material Comparison: PVC vs. Corrugated
Choosing the right pipe is critical for the longevity of your drainage system. Below is a comparison of the two most common materials used in residential French drains.
| Feature | Rigid PVC (SDR 35 or Schedule 40) | Flexible Corrugated Pipe |
|---|---|---|
| Durability | Extremely high; resists crushing under heavy loads. | Moderate; can collapse under heavy soil pressure or vehicle traffic. |
| Flow Rate | Smooth interior walls allow for fast, unrestricted water flow. | Ridged interior slows water flow and traps sediment more easily. |
| Installation | Requires cutting and gluing fittings; more labor-intensive. | Highly flexible; easy to bend around curves without fittings. |
| Maintenance | Easy to snake and flush out with a sewer jetter. | Difficult to clean; jetters can catch on ridges and tear the pipe. |
| Cost | Higher material cost. | Lower material cost. |
Recommendation: While corrugated pipe is cheaper and easier to install, rigid PVC is the superior choice for long-term performance, especially if the drain will be located under a driveway or heavily trafficked area.
Common French Drain Mistakes to Avoid
Even with the best intentions, DIY landscapers often make critical errors that render their drainage systems useless within a few years. Avoid these common pitfalls:
- Using Pea Gravel: Pea gravel is round and smooth. It shifts easily and does not lock together, which can lead to soil erosion into the pipe. Always use angular, washed crushed stone.
- Using Woven Weed Barrier: Woven plastics designed to stop weeds will quickly clog with silt and block water from entering the gravel bed. You must use non-woven geotextile fabric, which allows water to pass through while filtering out soil.
- Ignoring the Exit Point: A French drain is useless if the water has nowhere to go. Discharging water directly against a hill or into a flat area will just create a new mud puddle. Use a pop-up emitter that opens only when water pressure builds, or route the pipe to a municipal storm drain (where local codes permit).
Maintenance and Long-Term Care
French drains are relatively low-maintenance, but they are not entirely 'set it and forget it.' Once a year, preferably in late autumn after the leaves have fallen and before the spring thaw, inspect your discharge point. Ensure the pop-up emitter is clear of debris, mud, and rodent nests.
If you notice the system is draining slowly, you can flush the pipe using a garden hose or a specialized sewer jetter. Insert the hose into the pipe at the highest accessible point and run it at full pressure to blast out any accumulated silt or biofilm. If you used rigid PVC, this process is highly effective; if you used corrugated pipe, use low pressure to avoid tearing the interior ridges.
Authoritative Guidance on Yard Drainage
Proper water management is a cornerstone of sustainable landscaping and structural home protection. According to the University of Minnesota Extension, managing surface water and subsurface drainage is critical in regions with heavy clay soils or high water tables. Their guidelines emphasize that regrading the soil immediately adjacent to the home (creating a 5% slope away from the foundation for the first 10 feet) is the first line of defense, with French drains serving as the vital secondary system for properties where natural grading is insufficient.
'A well-designed subsurface drainage system, such as a French drain, relieves hydrostatic pressure against foundation walls and prevents the saturation of landscape beds, ultimately protecting both the structural integrity of the home and the health of ornamental plants.' - University of Minnesota Extension, Yard and Garden Drainage Guidelines.
By following these precise measurements, utilizing the correct washed gravel and geotextile fabrics, and respecting the laws of gravity, you can permanently eliminate standing water and transform your soggy yard into a usable, thriving outdoor living space.

