
Landscaping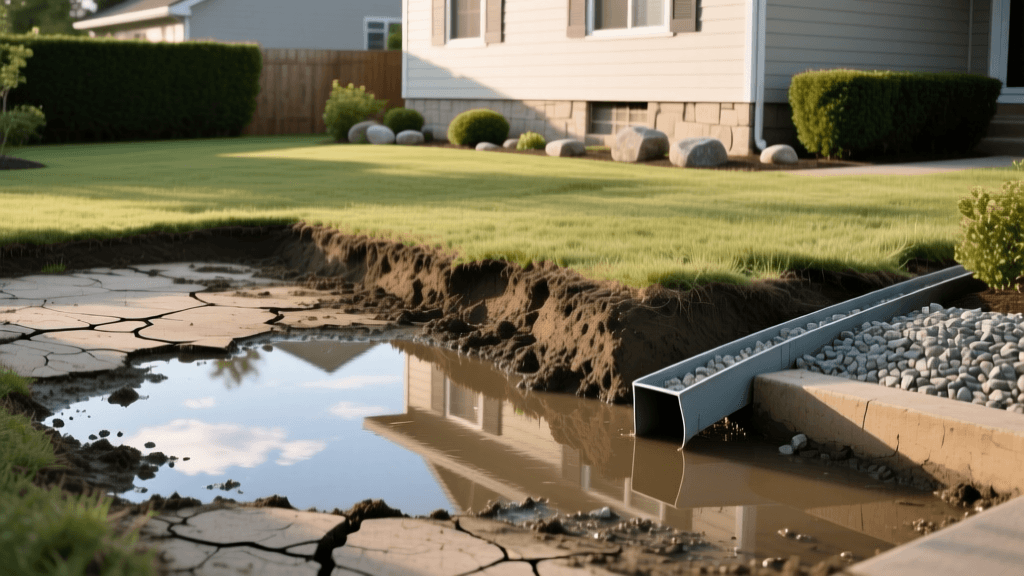
Diagnose and Fix Common Yard Drainage Problems Fast
The Hidden Dangers of Poor Yard Drainage
A beautiful landscape can quickly become a nightmare if water refuses to drain properly. Standing water in your yard is not merely an aesthetic nuisance; it is a severe threat to your property. Pooled water creates a prime breeding ground for mosquitoes, suffocates turfgrass roots leading to dead patches, and promotes the growth of destructive fungi. More critically, improper drainage can cause hydrostatic pressure to build up against your home's foundation, leading to cracked concrete, flooded basements, and thousands of dollars in structural repairs. Diagnosing the root cause of your yard drainage problems is the essential first step before investing in hardscaping or landscaping solutions.
Diagnosing Your Yard Drainage Problem
Before you rent a trencher or purchase hundreds of pounds of gravel, you must understand why water is accumulating. Water always follows the path of least resistance, and pooling usually occurs due to one of three main culprits: negative grading, compacted soil, or a high water table.
The Percolation Test
To determine if your soil is the bottleneck, perform a simple percolation test. Dig a hole approximately 12 inches deep and 12 inches wide in the problem area. Fill the hole with water and let it drain completely to saturate the surrounding soil. Refill the hole to the top and measure the water level with a ruler. Wait one hour and measure the drop in water level.
- Ideal Drainage: Water drops 2 to 4 inches per hour.
- Poor Drainage (Clay/Compacted): Water drops less than 1 inch per hour.
- Excessive Drainage (Sandy): Water drops more than 6 inches per hour.
If your soil falls into the poor drainage category, water is pooling simply because the ground cannot absorb it fast enough during heavy rainfall events. This requires mechanical intervention to move the water away from the area.
Authoritative Guidelines for Foundation Grading
The most common cause of severe drainage issues is improper grading around the home. Over time, soil settles, mulch decomposes, and landscaping projects alter the natural slope of the yard, often creating a negative grade that funnels water directly toward the foundation.
According to the University of Minnesota Extension, homes should have a positive surface grade of at least 5 percent to prevent water from seeping into basements and crawl spaces. This translates to a 6-inch drop in elevation over the first 10 feet extending outward from your foundation. If your yard does not meet this critical measurement, regrading must be your primary solution before attempting to install secondary drainage systems.
Top Drainage Solutions: Products and Costs
Once you have diagnosed the issue and verified your grading, you can select the appropriate drainage solution. Below are the most effective methods for resolving yard drainage problems, complete with specific product recommendations and cost estimates.
1. French Drains
A French drain is a subterranean trench filled with gravel and a perforated pipe that intercepts groundwater and surface water, redirecting it to a safe discharge point like a storm drain or daylighted hillside.
- Best For: Soggy lawns, retaining wall weeping, and intercepting groundwater.
- Materials: 4-inch ADS corrugated perforated pipe, Mirafi 500X non-woven landscape fabric, and 3/4-inch washed river rock.
- Estimated Cost: $10 to $30 per linear foot (DIY vs. Professional).
2. Dry Wells and Catch Basins
When you cannot daylight a pipe to a lower elevation, a dry well acts as an underground reservoir that collects water and allows it to slowly percolate into the surrounding subsoil. Catch basins are surface-level grates that capture heavy runoff before it floods the lawn.
- Best For: Downspout runoff and localized low spots where water pools.
- Materials: NDS Pro Series 12x12 Catch Basin, NDS Flo-Well 50-gallon Dry Well, and solid PVC pipe for connections.
- Estimated Cost: $300 to $800 per installation.
3. Grading and Swales
A swale is a shallow, broad, and vegetated ditch designed to slow down and direct surface water runoff. Combined with regrading, it is the most natural way to manage water flow.
- Best For: Large properties with gentle slopes and surface runoff issues.
- Materials: Topsoil, sod, or deep-rooted native plants (like Switchgrass or Joe-Pye Weed).
- Estimated Cost: $1,500 to $3,500 for professional regrading and swale creation.
Drainage Solutions Comparison Chart
| Solution | Best Application | Est. Cost (DIY/Pro) | Difficulty |
|---|---|---|---|
| French Drain | Subsurface water & soggy lawns | $10 - $30 / lin. ft. | Moderate |
| Dry Well | Downspout termination & low spots | $300 - $800 total | Moderate |
| Surface Swale | Redirecting surface runoff | $500 - $2,000 total | Easy |
| Foundation Regrading | Protecting home foundation | $1,500 - $3,500 total | Hard (Requires Machinery) |
Step-by-Step: Installing a French Drain
If your diagnosis points to subsurface water retention, a French drain is the gold standard. Follow these actionable steps to ensure a proper installation that will last for decades.
- Call 811 Before You Dig: Always contact your local utility locating service at least 48 hours before trenching to avoid striking underground gas, water, or electrical lines.
- Map the Route and Slope: Plan your trench from the wet area to the discharge point. Use a line level or laser level to ensure a minimum slope of 1/8 inch per foot (a 1% grade). Without this slope, water will sit stagnant inside the pipe.
- Dig the Trench: Excavate a trench approximately 12 to 18 inches deep and 9 to 12 inches wide. If you are hitting heavy clay, consider renting a walk-behind trencher to save your back and time.
- Line with Landscape Fabric: Drape a high-quality non-woven geotextile fabric (like Mirafi 500X) over the trench, leaving excess fabric on both sides. This is a critical step; it prevents fine soil particles from infiltrating the gravel and clogging the pipe over time.
- Add Base Gravel: Shovel a 2-inch layer of 3/4-inch washed drainage gravel into the bottom of the trench. Do not use pea gravel or crushed limestone, as they can compact or alter soil pH.
- Lay the Perforated Pipe: Place the 4-inch perforated pipe on top of the gravel base. Crucial Tip: Always lay the pipe with the perforations facing down. Water naturally rises, and entering through the bottom holes prevents the pipe from filling with sediment.
- Cover and Fold: Cover the pipe with another 3 to 4 inches of washed gravel. Fold the excess landscape fabric over the top of the gravel, creating a complete 'burrito' wrap that locks out dirt.
- Backfill and Restore: Top off the trench with native topsoil and lay new sod or sow grass seed to blend the repair seamlessly into your landscape.
Long-Term Maintenance and Care
Installing drainage solutions is only half the battle; maintaining them ensures your yard stays dry for years to come. Inspect your catch basins and downspout extensions every autumn and spring, clearing out leaves, twigs, and debris that can cause blockages. If you have exposed gravel in a French drain or dry well, use a leaf blower to remove organic matter before it decomposes into soil. Finally, avoid driving heavy machinery or parking vehicles over your drainage lines, as the weight can crush corrugated pipes and collapse gravel beds, rendering the system useless. By combining proper diagnosis, authoritative grading standards, and high-quality materials, you can permanently eliminate standing water and protect your landscape investment.

