
Gardening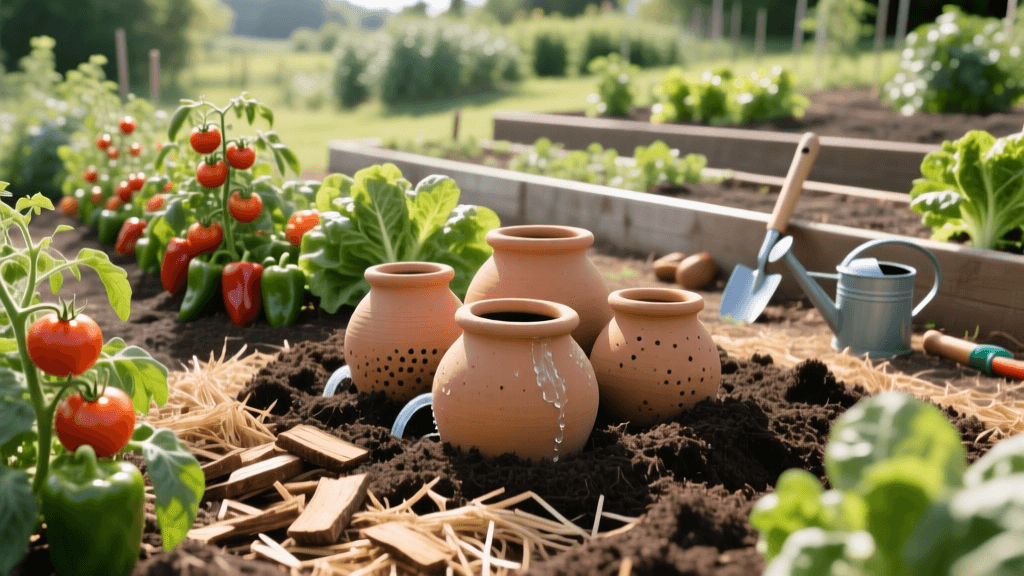
Drought-Proof Vegetable Gardens Using Ollas And Mulch
The Growing Challenge of Drought in Vegetable Gardening
As climate patterns shift and municipal water restrictions become increasingly common across the globe, home gardeners are facing a harsh reality: traditional overhead watering is no longer sustainable. Vegetable gardens are notoriously thirsty, with crops like tomatoes, squash, and melons requiring consistent moisture to produce viable yields. When drought conditions strike, gardeners are often forced to choose between letting their crops wither or facing exorbitant water bills and potential fines for violating local conservation ordinances.
According to the EPA WaterSense program, outdoor water use accounts for nearly 30% of total household water consumption, and in arid regions, that number can climb as high as 60%. Much of this water is lost to evaporation, wind drift, and surface runoff before it ever reaches the root zone of your plants. To cultivate a resilient, water-wise garden, we must look away from modern sprinkler systems and instead turn to ancient, highly efficient irrigation techniques paired with modern soil science.
What Are Ollas? The Ancient Secret to Water-Wise Irrigation
An olla (pronounced 'oy-yah') is an unglazed, porous terracotta clay pot that is buried in the soil next to your plants, with only its neck exposed above the surface. You fill the olla with water, and it slowly seeps through the microscopic pores of the clay directly into the surrounding soil. This method of irrigation has been used for thousands of years, dating back to ancient North African and Asian agricultural practices, and it remains one of the most water-efficient growing methods known to humanity.
The Science of Soil Moisture Tension
Ollas do not leak; they respond to soil moisture tension. When the soil around the olla is saturated, the water inside the pot stays put. However, as plant roots consume moisture and the soil begins to dry out, a negative pressure (suction) is created. This tension pulls the water through the porous clay walls exactly when and where the plants need it. Because the water is delivered below the soil surface, evaporation is virtually eliminated, and weed seeds on the surface are deprived of the moisture they need to germinate.
How to Select, Install, and Maintain Ollas
Transitioning to an olla irrigation system requires some upfront planning, but the long-term water savings and labor reduction are immense. Here is how to implement this system in your raised beds or in-ground garden.
Sizing and Spacing
Ollas come in various sizes, typically ranging from half a gallon to three gallons. A standard 1-gallon olla will irrigate a circular area with a diameter of roughly 18 to 24 inches. For larger raised beds, you will need to space your ollas every 2 to 3 feet to ensure overlapping zones of hydration. When planting, place your seeds or transplants within 6 to 12 inches of the buried olla so their roots can easily locate the moisture source.
Step-by-Step Installation
- Dig the Hole: Dig a hole slightly wider than the olla, deep enough so that only the top inch or two of the neck remains above the soil line. This prevents soil and mulch from falling into the water reservoir.
- Set the Olla: Place the olla in the hole and backfill the surrounding soil, tamping it down gently to ensure good contact between the soil and the clay walls. Poor soil contact will reduce the water transfer rate.
- Plant Your Crops: Plant your drought-tolerant vegetables around the olla, keeping heavy feeders like tomatoes and peppers closest to the water source.
- Fill and Cap: Fill the olla with water using a hose or watering can. Always use a tight-fitting lid (a terracotta saucer, a flat stone, or a specialized cork) to prevent mosquito breeding and reduce surface evaporation.
Cost Analysis and DIY Options
Commercially crafted ollas typically cost between $20 and $45 each, depending on size and aesthetic design. While this is an investment, the reduction in your water bill and the elimination of daily hand-watering quickly offset the cost. For budget-conscious gardeners, you can create a DIY olla by taking two standard unglazed terracotta pots, plugging the drainage hole of one with a cork or waterproof silicone, gluing them together rim-to-rim, and burying the assembly.
Best Drought-Tolerant Vegetables for Olla Systems
While ollas can be used for almost any crop, pairing them with naturally drought-resilient vegetables maximizes your water-wise efforts. Research from Colorado State University Extension highlights that selecting crops with deeper root systems and lower transpiration rates is key to surviving prolonged dry spells. Below is a comparison chart of ideal crops for olla irrigation.
| Vegetable Crop | Root Depth Profile | Recommended Olla Spacing | Drought Tolerance Rating |
|---|---|---|---|
| Tomatoes (Indeterminate) | Deep (36+ inches) | 24 - 30 inches apart | Moderate to High |
| Hot Peppers | Medium (18 - 24 inches) | 18 - 24 inches apart | High |
| Swiss Chard | Shallow to Medium (12 - 18 inches) | 12 - 18 inches apart | Moderate |
| Bush Beans | Shallow (12 - 18 inches) | 12 - 18 inches apart | High |
| Okra | Deep (36+ inches) | 24 - 36 inches apart | Very High |
| Eggplant | Medium to Deep (24 - 36 inches) | 24 inches apart | High |
The Perfect Partner: Deep Organic Mulching
An olla system is incredibly efficient, but its effectiveness is dramatically amplified when paired with a thick layer of organic mulch. Mulch acts as an insulating barrier, keeping the soil temperature cool and further preventing any residual subsurface moisture from escaping into the atmosphere. As noted by Oregon State University Extension, applying 2 to 4 inches of organic mulch in vegetable gardens can reduce summer water needs by up to 50% while simultaneously suppressing weed growth and adding vital organic matter to the soil as it decomposes.
Choosing the Right Mulch for Water Retention
Not all mulches are created equal when it comes to drought-proofing. Here is a breakdown of the best materials for water-wise vegetable beds:
- Straw (Not Hay): Straw is lightweight, easy to spread, and allows water to penetrate easily. It is excellent for insulating the soil around shallow-rooted crops like beans and chard. Ensure you buy certified weed-free straw to avoid introducing unwanted seeds to your garden.
- Shredded Leaves: A fantastic, free resource in the autumn. Shredded leaves break down relatively quickly, feeding the soil microbiome. They form a dense mat that is highly effective at blocking evaporation, though they should be applied after the soil has warmed in late spring.
- Arborist Wood Chips: Best used on garden pathways or around deep-rooted, perennial edibles like asparagus and artichokes. Fresh wood chips can temporarily tie up nitrogen at the soil surface, so they are less ideal for direct contact with heavy-feeding annual vegetables unless composted first.
- Compost: While technically a soil amendment, a 2-inch top-dressing of finished compost acts as a mulch that holds an incredible amount of water—up to 20 times its weight—while slowly releasing nutrients to your plants.
Seasonal Maintenance and Winterization
To ensure your olla irrigation system lasts for many growing seasons, proper maintenance is required. Terracotta is fragile and susceptible to cracking when water freezes and expands inside the pores of the clay.
End-of-Season Care
As your growing season concludes and the first hard frost approaches, it is vital to winterize your ollas. Stop filling them with water at least a week before the expected freeze to allow the surrounding soil to dry out slightly. Once the garden is cleared, carefully dig around the ollas and lift them out of the ground. Scrub the exterior with a stiff brush and a 10% white vinegar solution to remove mineral deposits and soil-borne pathogens. Store them in a dry, frost-free location like a garage or shed until spring.
Dealing with Mineral Buildup
If you live in an area with hard water, the microscopic pores of your ollas will eventually become clogged with calcium and magnesium deposits, reducing their water-seeping efficiency. To remedy this, soak your empty ollas in a large tub of water mixed with one part white vinegar to three parts water for 24 hours once a year. Rinse them thoroughly before reinstalling them in your garden beds.
By combining the ancient, targeted hydration of terracotta ollas with the insulating power of deep organic mulch, you can cultivate a lush, highly productive vegetable garden even in the harshest drought conditions. This water-wise approach not only conserves a precious natural resource but also fosters deeper, healthier root systems and a more resilient garden ecosystem overall.

