
Gardening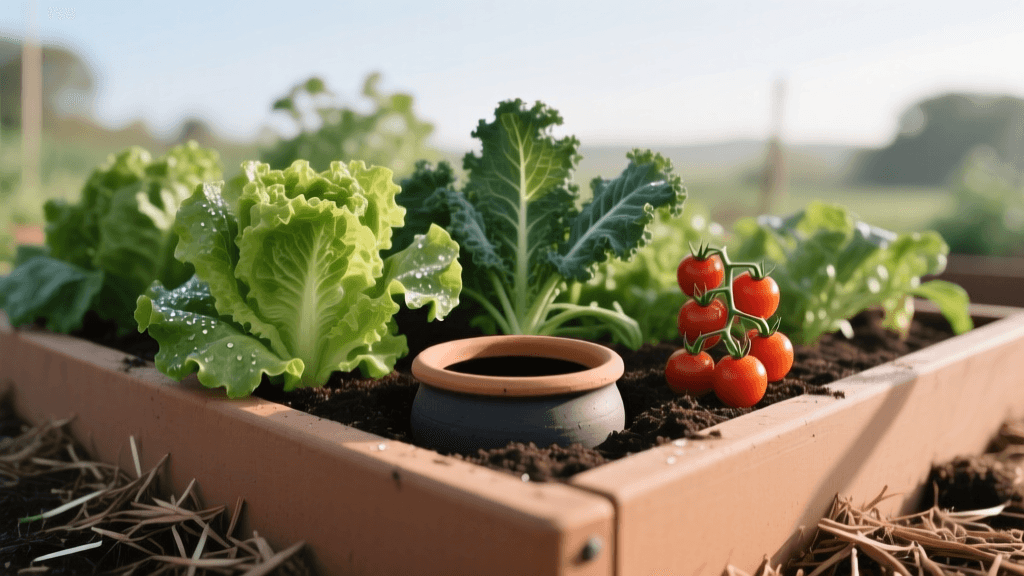
Drought-Proof Vegetable Gardening With Wicking Beds And Ollas
The Growing Need for Water-Wise Vegetable Gardening
As climate patterns shift and summer droughts become more frequent and severe, traditional vegetable gardening methods are facing unprecedented challenges. Overhead watering and shallow drip lines often lead to massive water loss through evaporation and runoff. According to the EPA WaterSense program, outdoor water use accounts for nearly 30% of total household water consumption, with a significant portion wasted due to inefficient irrigation practices. For home gardeners looking to maintain a bountiful harvest while adhering to strict municipal water restrictions, adopting water-wise and drought-resistant gardening techniques is no longer optional—it is essential.
Two of the most highly effective, water-conserving methods for vegetable production are wicking beds and olla (clay pot) irrigation. Both systems deliver water directly to the root zone, virtually eliminating surface evaporation and encouraging deep, resilient root growth. In this comprehensive guide, we will explore the science, construction, and implementation of these two ancient yet profoundly modern drought solutions.
Wicking Beds: The Ultimate Drought-Resistant Raised Bed
A wicking bed is a specialized raised garden bed that features a built-in water reservoir at its base. Instead of watering from the top down, water is introduced into the reservoir and travels upward through the soil via capillary action. This means the soil remains consistently moist at the root level, while the surface stays relatively dry, which drastically reduces weed germination and evaporation.
How to Build a 4x8 Wicking Bed
Building a wicking bed requires precise layering to ensure proper hydrology. Here is a step-by-step guide with material estimates and costs for a standard 4-foot by 8-foot bed:
- The Frame and Liner: Construct a sturdy frame using untreated cedar or composite lumber. Because the bed will hold a heavy water reservoir, ensure the corners are reinforced. Line the entire interior with a 45-mil EPDM pond liner to make it completely watertight. Estimated cost: $150 - $200.
- The Water Reservoir: Add a 4-inch layer of 3/4-inch crushed gravel (avoid rounded pea gravel, as it does not wick well). Lay a 4-inch diameter PVC pipe vertically in one corner, extending from the gravel layer to a few inches above the soil line. This is your fill pipe. Estimated cost: $40.
- The Separation Layer: Place a layer of permeable geotextile landscape fabric over the gravel. This prevents the soil from washing down into the reservoir while allowing water to wick upward.
- The Soil Mix: Fill the bed with 12 to 14 inches of a high-quality, moisture-retentive potting mix. A blend of 40% compost, 40% coco coir (which holds water exceptionally well), and 20% perlite or pumice is ideal. Estimated cost: $100 - $150.
- The Overflow Valve: Drill a 1/2-inch hole in the side of the bed liner, exactly at the top of the gravel layer, and insert a bulkhead fitting. This prevents the reservoir from overfilling and drowning your plants during heavy rainstorms.
Once constructed, a wicking bed typically only needs to be filled via the PVC pipe once every 5 to 7 days, even in peak summer heat, using roughly 50% less water than traditional surface watering.
Olla Irrigation: Ancient Clay Pot Technology
Ollas (pronounced 'oy-yahs') are unglazed, porous terracotta vessels that have been used for subsurface irrigation for thousands of years. When buried in the garden soil and filled with water, the clay acts as a semi-permeable membrane. Water seeps out of the olla only when the surrounding soil becomes dry, driven by soil moisture tension. If the soil is wet, the seepage stops automatically, making it a perfectly self-regulating, zero-waste irrigation system.
Sourcing and Installing Ollas
You can purchase purpose-made garden ollas from specialty ceramicists or online retailers, typically ranging from $15 to $40 per vessel depending on the size (usually 1 to 3 gallons). Alternatively, you can upcycle standard unglazed terracotta nursery pots by plugging the drainage hole with a wine cork and sealing it with waterproof silicone.
Installation Steps:
- Spacing: Bury the ollas in the center of your planting area, leaving the neck exposed above the soil line. A standard 1-gallon olla will effectively water a 3-foot diameter circle. Space them 18 to 24 inches apart for dense vegetable plantings.
- Planting: Plant your vegetable transplants or seeds within 6 to 12 inches of the buried olla. As the roots grow, they will sense the moisture gradient and wrap themselves around the clay pot, drawing water exactly when they need it.
- Filling: Fill the ollas with water every 2 to 4 days. Always keep the lid on the olla to prevent mosquitoes from breeding and to stop surface evaporation from the water inside the pot.
Subsurface irrigation methods like ollas and wicking beds drastically reduce the humidity around plant foliage, which in turn significantly lowers the incidence of fungal diseases like powdery mildew and blight.
System Comparison: Wicking Beds vs. Ollas vs. Drip Irrigation
Choosing the right water-wise system depends on your budget, garden layout, and local climate. The Penn State Extension highlights that while drip irrigation is highly efficient, subsurface methods often outperform it in extreme heat. Below is a comparison chart to help you decide.
| Feature | Wicking Beds | Olla Irrigation | Standard Drip Lines |
|---|---|---|---|
| Initial Setup Cost | High ($200+ per bed) | Medium ($15-$40 per pot) | Low ($50-$100 per zone) |
| Water Efficiency | Extremely High (Up to 80% savings) | Extremely High (Up to 70% savings) | High (Up to 50% savings) |
| Maintenance | Low (Annual soil top-dressing) | Medium (Frequent filling, winter storage) | High (Checking for clogs, rodent damage) |
| Best Use Case | Dense raised beds, urban patios | In-ground rows, container gardening | Large scale row crops, orchards |
| Evaporation Loss | Near Zero | Near Zero | Low to Moderate (if surface exposed) |
Soil Preparation and Mulching for Maximum Moisture Retention
Even the most advanced irrigation systems cannot compensate for poor soil structure. To truly drought-proof your garden, you must build soil that acts like a sponge. The University of California Agriculture and Natural Resources (UC ANR) strongly recommends amending soils with organic matter and utilizing heavy mulch layers to combat drought stress.
The Power of Biochar and Compost
Incorporate 2 to 3 inches of high-quality compost into your beds annually. Compost increases the soil's water-holding capacity by up to 20%. Additionally, consider adding horticultural biochar. Biochar is a highly porous form of charcoal that provides microscopic habitats for beneficial soil microbes and can hold up to five times its weight in water, slowly releasing it to plant roots during dry spells.
Mulching Strategies
Never leave your soil bare. A bare soil surface can lose up to an inch of water per week to evaporation. Apply a 3 to 4-inch layer of organic mulch over all exposed soil. For vegetable gardens, seed-free straw, shredded leaves, or grass clippings (untreated with herbicides) are excellent choices. For perennial drought-tolerant herbs and flowers, arborist wood chips provide long-lasting coverage and slowly break down to feed the soil food web.
Selecting Drought-Tolerant Vegetables
Pairing your water-wise irrigation systems with naturally drought-resistant crops will guarantee a successful harvest even during municipal watering bans. While leafy greens like lettuce and spinach will bolt and turn bitter under drought stress, many warm-season crops thrive in low-water environments once established.
- Cowpeas and Black-Eyed Peas: These legumes are incredibly heat and drought-tolerant. They also fix nitrogen in the soil, improving fertility for future plantings.
- Okra: With its deep taproot, okra can access moisture far below the surface and will continue to produce pods in temperatures exceeding 100°F.
- Swiss Chard: Unlike most leafy greens, chard has a robust root system that allows it to survive dry periods, wilting slightly during the heat of the day but recovering beautifully by evening.
- Cherry Tomatoes: While large heirloom tomatoes require consistent moisture to prevent blossom end rot, smaller cherry and grape varieties are much more resilient and will concentrate their sugars when slightly water-stressed, resulting in a sweeter fruit.
- Armenian Cucumbers: Technically a melon, this crop thrives in blistering heat and requires significantly less water than traditional pickling or slicing cucumbers.
Conclusion
Drought conditions do not have to spell the end of your home food production. By shifting away from outdated, water-wasting overhead sprinklers and embracing the physics of capillary action and soil moisture tension, you can cultivate a lush, productive garden. Whether you invest the time and capital into building a high-efficiency wicking bed or bury a few inexpensive terracotta ollas among your tomato plants, these water-wise strategies will save you money, conserve vital municipal water resources, and build a more resilient garden ecosystem for years to come.

