
Landscaping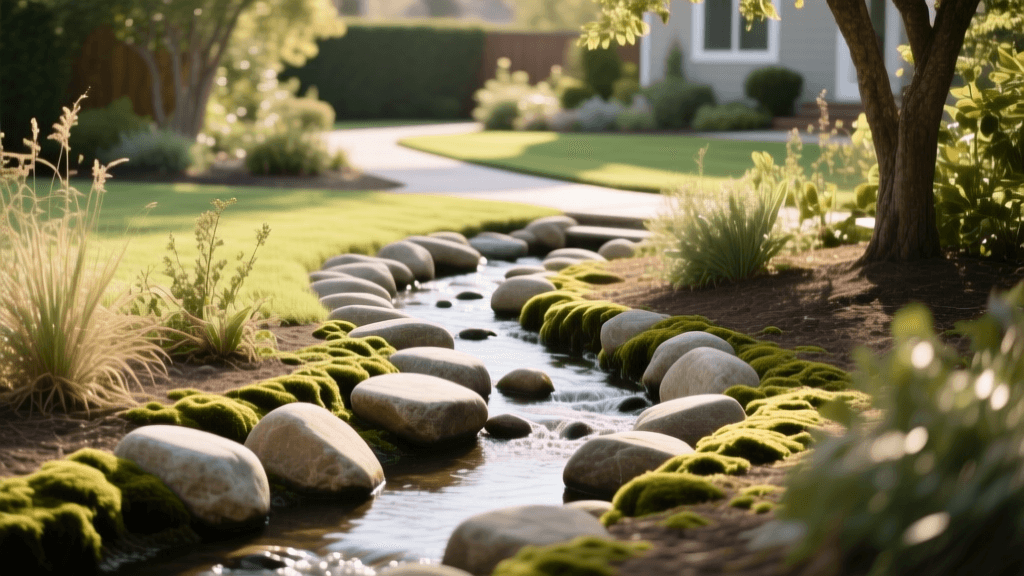
Expert Guide to Building a Dry Creek Bed for Drainage
Transforming Yard Drainage with a Dry Creek Bed
Standing water, washed-out mulch, and eroded topsoil are common nightmares for homeowners dealing with poor yard drainage. While French drains are a popular subsurface solution, they lack aesthetic appeal and can clog over time with sediment and root intrusion. Enter the dry creek bed: a highly effective, visually striking hardscaping feature that mimics natural waterways to manage stormwater runoff. As a senior landscaping expert, I have designed and installed dozens of dry stream beds. In this comprehensive guide, I will share the best practices, precise measurements, and material secrets to ensure your dry creek bed functions flawlessly and elevates your curb appeal.
The Science of Sizing and Slope
The most common mistake DIYers make is digging a shallow, uniform trench that looks like a scar across the lawn. A natural-looking and hydraulically efficient dry creek bed requires careful planning regarding slope, width, and depth.
Calculating the Grade
Water needs gravity to move. For a dry creek bed to effectively channel water away from your foundation or low-lying garden beds, you must maintain a minimum slope of 1 inch of drop per 10 feet of length (roughly a 1% grade). If your yard is exceptionally flat, you may need to incorporate a dry well at the terminus or tie the bed into an existing storm drain. Use a line level or a laser level to stake out your grade before breaking ground.
Width-to-Depth Ratio
Natural streams are rarely deep, narrow V-shapes; they are wide and meandering. Aim for a width-to-depth ratio of 2:1 or 3:1. For example, if your trench is 2 feet deep, it should be 4 to 6 feet wide. This ratio slows down water velocity during heavy downpours, reducing the risk of the water overtopping the banks and causing further erosion.
Materials and Cost Breakdown
Selecting the right materials is critical for both structural integrity and visual appeal. You will need a combination of boulders, cobbles, and river rock, along with heavy-duty landscape fabric. Avoid using cheap, woven weed barrier cloth from big-box stores; it will tear under the weight of the rocks and impede water percolation.
| Material | Size / Specification | Purpose in the Creek Bed | Estimated Cost |
|---|---|---|---|
| Non-Woven Geotextile Fabric | 4 oz to 6 oz weight | Prevents soil migration while allowing water to drain into the subsoil. | $0.50 - $1.00 / sq ft |
| Fieldstone Boulders | 12 to 24 inches | Acts as structural anchors and creates natural check dams to slow water. | $150 - $250 / ton |
| Cobble Stone | 3 to 5 inches | Lines the banks and fills gaps between boulders for a natural transition. | $120 - $180 / ton |
| River Rock | 1 to 3 inches | Fills the main channel, providing a smooth bed for water to flow over. | $100 - $150 / ton |
Note: For an average 50-foot long DIY dry creek bed, expect to spend between $800 and $1,500 on materials. Professional installation typically ranges from $30 to $50 per linear foot, bringing a 50-foot project to $1,500 - $2,500.
Step-by-Step Installation Best Practices
Step 1: Excavation and Meandering
Mark your path using landscaping spray paint. Avoid straight lines; incorporate gentle S-curves to mimic nature and slow water velocity. Dig your trench to the planned depth, ensuring you maintain your 1-inch per 10 feet slope. Create slight mounding on the outer edges of the curves to act as natural berms. If you encounter heavy clay soil during excavation, consider scarifying the bottom of the trench with a garden fork before laying the fabric. This allows for some secondary percolation into the subsoil, reducing the total volume of water that must travel to the end of the bed.
Step 2: Laying the Geotextile Fabric
Line the entire trench with your 4 oz to 6 oz non-woven geotextile fabric. The fabric must extend at least 12 inches beyond the edges of the creek bed on both sides. This overhang will be covered by the edge cobbles and turf, anchoring the fabric and preventing soil from washing into the rock bed. Overlap any seams by at least 12 inches.
Step 3: Setting the Boulders and Check Dams
Before adding the smaller rocks, place your 12 to 24-inch boulders. Bury at least one-third of each boulder into the soil so they look like they are naturally emerging from the earth, rather than sitting on top of it. On steeper slopes, arrange boulders horizontally across the channel to create check dams. These dams step the water down, dissipating kinetic energy and preventing the river rock from washing downstream during heavy storms.
Step 4: Adding Cobbles and River Rock
Fill the spaces between the boulders and along the banks with the 3 to 5-inch cobbles. Finally, pour the 1 to 3-inch river rock into the main channel. The rock layer should be at least 3 to 4 inches deep to ensure the landscape fabric is completely hidden and protected from UV degradation.
Expert Tips for Erosion Control and Plant Integration
A dry creek bed is not just a ditch filled with rocks; it is a riparian ecosystem. Integrating the right plants will stabilize the banks, filter pollutants, and soften the hardscaping.
'Dry stream beds are highly effective at slowing water velocity and reducing soil erosion when properly sized to handle the watershed's runoff volume. Incorporating native deep-rooted plants along the margins significantly increases the structural stability of the banks.'
— Clemson Cooperative Extension, Stormwater Management Best Practices
Follow these expert planting and maintenance tips:
- Plant in Zones: Place moisture-loving plants like Blue Flag Iris (Iris versicolor) and Swamp Milkweed (Asclepias incarnata) in the lowest parts of the bed or the terminus dry well. Use drought-tolerant ornamental grasses like Switchgrass (Panicum virgatum) on the upper banks.
- Add Bank Stabilizers: Another excellent choice for the banks is the Autumn Fern (Dryopteris erythrosora), which provides beautiful coppery-red accents and thrives in the dappled shade often found near larger landscape boulders. For sunny banks, consider creeping juniper (Juniperus horizontalis), which acts as a living mulch, suppressing weeds while its shallow, wide-spreading roots lock the topsoil in place.
- Use Root Plugs: When planting near the rocks, use deep-rooted native plugs rather than shallow annuals. The extensive root systems act as biological rebar, holding the soil and fabric in place.
- Install a Splash Block: Where your downspouts or sump pump discharge into the dry creek bed, place a flat, wide flagstone or a cluster of tight-fitting boulders. This splash block absorbs the initial impact of the water, preventing it from gouging a hole in the river rock and exposing the fabric.
- Annual Maintenance: Once a year, use a leaf blower on a low setting or a specialized rock vacuum to remove organic debris, leaves, and sediment that can clog the geotextile fabric. If the rocks become stained with algae or mud, a gentle power washing will restore their natural color.
Conclusion
Building a dry creek bed is one of the most rewarding landscaping projects a homeowner can undertake. By combining the hydraulic engineering principles of proper slope and check dams with the aesthetic beauty of natural stone and native plantings, you can permanently solve yard drainage issues. Follow these expert best practices, invest in high-quality geotextile materials, and take your time with the excavation to create a functional, stunning landscape feature that will protect your property for decades to come.

