
Tree Care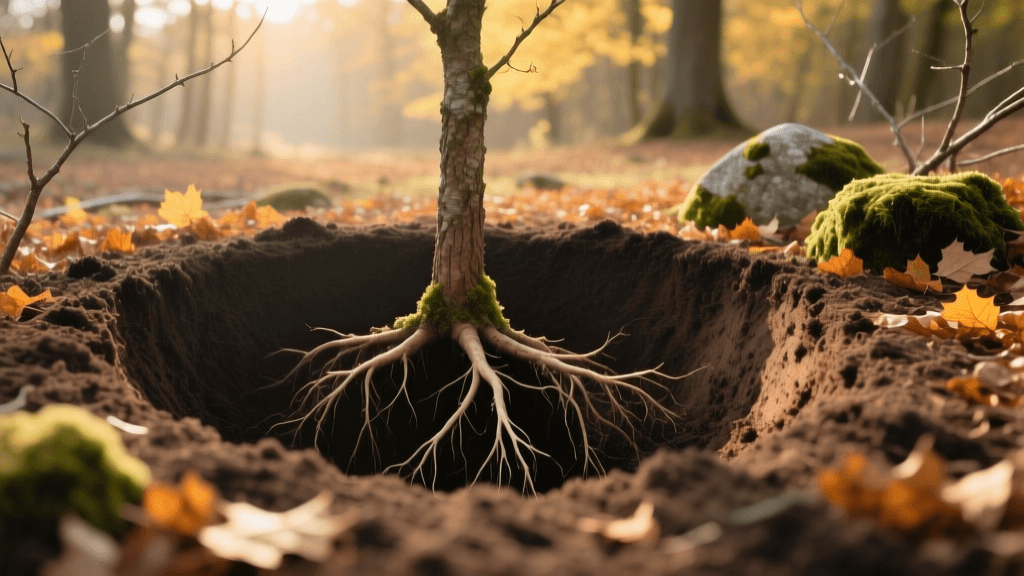
2026 Fall Tree Planting: Root Flare Hole Width & Depth
The Critical Role of Fall in Tree Establishment
As the 2026 autumn season settles in, homeowners and landscaping professionals alike are turning their attention to fall lawn care. While aeration, overseeding, and leaf management often dominate the conversation, fall is unequivocally the most biologically advantageous time to plant new trees. During the autumn months, air temperatures cool down significantly, reducing the transpiration rate and heat stress on the canopy. Meanwhile, soil temperatures remain warm enough to stimulate vigorous root growth until the ground freezes. However, the success of your fall planting efforts hinges entirely on one crucial anatomical feature: the root flare. Understanding the precise width and depth guidelines for the planting hole in relation to the root flare is the difference between a thriving, multi-generational shade tree and a declining specimen plagued by girdling roots and trunk rot.
Understanding the Root Flare
The root flare, also known as the trunk flare, is the specific anatomical zone where the tree's trunk transitions into its structural root system. At this junction, the trunk widens, and the bark tissue seamlessly morphs into root tissue. This area is highly specialized and requires direct access to atmospheric oxygen. When a tree is planted too deeply and the root flare is buried beneath the soil or mulch, the trunk tissue is deprived of oxygen and exposed to constant moisture. This leads to the death of the phloem and cambium layers, inviting opportunistic pathogens like Phytophthora and Armillaria root rot. Furthermore, burying the flare encourages adventitious roots to sprout from the trunk above the structural roots. These secondary roots eventually encircle and strangle the main trunk, a fatal condition known as girdling roots. In 2026, with many commercial nurseries still struggling with automated potting lines that bury flares too deeply in containers, it is more important than ever for the home gardener to identify and correct the flare's position during planting.
Guidelines for Planting Hole Width
When preparing your fall landscape for a new tree, the width of the planting hole is just as critical as the depth. The modern arboricultural consensus, supported by decades of soil science research, dictates that the planting hole should be 2 to 3 times the diameter of the root ball. Why so wide? Tree roots do not grow straight down like a taproot; they grow laterally, spreading out horizontally in the top 12 to 18 inches of soil to seek oxygen, water, and nutrients. By digging a wide hole, you loosen the compacted native soil surrounding the planting site, reducing mechanical resistance and allowing the delicate new feeder roots to establish rapidly before the winter freeze. Additionally, the sides of the hole should be roughened or scarified. Smooth, glazed sides created by a metal shovel can act like a terracotta pot, causing roots to circle the hole rather than venturing into the native soil.
Guidelines for Planting Hole Depth
The most common and devastating mistake in tree planting is digging the hole too deep. The golden rule for planting depth is that the root flare must sit 1 to 2 inches above the surrounding finished grade. This means the depth of your hole should actually be slightly shallower than the height of the root ball. When you place the tree in the hole, the bottom 10% of the root ball should rest on undisturbed, solid native soil. This prevents the tree from sinking over time as the loosened backfill soil settles during the fall and winter rains. By leaving the flare elevated, you ensure that water drains away from the sensitive trunk tissue and that the root crown has ample access to the oxygen it needs to survive the winter dormancy period and explode with growth in the spring of 2027.
2026 Dimensional Chart for Tree Planting
To help you plan your fall planting projects, refer to the table below. These dimensions are based on standard nursery caliper measurements and ensure the root flare remains properly exposed.
| Tree Caliper (Trunk Diameter) | Avg. Root Ball Diameter | Ideal Hole Width (2.5x) | Ideal Hole Depth |
|---|---|---|---|
| 1.5 inches | 18 inches | 45 inches | 16 inches (2" shallower than ball) |
| 2.0 inches | 24 inches | 60 inches | 22 inches (2" shallower than ball) |
| 2.5 inches | 28 inches | 70 inches | 26 inches (2" shallower than ball) |
| 3.0 inches | 32 inches | 80 inches | 30 inches (2" shallower than ball) |
Step-by-Step Fall Planting Process for the Root Flare
1. Expose the Flare Before Digging
Before you even pick up a shovel, examine the tree in its container or burlap wrap. Use a hand trowel or a specialized soil knife to gently brush away the top layer of soil until you find the root flare. In many 2026 nursery stock specimens, you may need to remove 2 to 4 inches of excess potting media to find the true flare. If you find circling roots at the top of the root ball, prune them away with sterilized bypass pruners.
2. Measure and Dig the Saucer-Shaped Hole
Measure the height of the root ball from the bottom to the newly exposed root flare. Dig your hole to that exact depth, or even one inch shallower. The width should be 2.5 to 3 times the root ball's diameter. Shape the hole like a shallow saucer with gently sloping sides rather than a straight-walled cylinder. This saucer shape encourages lateral root expansion and improves surface water drainage toward the root zone.
3. Set the Tree and Verify Depth
Place the tree in the center of the hole. Step back and look at the grade. The root flare should be visibly above the surrounding soil line. If the tree is sitting too low, lift it out and add a small mound of native soil to the bottom of the hole to raise it. Never grab the tree by the trunk to lift it; always support the root ball from underneath to prevent tearing the newly formed feeder roots.
4. Backfill with Native Soil
Backfill the wide void around the root ball using the native soil you just dug out. Avoid the outdated practice of amending the backfill with heavy compost or peat moss, as this creates a 'bathtub effect' where water pools in the loose organic matter and drowns the roots. Native soil encourages the roots to venture outward into the surrounding landscape. Water thoroughly as you backfill to eliminate large air pockets.
Fall Mulching and Winter Preparation
Once the tree is planted and the root flare is confirmed to be visible, it is time to apply fall mulch to insulate the root zone against extreme temperature fluctuations. Apply a 2 to 3-inch layer of organic mulch, such as shredded hardwood bark or pine needles, in a 3-foot radius around the tree. Crucially, you must practice the 'donut method': keep the mulch at least 3 inches away from the trunk itself. Piling mulch against the trunk, commonly known as 'volcano mulching,' effectively buries the root flare you just worked so hard to expose, negating all your careful depth calculations and inviting winter rodent damage and fungal cankers.
Expert Resources and Citations
Proper tree planting is an investment in your property's future. For further reading and to verify the arboricultural standards discussed in this guide, consult the following authoritative resources:
- The University of Minnesota Extension provides comprehensive, science-backed guidelines on hole dimensions and the critical importance of locating the trunk flare before planting.
- The Arbor Day Foundation offers excellent visual guides and step-by-step instructions for identifying the root flare and avoiding the common pitfalls of deep planting.
- The Morton Arboretum details the long-term consequences of improper planting depth, including the development of girdling roots and trunk decay, reinforcing why fall planting must prioritize the flare.
By adhering to these precise width and depth guidelines this autumn, you ensure your trees will establish a robust, shallow, and wide-spreading root system capable of withstanding the environmental stresses of the coming decades.

