Gardening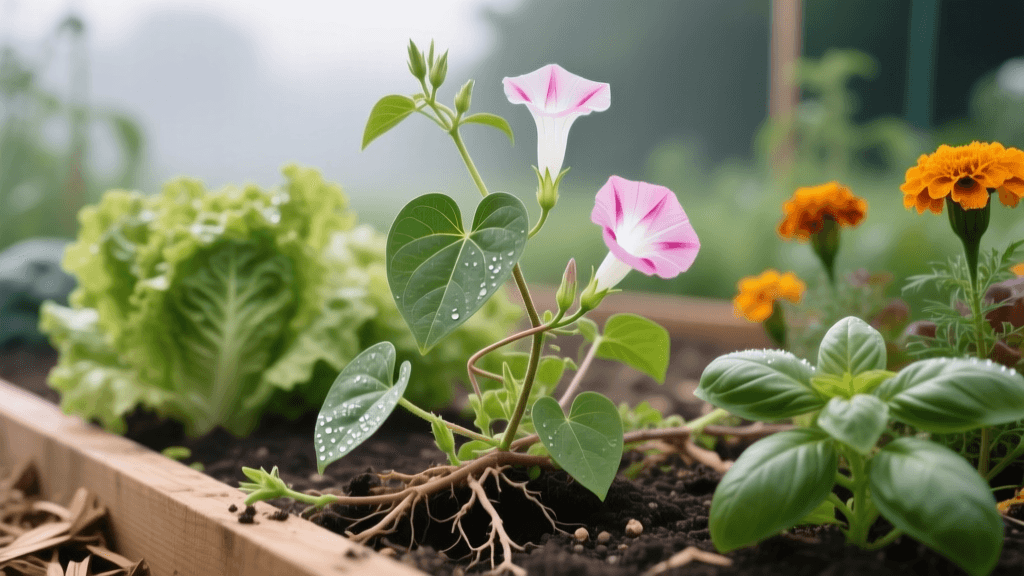
Identifying and Eradicating Field Bindweed in Garden Beds
The Ultimate Guide to Identifying and Eradicating Field Bindweed
If you have ever spent hours carefully cultivating a vegetable or flower garden bed, only to watch it get choked out by a relentless, twining vine, you have likely encountered field bindweed (Convolvulus arvensis). Often mistaken for its ornamental cousin, the morning glory, field bindweed is one of the most destructive and difficult-to-control weeds in North America and Europe. It does not merely compete with your prized tomatoes, peppers, and perennials for water and nutrients; it physically strangles them, blocking sunlight and pulling down entire trellises.
In this comprehensive weed identification and removal guide, we will explore exactly how to spot field bindweed early, understand its terrifying root system, and deploy both organic and targeted chemical strategies to eradicate it from your garden beds for good.
What is Field Bindweed?
Field bindweed is a deep-rooted, perennial broadleaf weed that belongs to the morning glory family (Convolvulaceae). While it produces attractive, trumpet-shaped white or pale pink flowers, its beauty is a deceptive trap for the unwary gardener. According to the University of California Integrated Pest Management Program, a single mature bindweed plant can develop a massive, fleshy root system that extends up to 10 feet laterally and plunges as deep as 20 feet into the soil profile. This extensive rhizome network stores vast amounts of carbohydrates, allowing the weed to survive droughts, freezing winters, and aggressive cultivation.
Furthermore, a single plant can produce hundreds of seeds that remain viable in the soil seed bank for up to 50 years. When you till or rototill a garden bed infested with bindweed, you are inadvertently chopping its roots into dozens of pieces, each capable of generating a brand-new, vigorous plant. This is why mechanical cultivation often makes a bindweed problem exponentially worse.
Identification: Field Bindweed vs. Morning Glory
Before you begin any removal protocol, accurate weed identification is critical. Many gardeners hesitate to pull a vine because they believe it is a volunteer morning glory. While they share a family resemblance, there are distinct morphological differences that can help you tell them apart.
| Feature | Field Bindweed | Ornamental Morning Glory |
|---|---|---|
| Leaf Shape | Small (1-2 inches), arrowhead or spade-shaped with pointed lobes at the base. | Larger (3-6 inches), heart-shaped with a rounded base. |
| Flower Size & Color | Small (0.5-1 inch), white or pale pink, often with a darker center throat. | Large (2-4 inches), vibrant blue, purple, red, or white. |
| Growth Habit | Aggressive twining vine that crawls along the ground and climbs structures. | Climbing vine, usually less aggressive and ground-crawling. |
| Lifespan | Deep-rooted perennial (returns every year from roots). | Typically an annual (dies in winter, reproduces by seed). |
Identifying Hedge Bindweed vs. Field Bindweed
While field bindweed is the most notorious, gardeners may also encounter hedge bindweed (Calystegia sepium). Hedge bindweed features much larger, pure white flowers (up to 2.5 inches across) and larger, more triangular leaves. Unlike the deep-rooted field bindweed, hedge bindweed spreads primarily through long, shallow, creeping rhizomes just below the soil surface. While it is slightly easier to control by digging out the shallow root mats, it still requires relentless removal to prevent it from smothering your garden structures and tall perennials.
Essential Tools for Bindweed Removal
Having the right equipment on hand will save you time and prevent the accidental spread of root fragments.
- Hori Hori Knife: A Japanese soil knife perfect for severing taproots just below the soil surface without disturbing nearby plant roots.
- Foam Paintbrushes: Cheap, disposable brushes for targeted herbicide application without risking spray drift onto desirable plants.
- 6-Mil Clear Polyethylene Sheeting: Essential for effective soil solarization; thinner plastic will tear or fail to trap adequate heat.
- Heavy-Duty Garden Fork: Use a broadfork or garden fork to gently loosen soil and extract long root segments, avoiding the chopping action of a spade or tiller.
Organic and Cultural Removal Strategies
For gardeners managing edible vegetable beds where broad-spectrum herbicides are undesirable, organic and cultural controls are your primary weapons. The Royal Horticultural Society (RHS) emphasizes that organic bindweed control requires immense patience and a strategy of starvation rather than immediate eradication.
1. Relentless Depletion (The Starvation Method)
Because bindweed relies on its deep roots to store energy, your goal is to force the plant to expend its energy reserves faster than it can replenish them through photosynthesis. Every time a shoot emerges, snap it off at the soil line immediately. Do not wait for it to develop leaves. If you consistently remove the green shoots every 7 to 10 days, the root system will eventually exhaust its carbohydrate reserves and die. This process can take up to two full growing seasons of unwavering vigilance.
2. Soil Solarization
If you are preparing a new garden bed or can afford to take a section out of production during the hottest months, soil solarization is highly effective. Clear the area of all plant debris, water the soil deeply, and cover it with clear, 6-mil thick polyethylene plastic. Bury the edges to trap the heat. Leave the plastic in place for 4 to 6 weeks during peak summer. The trapped solar energy will raise soil temperatures to 110°F–125°F, cooking the shallow roots and seeds. However, because bindweed roots can survive deep underground where heat does not penetrate, you may still need to monitor for deep-shoot emergence after removing the plastic.
3. Heavy Smother Mulching
Standard 2-inch layers of bark mulch will not stop bindweed. To effectively smother it organically, you must use a physical barrier. Lay down overlapping layers of heavy-duty cardboard or a woven geotextile landscape fabric (costing approximately $0.50 to $1.50 per square foot). Cover the barrier with 4 to 6 inches of arborist wood chips. While the bindweed may eventually find a gap in the cardboard, the physical resistance will severely weaken the shoots, making them easy to snap off when they appear.
Targeted Chemical Control Options
When organic methods fail, or when bindweed is invading non-edible ornamental borders and fence lines, targeted chemical control may be necessary. As noted by Penn State Extension, systemic herbicides are required because contact herbicides only burn the foliage, leaving the massive root system completely unharmed.
The Paintbrush and Wick Method
In a mixed garden bed, spraying herbicides like Glyphosate (commonly sold as Roundup Pro or Rodeo for agricultural use) is dangerous, as drift will kill your desirable plants. Instead, use the paintbrush method. Mix a 2% to 5% solution of glyphosate concentrate with water and a non-ionic surfactant. Wear chemical-resistant gloves, dip a small foam paintbrush or a sponge-tipped wick applicator into the solution, and carefully paint the herbicide directly onto the leaves of the bindweed. The plant will absorb the chemical and translocate it down into the deep root system, killing it at the source. Expect to pay around $30 to $50 for a high-quality agricultural concentrate, which will last you multiple seasons.
Timing is Everything
The most effective time to apply systemic herbicides to bindweed is in late summer or early autumn. During this period, the plant is naturally pulling nutrients and energy down into its roots to prepare for winter dormancy. Applying glyphosate at this time ensures the maximum amount of active ingredient is dragged deep into the rhizomes, providing superior kill rates compared to spring applications when the plant is pushing energy upward.
Preventing Bindweed from Returning
Eradicating an active infestation is only half the battle. Preventing reintroduction requires strict garden hygiene. Never accept topsoil, compost, or mulch from unverified sources, as bindweed seeds and root fragments are common contaminants in poorly managed commercial soil blends. If you must use a rototiller in an area where bindweed has historically grown, hand-pick every white, fleshy root fragment from the tilled soil before planting. Finally, maintain dense, healthy plantings and a thick layer of mulch in your garden beds to shade the soil surface, making it incredibly difficult for any stray bindweed seeds to successfully germinate and establish.
Pro Tip: If bindweed is twining tightly around a prized shrub or trellis, do not pull it forcefully, as you will break the desirable plant's stems. Instead, use sharp pruning shears to snip the vine at the base. The remaining vine will wither and turn brittle in a few days, allowing you to gently brush it off your plants without causing damage.