
Landscaping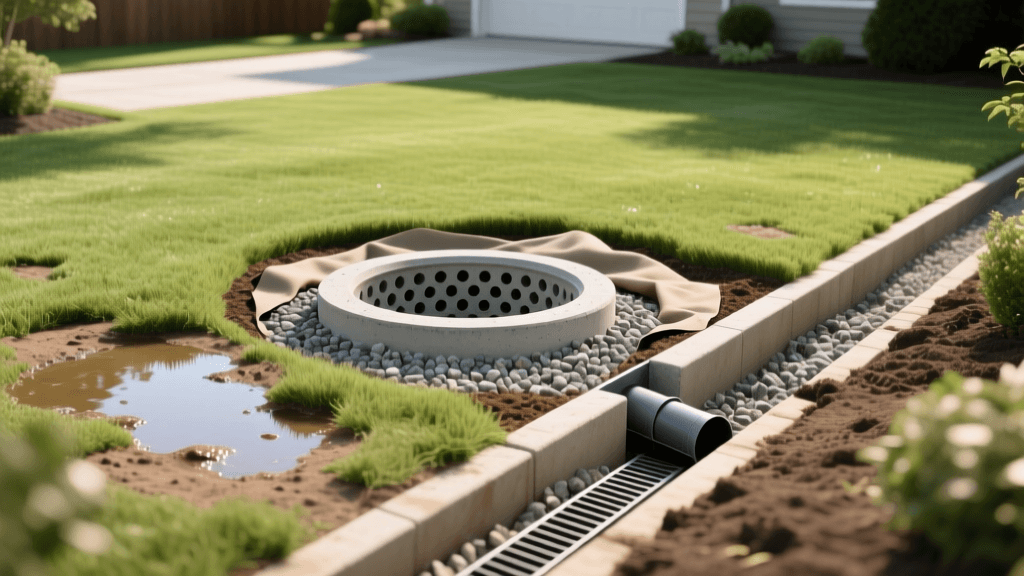
How to Fix Yard Drainage Problems: French Drains vs Dry Wells
Diagnosing Yard Drainage Issues: Why Water Pools in Your Landscape
Water pooling in your yard after a heavy rainstorm is more than just a visual nuisance; it is a critical landscaping problem that can compromise your home's foundation, drown your turfgrass, and create breeding grounds for mosquitoes. When dealing with a perpetually soggy lawn or a flooded patio, homeowners often rush to buy bags of topsoil to fill in low spots. However, simply adding dirt rarely solves the underlying hydrology issue. To permanently fix yard drainage problems, you must accurately diagnose the source of the water and implement a targeted subsurface solution. The two most effective and popular hardscaping solutions for managing excess stormwater are the French drain and the dry well. But which one is right for your specific soil type and landscape layout? In this comprehensive guide, we will walk you through the diagnosis process, break down the installation steps, compare costs, and help you choose the right drainage system for your property.
The Hidden Costs of Ignoring Poor Drainage
Before grabbing a shovel, it is important to understand the stakes. Poor landscape drainage does not just kill your expensive ornamental plants and cause root rot in your turf. According to the American Society of Home Inspectors, water intrusion and foundation damage are among the most costly repairs a homeowner can face, often exceeding ten thousand dollars. When hydrostatic pressure builds up against your basement walls or crawlspace due to improper grading and lack of subsurface drainage, the structural integrity of your home is at risk. Furthermore, standing water accelerates soil erosion, washes away expensive mulch, and creates hazardous, slippery conditions on walkways. Investing time and money into a proper drainage solution now will save you thousands in structural repairs and landscape renovations down the line.
Step 1: Diagnose Your Soil and Water Flow
You cannot fix a drainage problem without understanding how water moves through your specific yard. The first step in our diagnostic process is the Percolation Test, often called a perc test. This simple procedure will tell you if your soil is heavily compacted clay or loose, well-draining loam.
How to Perform a Backyard Perc Test
- Dig a hole approximately 12 inches deep and 6 inches wide in the area where water typically pools.
- Fill the hole with water and let it drain completely. This pre-soaks the soil and mimics a saturated state.
- Refill the hole with water to the top. Place a ruler or measuring tape in the center.
- Measure the water level drop every 15 minutes for one hour.
Diagnosis: If the water drops less than 1 inch per hour, you have heavy clay soil with poor drainage. If it drops between 1 and 3 inches, you have average loam. If it drops more than 3 inches, you have sandy, fast-draining soil. Heavy clay requires moving water away from the area entirely, while sandy soil can handle localized underground dispersal.
Next, observe the water flow during a rainstorm. Is the water coming from a downspout? Is it runoff from a neighbor's elevated property? Or is it a high water table pushing up from below? Identifying the source dictates your solution.
Solution A: Installing a French Drain System
A French drain is essentially a gravel-filled trench containing a perforated pipe that redirects surface and groundwater away from your home or low-lying areas. It is the gold standard for intercepting lateral water flow and relieving hydrostatic pressure against foundations.
When to Use a French Drain
Choose a French drain if your yard features heavy clay soil, if water is pooling against your foundation, or if you need to intercept runoff from a slope before it reaches your patio or garden beds.
Installation Steps and Materials
- Trenching: Dig a trench that is 12 to 24 inches wide and 18 to 24 inches deep. Crucially, the trench must have a consistent slope of at least 1/8 inch per foot (a 1 percent grade) toward the discharge point, such as a storm drain, dry creek bed, or street curb.
- Lining: Line the trench with a high-quality, non-woven geotextile landscape fabric (such as Mirafi 500X). This prevents soil and fine roots from clogging the gravel and pipe over time.
- Piping: Lay a 4-inch rigid PVC pipe with holes facing down, or use a flexible corrugated slotted pipe (like NDS EZ-Flow). Rigid PVC is preferred by professionals because it can be snaked and cleaned out years later.
- Backfilling: Cover the pipe with 3/4-inch washed drainage gravel. Do not use crushed limestone or pea gravel, as they can compact or fail to provide adequate void space. Wrap the excess fabric over the top of the gravel to create a burrito effect, then top with 2 inches of topsoil and sod.
Cost Estimate: DIY materials typically cost $10 to $15 per linear foot. Hiring a professional landscaping contractor usually ranges from $30 to $75 per linear foot, depending on access and soil conditions. Ensure your discharge point complies with local municipal codes, as some regions prohibit draining directly into street gutters or storm sewers without a permit.
Solution B: Building a Dry Well
Unlike a French drain, which moves water from point A to point B, a dry well is a subsurface chamber that collects water and allows it to slowly percolate into the surrounding soil. It is an excellent sustainable landscaping practice that recharges local groundwater.
When to Use a Dry Well
A dry well is the perfect solution for managing isolated, high-volume water sources, such as a roof downspout or a sump pump discharge, provided your soil has adequate percolation rates (sandy or loamy soils). It is not recommended for heavy clay soils or areas with a high seasonal water table.
Installation Steps and Materials
- Excavation: Dig a pit large enough to accommodate a pre-fabricated dry well tank (such as the NDS Flo-Well 50-gallon system) or a custom-built chamber lined with retaining wall blocks. The pit should be at least 48 inches deep and situated at least 10 feet away from your home's foundation.
- Base Preparation: Add a 6-inch base layer of 3/4-inch washed gravel to ensure stability and underlying drainage.
- Tank Placement: Lower the dry well tank into the pit. Connect your solid 4-inch PVC downspout extension directly into the inlet port of the tank.
- Surround and Cover: Fill the void space around the exterior of the tank with washed gravel. Wrap the entire assembly in geotextile fabric to prevent soil intrusion. Cap the tank, backfill the remaining 12 inches with topsoil, and seed with grass.
Cost Estimate: A DIY pre-fabricated dry well system costs between $150 and $300 for materials. Professional installation of a large-capacity dry well can range from $800 to $2,500, depending on the depth required and the volume of gravel needed. Adding an overflow exit pipe connected to a secondary discharge area ensures that during extreme storm events, the excess water has a safe escape route rather than surfacing in your yard.
French Drain vs. Dry Well: A Head-to-Head Comparison
| Feature | French Drain | Dry Well |
|---|---|---|
| Primary Function | Redirects water laterally away from an area | Collects water and disperses it vertically into soil |
| Best Soil Type | Heavy clay, compacted soils, poor drainage | Sandy, loamy, well-draining soils |
| Water Source | Surface runoff, high water tables, sloping yards | Concentrated point sources (downspouts, sump pumps) |
| Average DIY Cost | $10 - $15 per linear foot | $150 - $300 per unit |
| Maintenance | Low (occasional pipe flushing via cleanout) | Low (cleaning debris from downspout catch basins) |
Sustainable Practices and Expert Insights
When designing your drainage solution, it is vital to consider the broader environmental impact of your landscape. Simply piping stormwater directly into municipal sewers overwhelms treatment plants and contributes to urban flooding and waterway pollution.
According to the North Carolina State University Extension, implementing low-impact development (LID) strategies, such as dry wells and rain gardens, is critical for managing stormwater at its source. By allowing water to infiltrate the soil naturally, homeowners can filter out pollutants, reduce the thermal pollution of local streams, and maintain the natural hydrology of their watershed.
To maximize sustainability, consider pairing your dry well or French drain discharge with a rain garden planted with deep-rooted native species like Purple Coneflower, Swamp Milkweed, and Black-Eyed Susans. These plants act as biological filters, absorbing excess nutrients and heavy metals from roof runoff before they can enter the groundwater supply.
When to Call a Professional Landscaper
While many homeowners successfully tackle small-scale French drains and dry wells as weekend DIY projects, certain scenarios demand professional expertise. If your drainage issue involves complex grading, heavy machinery access, or proximity to underground utilities, hire a licensed landscape contractor. Always call 811 before you dig to have local utility lines marked. Furthermore, if your home is situated at the bottom of a steep municipal hill where massive volumes of stormwater are funneling onto your property, a professional engineer may need to design a multi-tiered retaining wall and commercial-grade drainage swale system to protect your investment.
Conclusion
Solving yard drainage problems requires a methodical approach. By performing a simple percolation test, observing water flow, and understanding the distinct mechanics of French drains and dry wells, you can reclaim your soggy lawn and protect your home's foundation. Whether you choose to laterally redirect water through a gravel-filled trench or sustainably recharge the groundwater via a subsurface chamber, taking action today will ensure a healthier, more resilient landscape for years to come. Remember that proper landscape drainage is not just about eliminating puddles; it is about creating a balanced ecosystem where water works for your garden rather than against it.

