
Landscaping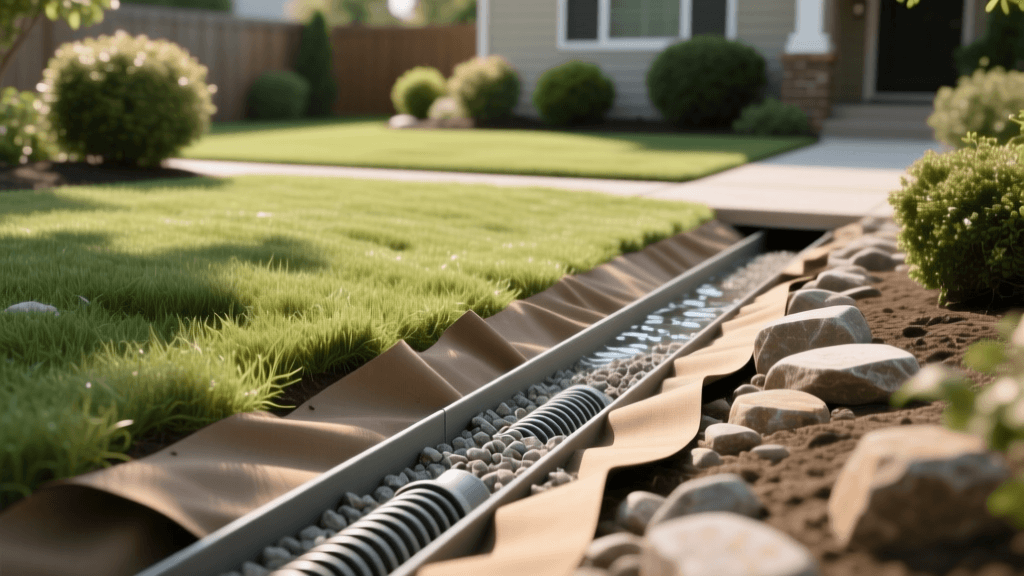
Expert Guide to French Drain Installation for Yard Drainage
Mastering Yard Drainage: The Expert Guide to French Drain Installation
Standing water in your yard is more than just a nuisance; it is a direct threat to your home's foundation, your landscape's health, and your property value. As a senior landscaping expert, I have diagnosed and resolved hundreds of drainage issues. When surface grading fails and soil percolation is poor, the undisputed gold standard for subsurface water management is the French drain. This comprehensive guide outlines the expert best practices, precise measurements, and material specifications required to install a high-performance French drain system that will protect your property for decades.
Diagnosing Your Drainage Problem
Before digging, you must understand the hydrology of your property. Water always follows the path of least resistance. If your yard pools after a heavy rain, you likely have compacted soil, a high clay content, or a negative grade directing water toward your home. Perform a simple percolation test: dig a hole 12 inches deep and 12 inches wide, fill it with water, and let it drain. Refill it and measure the drop. If the water level drops less than 1 inch per hour, you have heavy clay or severe compaction, necessitating a subsurface drainage solution like a French drain rather than simple surface aeration.
French Drains vs. Alternative Drainage Solutions
It is crucial to select the right tool for the job. Below is a comparison chart to help you determine if a French drain is the correct intervention for your specific landscape challenge.
| Drainage Solution | Best Application | Water Type Handled | Average Cost per Linear Ft. |
|---|---|---|---|
| French Drain | Soggy yards, high water tables, foundation weeping | Subsurface & Surface | $20 - $50 |
| Surface Swale | Gentle slopes, directing runoff away from beds | Surface Runoff | $5 - $15 |
| Channel (Trench) Drain | Driveways, patios, hardscape edges | Surface Runoff | $30 - $70 |
| Dry Well | Downspout termination, localized pooling | Concentrated Point Source | $150 - $300 (per unit) |
Step-by-Step French Drain Installation Best Practices
A French drain is essentially a gravel-filled trench containing a perforated pipe that redirects groundwater. However, amateur installations often fail within two years due to sediment clogging or improper sloping. Follow these expert guidelines to ensure longevity.
1. Planning, Routing, and Utility Checks
Never put a shovel in the ground without calling 811 to have underground utilities marked. Once cleared, map your route. The drain must start at the highest point of the water accumulation and terminate at a safe discharge point, such as a storm drain, a daylighted hillside, or a subterranean dry well. Ensure your discharge point complies with local municipal codes; it is illegal in most jurisdictions to route your drainage water directly onto a neighbor's property or into the sanitary sewer system.
2. Trenching with Precision Slope
The most common cause of French drain failure is an inadequate slope. Water requires gravity to move through the pipe. The industry standard minimum slope is a 1% grade, which equates to a 1/8-inch drop per linear foot. For a 50-foot run, the trench must drop at least 6.25 inches from start to finish. Use a string line and a line level to verify your grade continuously while digging. The trench should be a minimum of 12 inches wide and 18 to 24 inches deep, depending on the severity of the water table.
3. Selecting Professional-Grade Materials
Do not use the cheap, flexible black corrugated pipe found in big-box stores for primary drainage. It crushes under soil pressure and its slotted perforations clog easily with silt. Instead, use rigid SDR-35 PVC sewer and drain pipe with 1/2-inch drilled holes. For the gravel, avoid crushed limestone, which can degrade and cement together over time. Use 3/4-inch washed drainage rock (often called river rock or washed gravel). Finally, line the trench with a non-woven geotextile fabric (such as Mirafi 500X) to separate the soil from the gravel, preventing the system from silting in.
4. The Assembly and Wrapping Technique
Line the trench with the geotextile fabric, leaving enough overhang on both sides to wrap over the top of the gravel later. Add a 2-inch base layer of washed gravel. Place the PVC pipe on the gravel bed. Expert Tip: Orient the perforated holes facing downward. While counterintuitive to many DIYers, hydrology experts note that water rises through the gravel bed and enters the bottom of the pipe, preventing fine sediments from washing directly into the pipe cavity where they can accumulate and cause blockages. Cover the pipe with more gravel until you are 3 to 4 inches below the surface grade. Fold the excess fabric over the gravel to create a complete wrap, then top off with native soil or sod.
Terminating the System: Daylighting vs. Dry Wells
If you cannot daylight the pipe (bring it to the surface where gravity can carry water away), you must terminate it into a dry well. A dry well is a large subterranean chamber filled with gravel that allows water to slowly percolate into the surrounding deep soil. For a standard residential roof and yard runoff, a 4-foot deep by 3-foot wide dry well lined with fabric and filled with 1.5-inch washed stone is usually sufficient. When installing a dry well, it is vital to wrap the entire stone chamber in the same non-woven geotextile fabric used in the trench. This prevents the surrounding native soil from collapsing into the void space over time, which would effectively destroy the dry well's water-holding capacity. Additionally, ensure that the solid PVC pipe leading from the French drain to the dry well is sloped at a steeper 2% grade to accelerate water delivery into the chamber during torrential downpours. Always install a pop-up emitter at the final daylight exit point; this remains flush with the lawn when dry but pops open when water pressure builds, keeping rodents and debris out of your pipe.
Cost and Timing Expectations
For a professional-grade DIY installation, expect to spend between $8 and $15 per linear foot on materials (PVC, washed stone, geotextile fabric, and fittings). If you hire a licensed landscaping contractor, labor and heavy equipment (like a mini-excavator) will push the cost to $30 to $65 per linear foot. A typical 100-foot residential French drain project takes a professional crew of three about 1.5 to 2 days to complete, from trenching to sod replacement.
Expert Maintenance and Longevity
A properly installed French drain using rigid PVC and non-woven fabric should last 30 to 40 years with minimal maintenance. To ensure this, inspect the daylight exit point and pop-up emitters every spring and fall. Clear away any mulch, grass clippings, or debris that could block the outflow. If your system connects to roof downspouts, ensure your gutters are equipped with leaf guards to prevent organic matter from washing down the solid leader lines and into your subsurface drain. If you notice water pooling near the drain line years after installation, the system may have been compromised by root intrusion or heavy sediment. In such cases, a professional plumbing snake equipped with a specialized drain cleaning head can often clear the blockage without requiring a full excavation. However, prevention through proper fabric wrapping and the use of rigid PVC remains your best defense against costly landscape renovations.
Authoritative Citations and Further Reading
According to the University of Minnesota Extension in their comprehensive guide on Yard and Garden Drainage, 'Subsurface drainage systems, such as French drains, are essential for removing excess water from the root zone in heavy clay soils. Proper use of filter fabrics and washed aggregate is critical to prevent the migration of fine soil particles into the drainage aggregate, which is the primary cause of system failure over time.'
By adhering to these expert best practices, precise grading measurements, and high-quality material selections, you can permanently resolve your yard's drainage issues, protect your home's structural integrity, and reclaim your outdoor living spaces for years to come.

