
Tree Care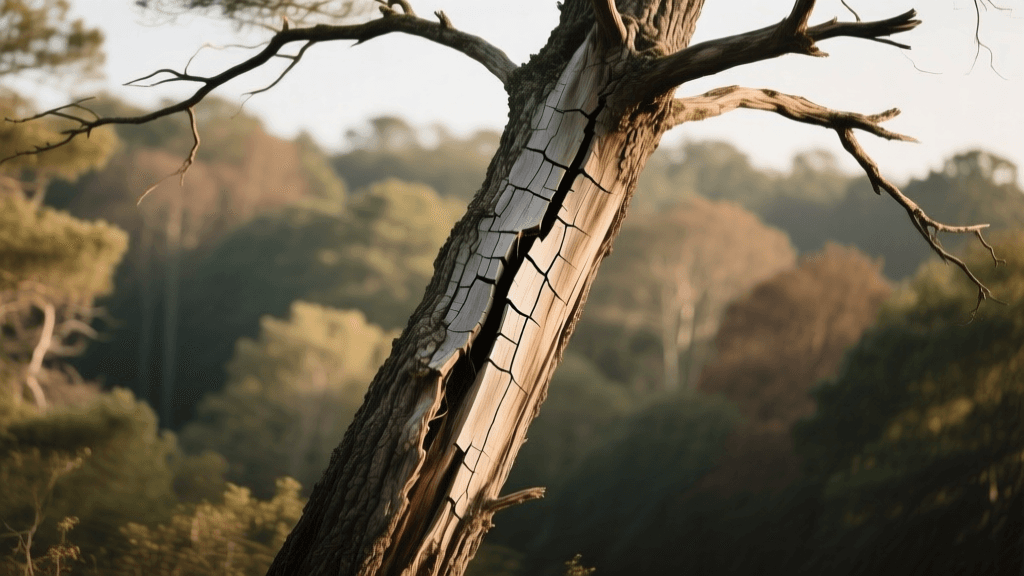
Hazard Tree Photo Documentation: Cracks & Leans in 2026
The Intersection of Garden Photography and Arboriculture in 2026
In 2026, the line between professional arboriculture and advanced garden photography has blurred. With the advent of ultra-high-resolution sensors, consumer-accessible LiDAR, and AI-assisted photogrammetry, homeowners and landscape professionals can now conduct preliminary hazard tree assessments with unprecedented accuracy. Documenting tree hazards—specifically trunk cracks, structural leans, and canopy deadwood—is no longer just about taking a quick snapshot for social media. It is a critical, data-driven process that provides certified arborists with the visual evidence needed to triage dangerous trees, track structural degradation over time, and support insurance claims after severe weather events.
Proper visual documentation requires an understanding of both photographic principles and tree biology. According to the International Society of Arboriculture (ISA), identifying targets, assessing the likelihood of failure, and evaluating the consequences are the three pillars of tree risk assessment. High-quality photography directly supports the second pillar by allowing experts to measure crack propagation and lean angles remotely before ever stepping foot on your property.
Essential Gear for Hazard Documentation
To capture the nuances of tree defects, you need equipment that excels in macro detail, dynamic range, and spatial mapping. Here is the standard kit for tree hazard photography in 2026:
- Mirrorless Cameras with High Megapixel Counts: Bodies like the Sony A7R V or Fujifilm GFX100 II paired with a 90mm or 100mm macro lens are ideal for capturing the intricate details of bark splitting and fungal fruiting bodies.
- Consumer Drones with Obstacle Avoidance: The DJI Air 3S or similar 2026 models allow you to safely inspect the upper canopy for deadwood and included bark unions without risking a climb.
- LiDAR-Equipped Smartphones: Devices like the iPhone 16 Pro or Samsung Galaxy S25 Ultra feature built-in LiDAR scanners and advanced macro modes, enabling you to generate 3D point clouds of a heaving root plate or a split trunk union.
- Scale References and Color Checkers: A standardized ABOR (Arboricultural Research) scale bar or a simple ruler is mandatory for photographing cracks to provide dimensional context.
Step-by-Step Guide to Photographing Tree Defects
1. Documenting Trunk Cracks and Splits
Trunk cracks are among the most alarming signs of impending structural failure. However, a photograph of a crack without context is virtually useless to an arborist. To properly document a crack, you must capture its width, depth, and length.
Lighting and Settings: Avoid harsh, direct midday sunlight, which creates deep shadows that obscure the bottom of the crack. Overcast days or using an off-camera diffused flash provides the even lighting needed to reveal the crack's true depth. Set your aperture to f/8 or f/11 to ensure the entire depth of the fissure remains in sharp focus.
Scale and Angle: Always place a ruler or a standardized scale bar directly adjacent to the widest part of the crack. Take three shots: a wide shot showing the crack's location on the trunk, a medium shot showing the crack's vertical extent, and a macro shot of the widest point with the scale reference. If the crack is weeping sap or showing signs of bacterial wetwood, capture the discoloration using a color checker card to ensure accurate white balance in post-processing.
2. Evaluating Tree Lean and Root Plate Heaving
A tree that has recently developed a lean, especially if accompanied by soil heaving on the opposite side of the trunk, is a critical hazard. Documenting this requires establishing fixed reference points to measure movement over time.
The Plumb Line Technique: Drop a weighted plumb line from a stable, elevated branch (if safe to do so) or use a digital inclinometer app overlaid on your camera's live view. Photograph the tree from two perpendicular angles (e.g., North and East) to capture the exact vector of the lean. Include a fixed, vertical structure in the background, such as a building corner or a fence post, to serve as a visual baseline.
Root Zone Documentation: Get low to the ground and photograph the base of the trunk. Look for tension cracks in the soil, severed roots, or the presence of Ganoderma or Armillaria mushrooms, which indicate advanced root rot. The University of Minnesota Extension notes that fungal conks at the base of a tree are a primary indicator of internal decay that severely compromises structural integrity, making root zone photography essential.
3. Identifying and Photographing Canopy Deadwood
Large, dead limbs suspended in the canopy—often called "widowmakers"—pose a severe threat to targets below. Because they are high up, drone photography is the safest documentation method.
Drone Flight Protocols: When flying near a compromised canopy, maintain a minimum 15-foot buffer to avoid striking hidden, brittle branches. Always check local regulations; the Federal Aviation Administration (FAA) requires recreational and commercial drone operators to maintain visual line-of-sight and avoid restricted airspace. Use your drone's telephoto lens to compress the background and isolate the deadwood against the sky. Look for missing bark, a lack of foliage compared to adjacent branches, and V-shaped crotches with included bark.
Digital Organization and Metadata Tagging
Taking the photos is only half the battle; organizing them for professional review is equally important. In 2026, arborists rely on structured digital portfolios to assess tree health over time.
- GPS and EXIF Data: Ensure your camera or drone is logging precise GPS coordinates. This allows the arborist to map the tree in GIS software before arriving on-site.
- File Naming Conventions: Rename your files using a standardized format: [Date]_[TreeSpecies]_[HazardType]_[Angle]. For example: 20260514_QuercusRubra_TrunkCrack_NorthView.jpg.
- Time-Lapse Folders: Create dedicated folders for each hazard tree. By taking photos from the exact same GPS coordinate and focal length every three months, you can create a time-lapse that visually proves whether a crack is widening or a lean is accelerating.
Comparison of Documentation Methods
Different hazards require different photographic approaches. Below is a comparison of the primary documentation methods used by landscape professionals and advanced homeowners in 2026.
| Method | Best Used For | Estimated 2026 Cost | Data Accuracy |
|---|---|---|---|
| DSLR Macro Photography | Trunk cracks, bark anomalies, fungal conks | $1,500 - $3,500 | High (with scale reference) |
| LiDAR Smartphone Scanning | Root plate heaving, trunk cavities, lean vectors | $1,000 - $1,400 | Medium-High (spatial mapping) |
| Drone Telephoto Imaging | Canopy deadwood, included bark unions, crown dieback | $800 - $2,200 | High (visual isolation) |
| Fixed Time-Lapse Cameras | Monitoring seasonal lean shifts and crack propagation | $150 - $400 | Medium (relative movement) |
Limitations of Visual Documentation
While advanced photography and LiDAR scanning provide incredible surface-level data, they cannot see inside the tree. A trunk that appears solid but is hollowed out by internal decay will not show its true danger through a standard photograph. Visual documentation is a triage tool, not a final diagnosis.
If your photos reveal deep cracks, sudden leans, soil heaving, or extensive deadwood, the next step is to hire an ISA Certified Arborist with Tree Risk Assessment Qualification (TRAQ). Professionals will use your photographic baseline to guide their advanced internal diagnostics, such as sonic tomography or resistograph drilling, to determine the exact percentage of compromised wood. By mastering the art of hazard tree photography, you become the first line of defense in protecting your property, your garden, and your family from catastrophic tree failure.

