
Landscaping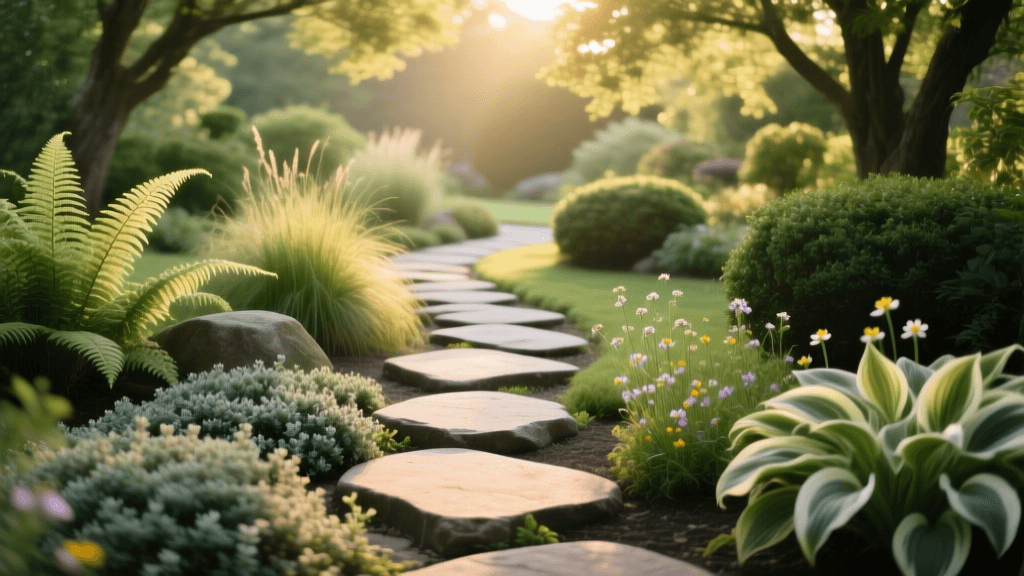
How To Build A Garden Path With Stepping Stones
Planning Your Stepping Stone Path
A garden stepping stone path does more than get people from one spot to another — it guides movement, keeps foot traffic off the grass, and gives the planting beds around it a sense of structure. It’s one of the most approachable hardscaping projects for homeowners: no special tools needed, and materials don’t cost much. But whether the path looks like it belongs or just shows up one day mostly comes down to how much time you spend planning it.
Before buying any stones, walk the route a few times — morning, afternoon, maybe even in the rain. Pay attention to where your feet land naturally. Most people step about 24 to 26 inches apart, center to center, so space your stones to match that rhythm. If the spacing forces you to shuffle or stretch, the path will feel off, no matter how nice the stones look.
Measure the full length of your planned path and figure out how many stones you’ll need. For a simple single-file path using 18-inch square stones spaced 24 inches apart, plan on one stone for every 2 linear feet. A 20-foot path needs about 10 stones. For a wider path with two stones side by side, double that number. The American Society of Landscape Architects (ASLA, 2023) says paths meant for two people walking together should be at least 48 inches wide — usually done with two rows of stones or a mix of stones and gravel between them.
Choosing the Right Stone Material
The material you pick changes how the path looks, how hard it is to lay, how long it lasts, and what it costs. Natural stone, concrete pavers, and reclaimed materials each bring something different to the table — and come with their own price tags.
Natural Flagstone
Flagstone covers several types of natural stone — sandstone, limestone, bluestone, slate — and remains a go-to for garden paths. Pennsylvania bluestone is especially common in the Mid-Atlantic and Northeast, where it’s quarried nearby. Irregular pieces run $3 to $7 per square foot; cut-to-size pieces are $8 to $15. Irregular flagstone takes more fitting but fits well in cottage or woodland gardens. Cut pieces go in faster and suit formal or modern designs.
Limestone shows up often in Texas Hill Country and across the Southeast, costing $2 to $5 per square foot. It weathers to a warm buff or gray and is softer than bluestone — it can pit over time in places where winter freezes and thaws happen repeatedly, so it’s better for USDA Hardiness Zones 7 and warmer. Slate, popular in the Pacific Northwest, ranges from charcoal to rust in color, but gets slippery when wet — something to keep in mind if you’re in Portland or Seattle.
Concrete Pavers
Manufactured concrete pavers come in consistent sizes, which makes laying them easier. You’ll find lots of colors and textures, including tumbled versions that look aged. These usually cost $1.50 to $4 per square foot at home improvement stores. For a 30-foot path using 16-inch square pavers, expect to spend roughly $45 to $120 on the pavers alone — not counting sand, gravel base, or edging. The University of Minnesota Extension (2022) points out that in cold climates, concrete pavers should be rated for freeze-thaw cycles and set on a well-compacted gravel base to avoid heaving.
Reclaimed and Salvaged Materials
Old brick, granite cobblestones pulled from old sidewalks, or broken concrete slabs (sometimes called “urbanite”) can all work as stepping stones — often for little or no cost. You might find them at demolition sites, salvage yards, or online marketplaces. The catch is that they’re rarely uniform, so fitting them takes more time. Reclaimed Chicago common brick, for example, is easy to find in the Midwest and runs $0.25 to $0.75 per brick. A 20-foot path could cost under $30 in materials.
Preparing the Ground
How you prep the ground makes or breaks most DIY stepping stone paths. Stones laid directly on untouched soil will shift, sink, or tip within a year or two. What you want instead is a stable, level base that drains well and holds up against frost.
Mark the path edges with spray paint or a garden hose, then dig out the soil to a depth of 4 to 6 inches. In sandy or loamy soil that drains well, 4 inches is enough. In heavy clay — common across the Midwest and Southeast — go 6 inches deep to allow room for a thicker gravel base that helps with drainage. Clear out all grass, roots, and debris from the dug-out area.
Add 2 to 3 inches of crushed gravel (¾-inch minus works best) and tamp it down firmly with a hand tamper or plate compactor. Then spread 1 inch of coarse sand or stone dust on top — this is your setting bed, where each stone settles into place.
"The single most common mistake homeowners make when installing stepping stones is skipping the gravel base. Without it, even the heaviest stones will migrate over time, especially in climates with significant frost penetration." — Extension Horticulture Specialist, Iowa State University Extension and Outreach
Setting the Stones
Once the base is ready, lay the stones on top first without pressing them in. Move them around until the spacing feels right and your stride flows naturally. Step on each one to test it before you commit.
To set a stone, press it firmly into the sand and wiggle it slightly to help it settle. Check it with a level — a gentle slope of 1 to 2 percent away from buildings or toward a drain helps water run off. If a stone rocks, lift it, add or remove sand under the high or low spots, and reset it. A rocking stone is both a tripping hazard and likely to crack over time.
Each stone’s top surface should sit about ½ inch above the surrounding soil. That keeps it visible and stops grass or mulch from covering it up, while still letting a lawn mower pass over without catching the edge. This detail matters most in lawn areas, where maintenance adds up over time.
Cutting Stones to Fit
Irregular flagstone often needs trimming to fit curves or close gaps. A cold chisel and hammer handle rough shaping — score a line across the stone, then tap along it with the chisel. For cleaner cuts, rent an angle grinder with a diamond blade ($40 to $60 per day) or a wet saw. Always wear eye protection and a dust mask when cutting — silica dust is dangerous to breathe.
Filling the Gaps Between Stones
What you put between the stones changes how the path looks and how much upkeep it needs. Here are the main options:
- Decomposed granite (DG): Compacts well, drains well, and blends in with a natural tan or gray tone. Costs $35 to $50 per cubic yard. Needs topping up now and then as it wears away.
- Pea gravel: Looks nice and doesn’t cost much ($25 to $45 per cubic yard), but moves around underfoot and can spill onto nearby lawn.
- Polymeric sand: Hardens when wet, locking joints in place and discouraging weeds. Costs $20 to $35 per 50-pound bag. Best for tight-joint, formal paths.
- Ground cover plants: Low-growing species planted in the joints create a soft, living path. Takes longer to fill in but costs almost nothing after the first year.
- Mulch: Shredded bark or wood chips are cheap and easy to spread, but break down quickly and can attract slugs in damp climates.
Ground Cover Plants for Path Joints
Planting low growers between stepping stones is one of the easiest ways to tie a path into the rest of the garden. They soften the edges, crowd out weeds, and sometimes release fragrance when brushed against. Pick ones that handle light foot traffic and match your site’s light conditions.
In sun, Thymus serpyllum (creeping thyme) is a solid choice — it tolerates stepping, blooms pink or white in early summer, and smells herbal when walked on. It fills joints in one to two seasons and needs almost no care once it’s settled in. Pratia pedunculata (blue star creeper) does well in partial shade and flowers blue through much of the growing season. For deep shade, Soleirolia soleirolii (baby’s tears) forms a dense, mossy mat — though it only survives reliably to Zone 9 and is considered invasive in parts of California.
In the Southeast, Dichondra carolinensis (Carolina ponysfoot) is a native option that handles heat, humidity, and light foot traffic. At the Chicago Botanic Garden in Glencoe, Illinois, designers use Mazus reptans (mazus) heavily in path joints — it’s hardy to Zone 5, spreads fast to fill gaps, and puts out small purple flowers each spring.
Cost Breakdown and Project Examples
Here’s what real stepping stone path projects have cost in different parts of the country:
| Project | Location | Length / Area | Material | Total Cost (Materials) |
|---|---|---|---|---|
| Backyard garden path | Austin, TX | 25 ft / ~35 sq ft | Local limestone, irregular | $110–$175 |
| Front entry path | Portland, OR | 40 ft / ~80 sq ft | Basalt stepping stones | $320–$480 |
| Formal garden path | Asheville, NC | 60 ft / ~120 sq ft | Pennsylvania bluestone, dimensional | $960–$1,800 |
If you hire a landscaper, labor usually adds $8 to $20 per square foot on top of materials — depending on where you live and how tricky the job is. A 40-square-foot path that costs $200 in materials might run $520 to $1,000 installed. Most homeowners with a weekend and basic tools save a lot doing it themselves.
One example: a homeowner in North Carolina’s Piedmont Triad region replaced a worn grass strip between their driveway and back gate with a 30-foot stepping stone path made from reclaimed brick found at a local salvage yard. Total material cost was under $60. They spent one full day digging, laying gravel, and setting the bricks in a running bond pattern. Two years later, the path is still level and stable, with creeping thyme filling the gaps.
Long-Term Maintenance
A well-built stepping stone path doesn’t need much upkeep, but a few quick tasks keep it looking good year after year.
- Re-level shifted stones annually. In areas with freezing winters, check the path each spring. Lift any stones that have risen or sunk, adjust the sand underneath, and reset them. For a 30-foot path, this usually takes less than an hour.
- Control weeds in joints. Even with polymeric sand or ground cover plants, some weeds will pop up. Pull them by hand when they’re small, or spot-treat with a non-selective herbicide — just be careful not to spray nearby plants.
- Clean stone surfaces. Algae and moss can make stones slick, especially in shade or damp spots. Scrub with a stiff brush and a weak vinegar solution (1 part vinegar to 10 parts water), or use a pressure washer on low. Avoid high pressure on softer stones like sandstone or limestone — it can wear them down.
- Replenish joint material. Decomposed granite and gravel settle and wash away over time. Top off the joints every two to three years to keep things tidy and stop weeds from taking hold in bare soil.
- Seal natural stone if desired. A penetrating sealer can help porous stones like limestone and sandstone resist stains and slow weathering. Reapply every three to five years, following the label instructions.
With those steps, a solid stepping stone path can last 20 years or more. Taking the time to get the base right upfront saves hours of fixing later — no resetting sunken stones or patching cracked joints. Whether your path winds through a shady garden with hostas and Japanese painted ferns or cuts straight through a sunny perennial border, the basics stay the same — and the result is a garden feature you’ll use and enjoy daily.

