
Landscaping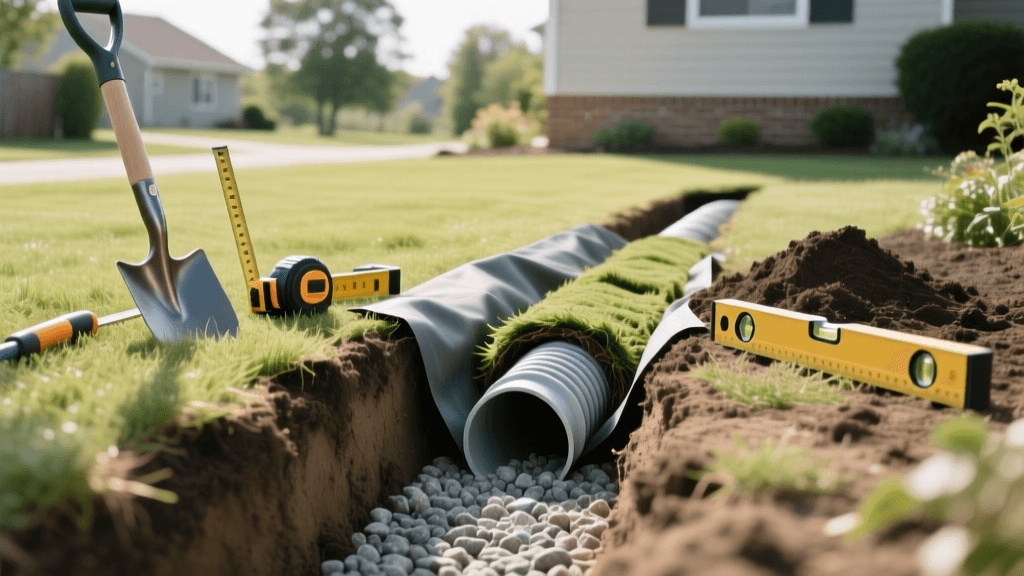
Step-by-Step Guide to Installing a Yard French Drain
What is a French Drain?
A French drain is a highly effective, time-tested landscaping drainage solution designed to redirect groundwater and surface water away from vulnerable areas of your property. Consisting of a gravel-filled trench containing a perforated pipe, this system relies on gravity to channel water away from your home’s foundation, soggy garden beds, or perpetually wet lawn patches. If you are dealing with standing water after heavy rains, installing a French drain is one of the most practical hardscaping projects you can undertake to protect your landscape and your home's structural integrity.
Tools and Materials Needed
Before breaking ground, gather the necessary tools and materials. Investing in high-quality landscape fabrics and pipes will ensure your drainage system lasts for decades without clogging.
- Tools: Trenching shovel, spade, wheelbarrow, line level or laser level, tape measure, utility knife, tamper, and work gloves.
- Pipe: 4-inch perforated corrugated drain pipe or Schedule 40 PVC (rigid) pipe.
- Gravel: Washed drainage gravel (typically 3/4-inch crushed stone; avoid pea gravel as it compacts too tightly).
- Fabric: Heavy-duty, non-woven geotextile landscape fabric (e.g., Mirafi or Dewitt Pro Series).
- Optional: Catch basins, pop-up emitters, and corrugated pipe fittings (T-joints, couplers).
Corrugated vs. PVC Drain Pipe: Which Should You Use?
Choosing the right pipe is critical for the longevity of your French drain. Below is a comparison to help you decide which material fits your specific landscaping needs.
| Feature | Corrugated Flexible Pipe | Rigid PVC Pipe (Schedule 40) |
|---|---|---|
| Cost | Low ($15 - $25 per 10 ft) | High ($30 - $45 per 10 ft) |
| Installation | Easy; bends around curves naturally | Moderate; requires fittings for turns |
| Durability | Moderate; can crush under heavy loads | Extremely High; withstands heavy loads |
| Clog Resistance | Lower; ridges trap sediment and roots | Higher; smooth interior walls |
| Best Use Case | Shallow yard drains, DIY curving paths | Deep trenches, under driveways, long runs |
Step-by-Step Installation Guide
Step 1: Plan the Route and Call 811
Water flows downhill, so your drain must follow a continuous downward slope to a suitable discharge point. Ideal discharge locations include a municipal storm drain, a dry well, or a lower-elevation area of your property (known as "daylighting"). Before you dig a single shovel of dirt, call 811 to have your local utility companies mark underground gas, water, and electrical lines. This is a non-negotiable safety and legal requirement.
Step 2: Dig the Trench with the Proper Slope
Dig a trench that is approximately 12 to 24 inches wide and 18 to 24 inches deep. The most critical factor in this step is the slope. For a French drain to function, it requires a minimum slope of 1 percent, which equates to a 1-inch drop for every 8 feet of trench length. Use a string line and a line level to verify your gradient as you dig. If your yard is entirely flat, you will need to dig progressively deeper as you move toward the discharge point to manufacture the necessary slope.
Step 3: Line the Trench and Add Base Gravel
Line the entire trench with your non-woven geotextile landscape fabric. Leave at least 12 inches of excess fabric hanging over both sides of the trench; you will use this to fold over the top later. Once the fabric is laid, pour a 2-inch to 3-inch base layer of washed 3/4-inch gravel into the bottom of the trench and tamp it down to create a stable, level bed for your pipe.
Step 4: Lay the Perforated Pipe
Place your perforated pipe on top of the gravel base. A common debate among landscapers is whether the pipe holes should face up or down. According to the University of Minnesota Extension, placing the perforated pipe with the holes facing downward is the best practice for French drains. As the water table rises in the gravel trench, water enters the pipe from the bottom and sides. This orientation prevents sediment and debris from washing directly down into the pipe from above, significantly reducing the risk of clogs over time.
Ensure the pipe is sloped correctly and connect multiple sections using couplers. If you are tying in a surface catch basin, use a T-fitting to connect the basin to the main drain line.
Step 5: Cover and Conceal the Drain
Shovel the remaining washed gravel over the pipe until the gravel layer is about 2 to 3 inches below the ground surface. Fold the excess landscape fabric over the top of the gravel, overlapping the seams to create a "burrito" effect. This fabric barrier is essential; it prevents topsoil and plant roots from migrating into the gravel and clogging the system. Finally, cover the fabric with 2 inches of topsoil and lay sod or plant shallow-rooted ground cover to seamlessly blend the drain into your existing landscape design.
Estimated Cost Breakdown
The cost of installing a French drain varies based on trench depth, soil type, and material choices. Below is an estimated cost breakdown for a standard 50-foot DIY yard French drain.
| Material / Service | Estimated Quantity | Estimated Cost |
|---|---|---|
| 4-inch Corrugated Pipe (10ft sections) | 5 sections | $100.00 |
| Washed Drainage Gravel (Bulk) | 2 tons | $120.00 |
| Non-Woven Geotextile Fabric | 1 roll (3x50 ft) | $85.00 |
| Fittings and Adhesives | Assorted | $40.00 |
| Tool Rental (Trencher - Optional) | 1 day | $150.00 |
| Total Estimated DIY Cost | $495.00 |
Note: Hiring a professional landscaping contractor typically costs between $20 and $50 per linear foot, meaning a 50-foot professional installation could range from $1,000 to $2,500.
Common French Drain Mistakes to Avoid
- Using the wrong gravel: Pea gravel or crushed limestone with fine dust will compact and block water flow. Always use washed 3/4-inch angular gravel.
- Skipping the landscape fabric: Without a geotextile barrier, soil will inevitably wash into the gravel bed, rendering the drain useless within a few years.
- Inadequate slope: Water will not move without gravity. Always double-check your 1% slope gradient with a level before laying the pipe.
- Illegal discharge: Never route your French drain directly into a municipal sanitary sewer system or onto your neighbor's property. Always check local zoning laws regarding stormwater runoff.
Maintenance and Troubleshooting
While French drains are largely passive and low-maintenance, they do require occasional inspection. Once a year, check the discharge point (the "daylight" end of the pipe) to ensure it is free of debris, leaves, and animal nests. If you notice water pooling over the drain line during heavy rain, the gravel bed may be clogged with sediment. In severe cases, you can rent a sewer jetter with a specialized drain cleaning hose to flush out the perforated pipe without digging up your yard.
Conclusion
Installing a yard French drain is a highly rewarding landscaping project that solves chronic drainage issues and protects your property from water damage. By carefully planning your route, maintaining a strict 1% slope, and utilizing high-quality geotextile fabrics and washed gravel, you can build a subterranean drainage system that keeps your lawn dry and your foundation secure for decades.

