Gardening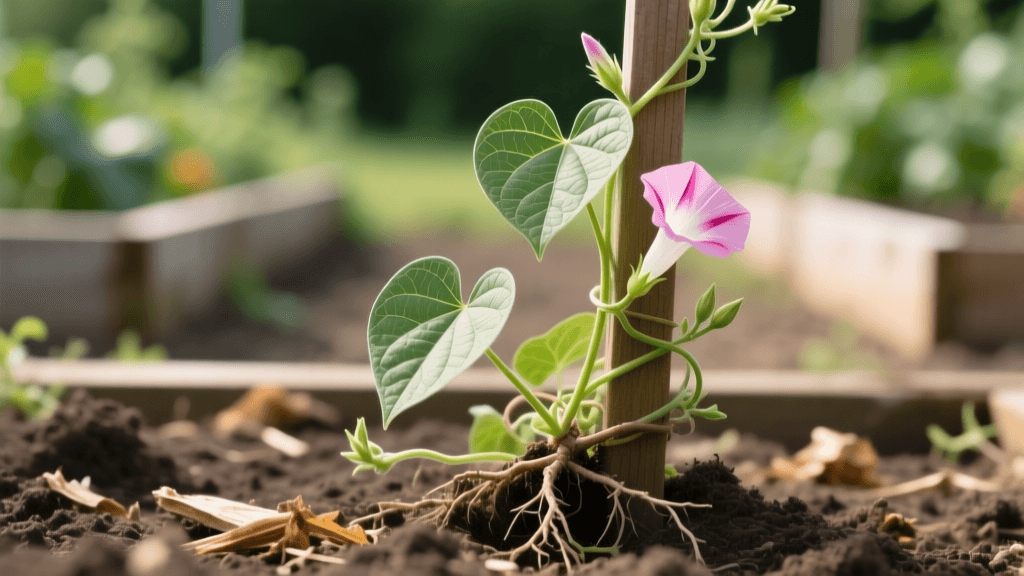
How to Identify and Eradicate Bindweed in the Garden
Introduction: The Garden's Most Relentless Invader
If you grow vegetables or maintain ornamental flower beds, few words strike fear into your heart quite like Convolvulus arvensis, commonly known as field bindweed. Often mistaken for its harmless and beautiful cousin, the annual morning glory, field bindweed is a deeply entrenched, aggressive perennial weed that can quickly choke out your prized tomatoes, peppers, and roses. Unlike annual weeds that complete their lifecycle in one season and are easily pulled, bindweed plays the long game. It is a master of survival, capable of regenerating from tiny root fragments and smothering entire raised beds in a matter of weeks.
In this comprehensive weed identification and removal guide, we will break down exactly how to spot field bindweed, understand its subterranean warfare tactics, and deploy targeted, actionable strategies to eradicate it from your garden for good. Whether you prefer organic smothering techniques or targeted chemical interventions, this guide provides the precise measurements, product recommendations, and timelines you need to reclaim your soil.
Step 1: Accurate Weed Identification
Before you can defeat your enemy, you must correctly identify it. Field bindweed is frequently confused with other vining plants, but misidentification can lead to ineffective removal strategies. According to plant pathologists and weed scientists at the Penn State Extension, accurate identification hinges on three primary characteristics: the leaves, the flowers, and the vining habit.
Leaves and Stems
Bindweed leaves are typically 1 to 2 inches long, shaped like arrowheads or small guitar picks, with smooth edges and a prominent central vein. The leaves alternate along the stem. The stems themselves are slender, green to reddish-brown, and lack the tiny hairs found on many other garden vines. As the plant grows, the stems will aggressively twine around any available support, including your vegetable trellises, tomato cages, and the stems of nearby plants, literally strangling them in the process.
Flowers
The flowers are the most recognizable feature, though they only appear from early summer through the first frost. They are trumpet-shaped, about 1 inch in diameter, and range from pure white to pale pink, often with a darker pink or yellow throat. While pretty, each flower is a warning sign that the plant is establishing deeper roots and preparing to drop seeds that can remain viable in your garden soil for up to 50 years.
The Subterranean Nightmare: Understanding the Root System
To understand why bindweed is so difficult to remove, you have to look beneath the soil surface. The Royal Horticultural Society (RHS) notes that field bindweed possesses one of the most extensive and resilient root systems of any common garden weed.
- Vertical Depth: The main taproot can plunge 10 to 20 feet deep into the soil, well beyond the reach of standard garden tilling or hand-pulling.
- Lateral Spread: Horizontal rhizomes can spread outward up to 30 feet from the parent plant, popping up new shoots in neighboring beds or even under concrete pathways.
- Brittle Regeneration: The roots are incredibly brittle. A root fragment as small as 2 inches long, if left in the soil, contains enough stored carbohydrates to generate a brand-new, fully established plant within weeks.
This root structure means that simply rototilling a bed infested with bindweed is the worst possible action you can take. Tilling chops the roots into hundreds of pieces, effectively planting a new bindweed weed every few inches across your entire garden.
Proven Bindweed Removal Strategies
Eradicating bindweed requires patience, persistence, and a multi-pronged approach. Below are the three most effective methods for removing bindweed from active vegetable and flower gardens, complete with costs and timelines.
Method 1: Targeted Chemical Wicking (For Severe Infestations)
In an active vegetable garden, spraying systemic herbicides like glyphosate is highly risky, as drift will kill your edible crops. However, you can use a technique called wicking or painting to apply the herbicide directly to the bindweed without harming nearby plants.
The Process:
- Purchase a concentrate containing 41% active ingredient glyphosate (e.g., Roundup Pro or Compare-N-Save Concentrate). Cost: Approximately $20 to $30 per pint.
- Mix a strong solution: 4 fluid ounces of concentrate per 1 gallon of water. Add a non-ionic surfactant (1 teaspoon per gallon) to help the chemical stick to the waxy bindweed leaves.
- Allow the bindweed vines to grow at least 12 inches long and untangle them from your desirable plants. Lay the vines flat on a piece of cardboard placed on the soil.
- Using a disposable foam brush or a specialized weed wicking glove, carefully paint the herbicide solution directly onto the leaves.
- Wait 7 to 14 days. The systemic herbicide will travel down the vine and into the deep root system, killing it from the inside out. Do not pull the vine until it has completely turned brown and crispy.
Note: Triclopyr-based herbicides are also highly effective on broadleaf bindweed, but they have a much longer soil residual life and should never be used in or near vegetable gardens, as they can damage future crops for over a year.
Method 2: Deep Manual Extraction (For Small Raised Beds)
If you maintain a strictly organic garden or are working in a small, contained raised bed, manual extraction is viable, though labor-intensive.
The Process:
- Wait for a heavy rain or deeply water the bed 24 hours before digging. Moist soil prevents the brittle roots from snapping.
- Use a high-quality spading fork (such as a DeWit or Bully Tools fork, costing around $40 to $60) rather than a shovel. A fork slices through soil with less resistance and is less likely to chop roots cleanly.
- Insert the fork at least 12 to 14 inches deep, angling it toward the base of the vine. Gently lever the soil upward to expose the root mass.
- Hand-sift the excavated soil, removing every white, fleshy root fragment you can find.
- Monitor the bed weekly. Any new shoots that emerge must be pulled immediately at the soil line to starve the remaining deep roots of photosynthetic energy.
Method 3: Soil Solarization and Smothering (For Empty Beds)
If you have a bed that is completely overrun and you can afford to take it out of production for a season, solarization is highly effective. As documented by the University of Minnesota Extension, trapping the sun's heat beneath clear plastic can cook weed roots and seeds in the top layers of soil.
The Process:
- Mow or cut the bindweed as close to the soil surface as possible.
- Water the soil deeply to a depth of 12 inches. Wet soil conducts heat much more effectively than dry soil.
- Cover the entire bed with 6-mil thick, UV-resistant clear polyethylene plastic (Cost: ~$50 for a 10x25 foot roll). Clear plastic is mandatory; black plastic blocks light but does not trap enough heat to kill deep perennial roots.
- Bury the edges of the plastic in a 6-inch trench around the perimeter to create an airtight seal.
- Leave the plastic in place for 4 to 6 weeks during the hottest part of the summer (July and August). Soil temperatures beneath the plastic must reach at least 110°F to 120°F to effectively pasteurize the soil and kill the bindweed crown.
Comparison Chart: Bindweed Removal Methods
| Method | Estimated Cost | Time to Eradicate | Best Used In | Pros & Cons |
|---|---|---|---|---|
| Chemical Wicking (Glyphosate) | $25 - $40 | 2 - 4 weeks | Active vegetable & flower beds | Pro: Kills deep roots. Con: Requires careful application to avoid crop damage. |
| Deep Manual Extraction | $40 - $60 (Tool cost) | 1 - 2 seasons of vigilance | Small raised beds, organic gardens | Pro: 100% organic, improves soil aeration. Con: Extremely labor-intensive; high risk of leaving root fragments. |
| Soil Solarization | $50 - $80 | 4 - 6 weeks (Summer only) | Empty beds, new garden prep | Pro: Kills weed seeds and soil-borne pathogens. Con: Bed is unusable during treatment; requires peak summer heat. |
| Smothering (Cardboard + Mulch) | $30 - $50 | 6 - 12 months | Pathways, perennial borders | Pro: Builds soil organic matter. Con: Bindweed roots often survive and penetrate cardboard over time. |
Preventing Bindweed from Returning
Once you have successfully eradicated the visible bindweed, your focus must shift to prevention. Because bindweed seeds can lie dormant for decades, and neighboring properties may harbor lateral roots, vigilance is your best defense.
Maintain a Thick Mulch Layer
While mulch alone will not stop established bindweed roots, a 3-to-4-inch layer of arborist wood chips or straw will block the sunlight necessary for bindweed seeds to germinate. It also makes any rogue shoots much easier to spot and pull when they are young and weak.
Plant Competitive Cover Crops
Bindweed thrives in bare, disturbed soil. In the off-season, plant aggressive cover crops like winter rye or buckwheat. These crops establish dense root mats and canopy cover that outcompete bindweed seedlings for water, nutrients, and sunlight.
Inspect New Soil and Compost
Many gardeners accidentally introduce bindweed by purchasing cheap topsoil or using unverified municipal compost that was not hot-composted to high enough temperatures to kill weed seeds and root fragments. Always source soil from reputable suppliers and inspect it for white, fleshy root pieces before adding it to your raised beds.
Final Thoughts on Garden Persistence
Field bindweed is not a weed you can defeat in a single afternoon. It requires a strategic, season-long commitment to depleting its massive underground energy reserves. By accurately identifying the plant, refusing to rototill the roots, and employing targeted removal methods like chemical wicking or solarization, you can eventually win the war. Protect your soil, stay vigilant, and your vegetable and flower gardens will thrive free from the suffocating grip of bindweed.