Gardening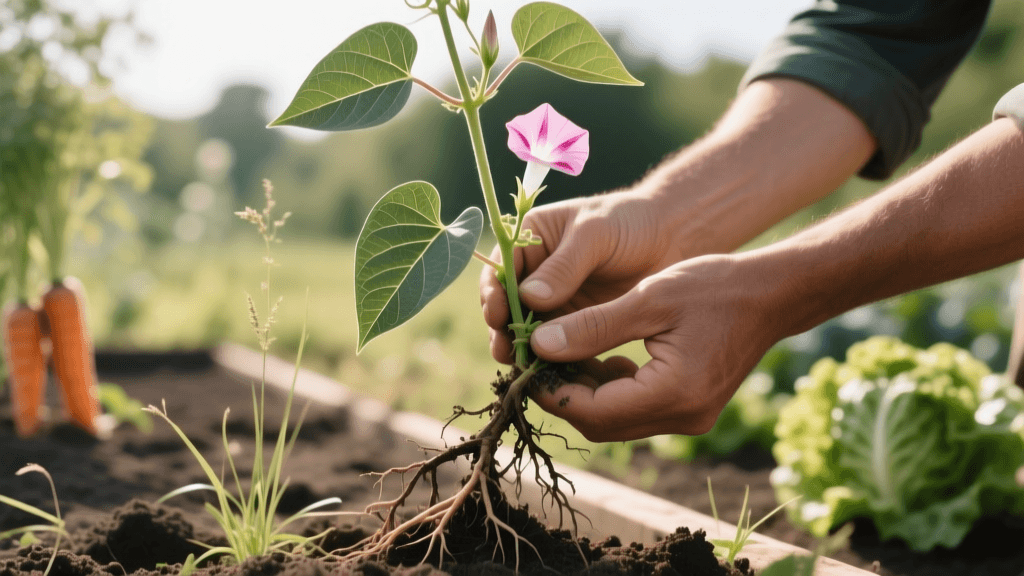
How to Identify and Eradicate Bindweed in Your Garden
Introduction to the Gardener's Worst Nightmare
Gardening brings immense joy, but few things can ruin a meticulously planned vegetable patch or vibrant flower bed faster than bindweed. Unlike annual weeds that complete their lifecycle in a single season and can be easily managed with basic mulching or shallow hoeing, bindweed is a relentless perennial vine. It wraps around your prized tomatoes, chokes your climbing roses, and spreads aggressively beneath the soil surface where you cannot see it.
For home gardeners, bindweed represents one of the most frustrating challenges in landscape management. Its deceptive, attractive morning-glory-like flowers often trick novice gardeners into letting it grow just a little too long. By the time the vine begins to strangle nearby crops, the root system has already established a deep, nearly indestructible network. Eradicating bindweed requires patience, precise identification, and a strategic, multi-season approach.
In this comprehensive guide, we will break down exactly how to identify the specific type of bindweed invading your space, understand its biological survival mechanisms, and deploy actionable, proven removal strategies to reclaim your garden.
Identifying the Culprit: Field vs. Hedge Bindweed
Before you can defeat your enemy, you must correctly identify it. The term 'bindweed' generally refers to two distinct species that plague home gardens: Field Bindweed (Convolvulus arvensis) and Hedge Bindweed (Calystegia sepium, also known as Convolvulus sepium). While they share similar vining habits and trumpet-shaped flowers, their growth patterns and management nuances differ slightly.
According to the Royal Horticultural Society (RHS), both species twine clockwise around any available support, but distinguishing between them is crucial for understanding the depth of your infestation. Field bindweed is generally more drought-tolerant and features a much deeper, more extensive root system, making it notoriously difficult to eradicate from deep garden beds.
Comparison Chart: Field Bindweed vs. Hedge Bindweed
| Characteristic | Field Bindweed (Convolvulus arvensis) | Hedge Bindweed (Calystegia sepium) |
|---|---|---|
| Leaf Shape | Small, arrowhead-shaped (1/2 to 2 inches long) | Large, triangular with pointed lobes at the base (2 to 4 inches long) |
| Flower Size & Color | Small (3/4 to 1 inch), white or pale pink | Large (1.5 to 3 inches), pure white |
| Root System Depth | Extremely deep, can reach 10 to 20 feet | Deep but more concentrated in the top 12-18 inches |
| Growth Habit | Creeps along ground before climbing | Aggressive climber from the start |
Why Bindweed is the Ultimate Garden Survivor
To understand why pulling bindweed rarely works, you have to look underground. The University of California Integrated Pest Management (UC IPM) program notes that field bindweed roots can penetrate the soil up to 20 feet deep. These roots are not just taproots; they form a massive lateral network of rhizomes. If you use a rototiller or a spade to chop the roots, every single fragment containing a node can generate a brand-new, fully viable plant.
Furthermore, bindweed is a prolific seed producer. A single plant can produce hundreds of seeds that remain viable in the soil seed bank for up to 20 years or more. The seeds have incredibly hard coats, requiring scarification (often passing through an animal's digestive tract or enduring extreme weathering) to germinate. This means that even if you kill the mature vines, you must remain vigilant against new seedlings for decades.
Step-by-Step Bindweed Removal Strategies
Because of its biological resilience, a single quick fix will not eliminate bindweed. You must employ a combination of mechanical, cultural, and, if necessary, chemical controls. Here are the most effective strategies for home gardeners.
1. The Starvation Method (Manual Removal)
If you are growing an organic vegetable garden and refuse to use herbicides, the starvation method is your best option. Bindweed relies on its leaves to photosynthesize and send energy down to its massive root system. By repeatedly removing the foliage, you force the roots to expend stored energy to push up new shoots.
- Action: Snap or cut the vines off at the soil line every 7 to 10 days. Do not pull them, as this can break the root and stimulate new lateral shoots.
- Tool: Use a sharp stirrup hoe or a Japanese weeding sickle (kama) to slice the stems just below the soil surface.
- Timeline: This requires relentless dedication. It typically takes two to three full growing seasons of consistent hoeing to exhaust the root system completely.
2. Smothering and Solarization
For garden pathways, future bed sites, or areas you can afford to leave fallow for a season, smothering is highly effective. However, standard landscape fabric is useless against bindweed; the sharp tips of the vines will easily pierce woven geotextiles.
- Action: Mow or cut the bindweed down to the ground. Cover the area with overlapping layers of heavy, unwaxed cardboard. Top the cardboard with at least 4 to 6 inches of heavy organic mulch (wood chips or straw) or a thick layer of compost.
- Solarization: In hot climates, you can use clear, UV-resistant polyethylene plastic sheeting (2 to 4 mil thick) during the peak summer months. The trapped heat will cook the top layers of the root system and sterilize the soil seed bank.
- Warning: Never use black plastic for solarization, as it does not trap enough heat to kill the deep roots or seeds.
3. Targeted Herbicide Application (The 'Painting' Method)
In ornamental beds or around established perennials where hoeing is difficult and smothering will kill desirable plants, systemic herbicides containing glyphosate or triclopyr can be used safely if applied with precision. Spraying is highly discouraged, as the drift will kill your flowers and vegetables.
- Action: Allow the bindweed vines to grow long and untangle them from your desirable plants. Lay the vines flat on a piece of cardboard or the bare ground.
- Application: Mix a 2% to 5% solution of systemic herbicide according to the label. Using a disposable foam paintbrush or a specialized weed-wiping glove, carefully 'paint' the leaves of the bindweed. The plant will absorb the chemical and translocate it down to the deep roots, killing the entire system.
- Cost: A small concentrate bottle of glyphosate costs around $15-$25 and will last a home gardener several seasons for spot-treatment.
4. Thermal and Organic Acid Controls
For bindweed emerging in driveway cracks, patio pavers, or the very edges of raised beds, thermal weeding is a fast, chemical-free option.
- Boiling Water: Pouring a full kettle of boiling water directly onto the crown of the plant will cook the root collar. This may need to be repeated 3 or 4 times.
- Horticultural Vinegar: A 20% to 30% acetic acid solution will rapidly burn down the foliage. Note that this is a contact burn only; it will not kill the deep roots, but it serves as a rapid, organic way to defoliate the plant and initiate the starvation process.
Managing Bindweed in Raised Beds and Containers
Raised beds are not immune to bindweed, especially if they are built directly on native soil without a proper base barrier. If bindweed breaches a raised bed, do not till the soil, as this will distribute root fragments throughout your premium planting mix.
Instead, carefully trace the vine down to the exact point it enters the soil. Use a narrow trowel or a dandelion digger to excavate a deep, narrow hole and extract as much of the primary taproot as possible. For container gardening, if bindweed has infiltrated a potted plant, the safest and most guaranteed remedy is to remove the plant entirely, wash the roots bare under a hose, and repot it in fresh, sterile potting soil. Sift the old soil through a 1/4-inch hardware cloth screen to catch any white root fragments before composting or discarding it.
Prevention and Long-Term Vigilance
Once you have eradicated an active infestation, preventing a resurgence is paramount. Implement the following cultural practices to keep your garden bindweed-free:
- Inspect Nursery Plants: Bindweed often hitchhikes into gardens hidden in the root balls of container-grown nursery stock. Before planting, gently loosen the outer roots and look for the telltale white, brittle, spaghetti-like roots of bindweed.
- Use Clean Compost and Mulch: Ensure that any bulk compost or manure you purchase has been hot-composted to at least 140°F (60°C) to kill weed seeds. Avoid using hay, which is often loaded with weed seeds, and opt for straw or wood chips instead.
- Maintain a Healthy Lawn and Groundcover: Bindweed thrives in poor, compacted, or bare soil. Maintaining a dense, healthy turf or planting aggressive, shade-casting groundcovers in ornamental beds will outcompete bindweed seedlings for sunlight and space.
- Never Let it Flower: If you miss a few weeks of weeding and the bindweed begins to form seed pods, immediately snip off the flowers and dispose of them in the municipal trash, never in your home compost bin.
Conclusion
Battle with bindweed is a test of endurance rather than a single decisive victory. By correctly identifying whether you are facing field or hedge bindweed, understanding its deep-rooted survival tactics, and consistently applying the starvation, smothering, or targeted chemical methods outlined above, you can successfully reclaim your garden. Stay vigilant, keep your tools sharp, and never underestimate the resilience of a weed that has evolved to survive nearly anything nature throws at it.