
Landscaping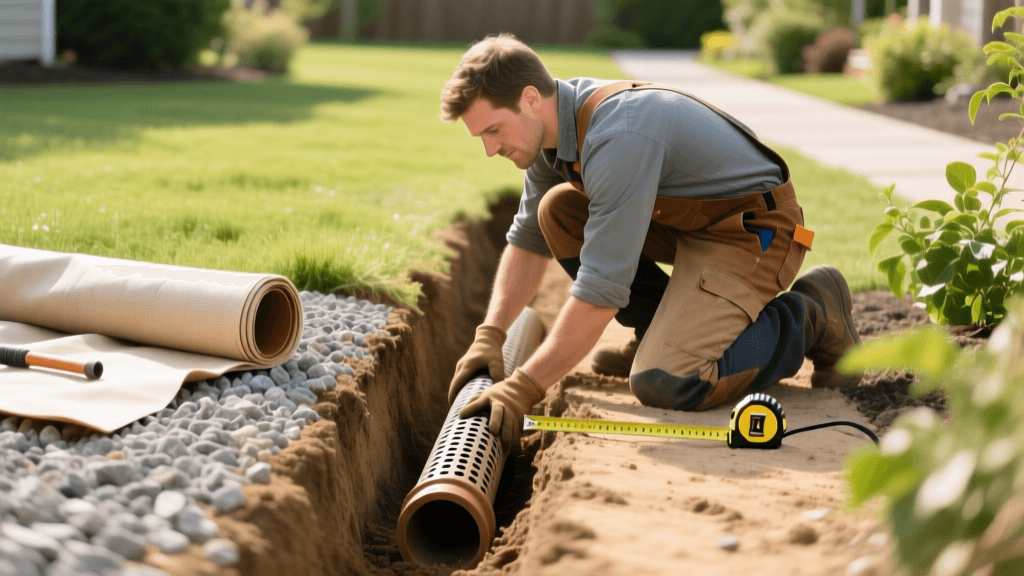
How to Install a French Drain to Fix Yard Drainage
Why Your Yard Needs a French Drain
Standing water in your yard is more than just a landscaping nuisance; it is a direct threat to your home's foundation, your lawn's root system, and your property's overall curb appeal. When heavy rains leave your grass spongy or create muddy swales near your home's perimeter, surface grading alone is often not enough to solve the problem. This is where a French drain becomes an essential landscaping project. By capturing subsurface water and redirecting it away from vulnerable areas, a French drain acts as a hidden highway for excess moisture, ensuring your outdoor living spaces remain dry and usable year-round.
How a French Drain Works
A French drain is fundamentally a slightly sloped trench filled with gravel and a perforated pipe. As water pools in the soil, it naturally seeks the path of least resistance. The gravel bed provides this path, funneling water into the perforated pipe. The pipe then carries the water downhill to a designated exit point, such as a storm drain, a dry well, or a lower elevation area of your property known as 'daylighting.' Unlike solid underground plumbing, a French drain is designed to leak in reverse—letting water in from the surrounding soil before channeling it away.
Tools and Materials Required
Before breaking ground, gather the necessary tools and materials. Sourcing high-quality drainage products will prevent clogs and system failures down the line.
- Tools: Trenching shovel, spade, wheelbarrow, line level, string line, tape measure, landscaping staples, and a utility knife.
- Landscape Fabric: Use a heavy-duty, water-permeable geotextile fabric (such as Mirafi 500X or NDS Pro Series). Do not use cheap, woven weed barrier, as it will restrict water flow and clog rapidly.
- Drainage Pipe: 4-inch perforated drain pipe (corrugated or PVC).
- Gravel: 3/4-inch washed drainage rock or river rock. Avoid crushed limestone or pea gravel, which can compact and impede water flow or degrade over time.
- Optional Catch Basin: An NDS 9x9 catch basin can be integrated at the start of the trench to capture rapid surface runoff before it enters the soil.
Corrugated vs. PVC Pipe: Which Should You Choose?
One of the most common dilemmas for DIY landscapers is choosing between flexible corrugated pipe and rigid PVC pipe. Both have distinct advantages depending on your soil type and yard layout.
| Feature | Corrugated Pipe (Flexible) | PVC Pipe (Rigid SDR-35) |
|---|---|---|
| Installation Ease | High; bends around curves easily | Low; requires fittings for turns |
| Durability | Moderate; can crush under heavy loads | High; withstands heavy soil pressure |
| Maintenance | Difficult; ridges trap silt and roots | Easy; smooth interior allows flushing |
| Cost per Foot | $0.75 - $1.25 | $2.50 - $4.00 |
| Best Application | Shallow trenches, curved garden beds | Deep trenches, under driveways, long runs |
For most residential yard drainage projects, rigid PVC is the superior long-term investment. While corrugated pipe is cheaper and faster to lay, its ribbed interior traps sediment, making it highly susceptible to clogging after a few years of heavy use.
Step-by-Step French Drain Installation Guide
Step 1: Plan the Route and Call 811
Water flows downhill, so your drain must follow a continuous downward slope to an exit point. Identify where the water is pooling and map a route to a lower elevation, storm sewer, or dry well. Avoid routing water onto your neighbor's property, as this violates local municipal codes and can lead to liability issues. Before you dig a single trench, call 811 (the national call-before-you-dig hotline) at least 48 hours in advance. Utility companies will come out and mark underground gas, water, and electrical lines for free, preventing catastrophic and dangerous accidents.
Step 2: Dig the Trench with Precision
The standard French drain trench is 12 inches deep and 6 inches wide. However, the most critical factor is the slope. You must maintain a minimum 1 percent grade, which translates to a 1-inch drop for every 8 feet of trench length. Use a string line and a line level to mark your desired slope on wooden stakes driven into the ground at the beginning and end of your route. As you dig with your trenching shovel, constantly measure from the string line down to the trench floor to ensure you are maintaining the exact 1 percent pitch. If the trench is too flat, water will stagnate in the pipe; if it is too steep, the water will outrun the sediment, leaving silt behind to clog the system.
Step 3: Line the Trench with Landscape Fabric
Once the trench is dug and the slope is verified, drape your heavy-duty geotextile landscape fabric over the entire trench. You want the fabric to line the bottom and extend up both sides, leaving at least 6 inches of excess fabric hanging over the top edges on each side. This excess will be folded over the top of the gravel later to create a complete 'burrito' wrap. Secure the fabric to the trench walls using landscaping staples to prevent it from slipping while you add heavy gravel. This fabric layer is non-negotiable; it prevents fine soil particles from migrating into the gravel bed and choking the pipe.
Step 4: Lay the Gravel Bed and Pipe
Pour a 2-inch base layer of 3/4-inch washed drainage rock into the bottom of the fabric-lined trench. Tamp it down lightly to create a stable, level bed. Next, lay your perforated pipe on top of the gravel. Crucial Tip: Always place the pipe with the perforated holes facing down. While it seems counterintuitive, water will fill the gravel bed from the bottom up. When the water level reaches the pipe, it enters through the bottom holes, leaving suspended silt and sediment to settle harmlessly in the gravel bed below the pipe rather than clogging the interior. Connect your pipe sections securely, ensuring all joints are tight.
Step 5: Wrap, Cover, and Restore
Once the pipe is laid, cover it with another 3 to 4 inches of washed drainage rock, completely burying the pipe. Smooth the rock out evenly. Now, take the excess landscape fabric hanging over the edges of the trench and fold it tightly over the top of the gravel, overlapping the layers to seal the system. This prevents topsoil and grass roots from penetrating the gravel bed. Finally, backfill the remaining 2 to 3 inches of the trench with native topsoil and lay sod or sprinkle grass seed over the top to seamlessly blend the drain into your existing lawn.
French Drain Cost Breakdown
Understanding the financial commitment helps in deciding whether to tackle this as a weekend DIY project or hire a professional landscaping crew.
| Cost Factor | DIY Installation (Per Linear Foot) | Professional Installation (Per Linear Foot) |
|---|---|---|
| Materials (Pipe, Rock, Fabric) | $4.00 - $8.00 | $5.00 - $10.00 |
| Labor & Equipment | $0.00 (Sweat Equity) | $15.00 - $40.00 |
| Permits / Utility Locates | $0.00 (811 is Free) | $50.00 - $150.00 Flat Fee |
| Total Estimated Cost (50 ft run) | $200 - $400 | $1,000 - $2,500+ |
While DIY saves significant money, professional installation is highly recommended if your yard requires heavy machinery like a mini-excavator, or if the drain must be routed beneath existing concrete hardscaping or deep root systems.
Expert Advice and Best Practices
Proper drainage is deeply tied to soil science and structural integrity. According to the University of Minnesota Extension, subsurface drainage systems must be paired with correct surface grading to be truly effective. Their guidelines emphasize that soil should slope away from the home's foundation at a minimum rate of 6 inches over the first 10 feet. A French drain cannot compensate for severe negative grading that directs thousands of gallons of roof runoff directly against your foundation. Always address surface grading and extend your downspouts at least 4 feet away from your home before relying entirely on a subsurface French drain.
'Subsurface drainage is critical for poorly drained soils, but it must be integrated with surface water management. Ensuring that downspouts and surface swales direct water away from the foundation reduces the hydrostatic pressure that causes basement leaks and structural settling.' - University of Minnesota Extension, Yard and Garden Briefs.
Maintenance Tips for Longevity
A well-built French drain can last 20 to 30 years with minimal upkeep. To ensure your system performs optimally, follow these maintenance rules:
- Install Cleanouts: Always install a vertical PVC cleanout pipe with a removable cap at the highest point of the drain and at every major directional change. This allows you to insert a plumber's snake or a high-pressure garden hose to flush out accumulated silt.
- Protect the Exit Point: The daylight exit point is vulnerable to erosion and debris. Line the exit trench with riprap (large stones) to prevent soil washout, and inspect it seasonally to ensure leaves, rodents, or lawn debris have not blocked the opening.
- Avoid Heavy Traffic: Do not drive heavy vehicles or park cars over the trench line unless you have specifically installed Schedule 40 PVC pipe and compacted the gravel base with a mechanical plate compactor. Standard corrugated pipe will collapse under vehicular weight, causing a depression in your lawn and a total system failure.
By carefully planning your route, selecting the right washed gravel and rigid piping, and adhering to the strict 1 percent slope rule, you can permanently eliminate standing water and protect your landscape investment for decades to come.

