
Landscaping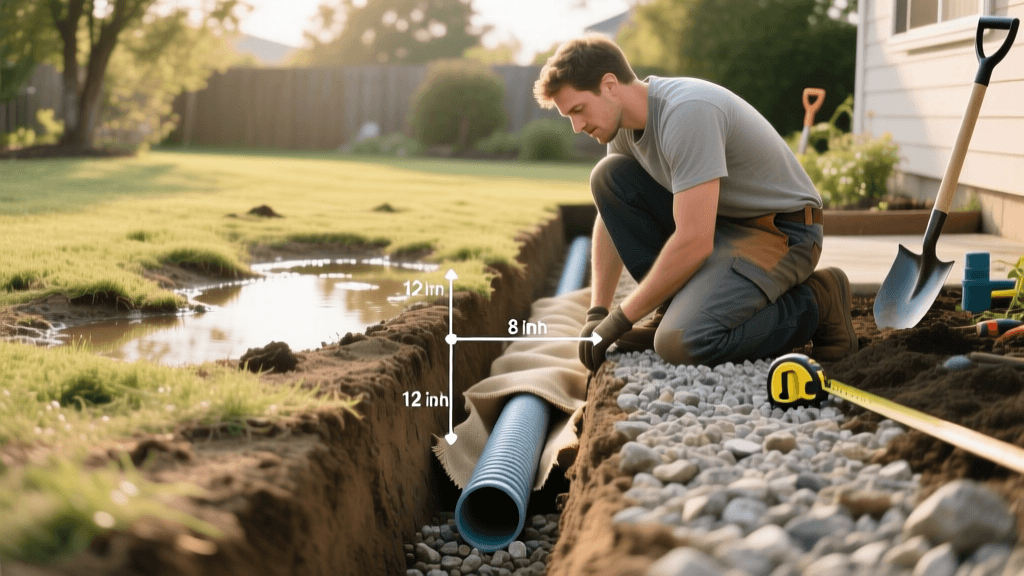
How to Install a French Drain to Fix Poor Yard Drainage
Why Your Yard Needs a French Drain
Standing water in your yard is more than just a nuisance; it is a direct threat to your home's foundation, your landscaping investments, and your lawn's root system. When soil becomes oversaturated, hydrostatic pressure builds up against basement walls and concrete footings, leading to cracks, leaks, and catastrophic structural damage over time. Furthermore, waterlogged soil deprives turfgrass and ornamental plants of essential oxygen, leading to root rot and fungal diseases.
A French drain is a highly effective, time-tested landscaping solution designed to intercept and redirect subsurface water away from vulnerable areas. Unlike surface drains that only catch water after it has already pooled, a French drain utilizes a gravel-filled trench and a perforated pipe to capture groundwater as it moves through the soil profile. This practical how-to guide will walk you through the exact measurements, material selections, and installation techniques required to build a professional-grade French drain on your property.
Tools and Materials Required
Before breaking ground, gather the necessary tools and high-quality materials. Skimping on landscape fabric or gravel will lead to a clogged system within a few years.
- Tools: Spade shovel, trenching shovel, wheelbarrow, string line, line level, tape measure, utility knife, and a tamper.
- Pipe: 4-inch NDS corrugated perforated drain pipe (sock-wrapped is highly recommended to prevent fine silt intrusion).
- Gravel: 3/4-inch washed river rock or crushed granite. Do not use pea gravel or limestone, as they round off or break down and clog the pipe.
- Fabric: Heavy-duty non-woven landscape fabric (e.g., Mirafi 500X or equivalent commercial-grade geotextile).
- Safety: Work gloves, safety glasses, and steel-toe boots.
Step-by-Step French Drain Installation Guide
Step 1: Plan the Route and Establish the Slope
Water flows downhill, so your drain must have a continuous downward slope to function. The industry standard for drainage slope is a 1% grade, which equates to a 1/8-inch drop per linear foot. Use a string line and a line level to map out your trench route from the problem area to the discharge point (such as a storm drain, dry well, or daylighted hillside).
Crucial Warning: Always call 811 (the national call-before-you-dig hotline) at least 72 hours before you start digging. Utility companies will come out and mark underground gas, water, and electrical lines for free, preventing dangerous and costly accidents.
Step 2: Dig the Trench
For a standard residential yard drainage project, your trench should be 12 inches wide and 18 to 24 inches deep. The depth depends on your frost line and the severity of the water table. Use a flat spade shovel to cut the sod, and a trenching shovel to remove the heavy soil. If you are digging more than 50 linear feet, consider renting a mini-excavator or a walk-behind trencher from a local equipment rental center for approximately $150 to $200 per day to save your back and hours of manual labor.
Step 3: Line the Trench with Landscape Fabric
Drape the heavy-duty geotextile fabric into the trench, allowing at least 12 inches of excess fabric to hang over both sides of the trench edges. This fabric is the most critical component of the system; it separates the surrounding soil from the gravel, preventing the system from silting in and failing. Overlap multiple sheets of fabric by at least 12 inches to ensure no soil can bypass the barrier.
Step 4: Add the Gravel Base
Shovel a 2-inch to 3-inch layer of 3/4-inch washed river rock into the bottom of the fabric-lined trench. Use a wooden 2x4 or a hand tamper to level and lightly compact this base layer. This creates a stable, permeable foundation for your drain pipe and allows water to flow freely beneath the pipe.
Step 5: Lay the Perforated Pipe
Place your 4-inch perforated drain pipe on top of the gravel base. There is a long-standing debate in landscaping circles regarding pipe orientation, but authoritative sources have settled it. According to the Penn State Extension, you should 'place the pipe with the holes facing downward.' This counterintuitive placement allows the water table to rise through the gravel and enter the bottom of the pipe while minimizing the direct infiltration of sediment and debris that would otherwise fall straight into upward-facing holes.
Step 6: Cover the Pipe and Fold the Fabric
Shovel more washed river rock over the pipe until the gravel layer is about 3 to 4 inches below the surface grade. Once the pipe is completely encased in gravel, take the excess landscape fabric hanging over the edges and fold it over the top of the gravel bed. Overlap the fabric flaps to create a secure 'burrito' or envelope effect. This completely seals the gravel and pipe away from the topsoil.
Step 7: Top with Soil and Restore the Landscape
Fill the remaining 3 to 4 inches of the trench with high-quality topsoil. Compact the soil lightly to prevent future settling, then lay new sod or spread grass seed and straw over the trench to seamlessly blend the repair into your existing lawn. For garden bed applications, you can top the gravel with decorative river rock or mulch instead of soil.
French Drain Cost Breakdown: DIY vs. Professional
Installing a French drain is a labor-intensive project, but doing it yourself can save a significant amount of money. Below is a cost comparison based on a standard 50-foot drainage run.
| Cost Category | DIY Installation (50 ft) | Professional Installation (50 ft) |
|---|---|---|
| Perforated Pipe & Fittings | $45 - $75 | $100 - $150 (Wholesale markup) |
| Washed River Rock (2 tons) | $80 - $120 | $150 - $250 (Delivery & handling) |
| Geotextile Landscape Fabric | $60 - $90 | $100 - $150 |
| Equipment Rental (Trencher) | $150 - $250 | Included in labor |
| Labor (Manual/Machine) | 0 (Sweat Equity) | $1,000 - $2,500 |
| Total Estimated Cost | $335 - $535 | $1,350 - $3,050 |
Note: Professional landscaping contractors typically charge between $25 and $50 per linear foot for French drain installation, heavily dependent on local labor rates, soil composition (e.g., heavy clay vs. loam), and site accessibility.
Expert Tips for Long-Lasting Drainage
- Daylight the Pipe: Ensure the discharge end of your pipe 'daylights' (exits above ground) in a safe area where water can safely disperse without eroding soil or flooding a neighbor's property. Use a solid pipe for the last 5 feet to prevent water from dumping right next to your discharge point.
- Install a Catch Basin: If your yard suffers from massive surface pooling during heavy downpours, tie an NDS square catch basin into the French drain system using a solid wye-fitting. This allows rapid surface water to enter the system before it has time to percolate through the soil.
- Use Cleanouts: Install a vertical cleanout pipe with a cap near the highest point of the drain. This allows you to insert a garden hose or a sewer jetter annually to flush out any fine silt or root intrusions that may have bypassed the fabric.
Frequently Asked Questions
How long does a French drain last?
A properly installed French drain using non-woven geotextile fabric and washed river rock can last 30 to 40 years. Systems that omit the fabric or use cheap weed-barrier plastics typically fail within 3 to 5 years due to silt clogging.
Can I use a solid pipe instead of a perforated pipe?
Solid pipes are used for downspout extensions and moving water quickly from point A to point B. However, to solve a high water table or soggy yard issue, you must use perforated pipe to allow groundwater to enter the system.
What if my yard is completely flat?
If your property lacks the natural elevation change required for a 1% slope, a traditional French drain will not work. In these scenarios, you must install a dry well to store the water underground, or use an exterior sump pump system to mechanically lift and move the water to a municipal storm drain.

