
Landscaping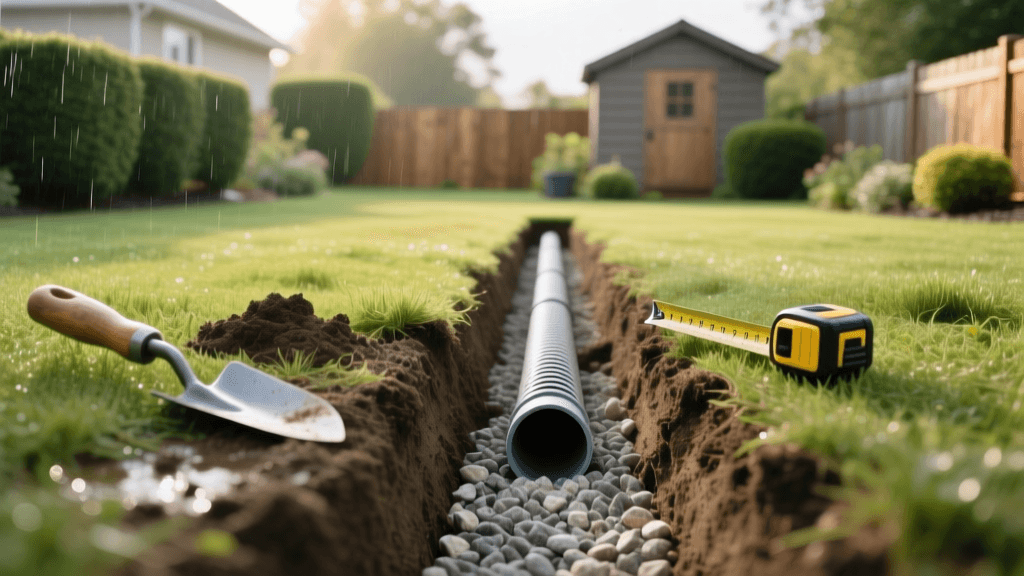
How to Install a French Drain to Fix a Soggy Yard
Understanding the French Drain System
Dealing with a soggy yard can be one of the most frustrating challenges for a homeowner. Standing water not only kills your turfgrass and ruins your garden beds, but it can also lead to severe foundation issues, basement flooding, and mosquito breeding grounds. If your property suffers from poor drainage, installing a French drain is one of the most effective, time-tested hardscaping solutions available. Invented by Henry French in 1859, this system uses gravity and a perforated pipe to redirect subsurface and surface water away from vulnerable areas of your landscape.
This comprehensive, practical how-to guide will walk you through the exact steps to design, dig, and install a French drain in your yard. We will cover specific material recommendations, precise measurements for slope and trench depth, and provide a cost comparison to help you budget your DIY landscaping project.
Tools and Materials Required
Before beginning your hardscaping project, gather the following tools and materials to ensure a smooth installation process:
- Tools: Trenching shovel, flat spade, steel rake, hand tamper, line level, masonry string, wooden stakes, tape measure, carpenter's level, and a garden fork.
- Pipe: 4-inch perforated corrugated drain pipe (or rigid SDR 35 PVC for heavy-load areas).
- Fabric: Heavy-duty, non-woven geotextile landscape fabric (minimum 4 oz per square yard).
- Gravel: 3/4-inch washed drainage gravel (crushed stone). Do not use pea gravel or crushed limestone.
- Finishing: Topsoil, sod, or grass seed to match your existing lawn.
Step 1: Planning the Route and Checking Utilities
Before you break ground, you must determine the water's entry point and its exit point. The exit point must be a safe discharge area, such as a municipal storm drain, a dry well, or a lower elevation on your property where water can safely disperse without affecting neighbors or violating local runoff ordinances.
Crucially, you must call 811 (the national call-before-you-dig number) at least a few days before starting. This free service will mark underground utility lines, preventing dangerous and costly accidents. Once utilities are marked, use stakes and string to map out your trench route. Calculate the slope: a French drain requires a minimum slope of 1 percent, which equates to a 1-inch drop for every 8 feet of trench length. Use a line level attached to your string to verify this gradient across the entire route.
Step 2: Digging the Trench
The standard dimensions for a residential French drain trench are 12 inches wide and 18 to 24 inches deep. If you are dealing with heavy clay soil or severe water accumulation, you may need to dig up to 24 inches deep to accommodate a larger gravel bed and increase the system's water-holding capacity.
Use a trenching shovel to cut through the sod and soil. Keep the trench walls as vertical as possible to prevent cave-ins and make lining the trench easier. As you dig, constantly check your slope using a long carpenter's level or a water level. If you hit heavy, compacted clay at the bottom of the trench, consider scoring the soil with a garden fork to improve natural soil percolation.
Step 3: Lining the Trench and Adding the Base
Line the entire trench with your heavy-duty, non-woven geotextile landscape fabric. Do not use cheap, woven weed barrier fabric from big-box stores; it will quickly clog with silt and fail within a few years, rendering your drain useless. The fabric should be wide enough to drape over the sides of the trench and extend at least 12 inches beyond the top edges on both sides. This overhang is critical for wrapping the gravel later.
Once the fabric is laid, add a 2- to 3-inch base layer of 3/4-inch washed drainage gravel. Washed gravel is essential because it is free of stone dust and fines that can wash into the pipe and cause clogs. Tamp the gravel base lightly to create a firm, sloped foundation for the pipe.
Step 4: Laying the Perforated Pipe
Unroll your 4-inch perforated drain pipe and lay it on top of the gravel base. A common debate in landscaping circles is whether the pipe holes should face up or down. According to civil engineering principles and guidelines from the American Society of Agricultural and Biological Engineers (ASABE), the holes should face downward. Water naturally rises through the gravel bed due to hydrostatic pressure; placing the holes at the bottom allows water to enter the pipe at the lowest possible point, maximizing the trench's water-holding capacity before the pipe even begins to fill.
Connect pipe sections using internal couplers, and ensure the pipe maintains the 1 percent slope. If you are using rigid PVC, use 45-degree wye fittings for any branches rather than sharp 90-degree elbows to maintain water flow velocity.
Pipe Material Comparison: Corrugated vs. Rigid PVC
| Feature | Corrugated Slotted Pipe | Rigid PVC (SDR 35) |
|---|---|---|
| Cost per Foot | $0.75 - $1.25 | $2.50 - $4.00 |
| Durability | Moderate (can crush under heavy load) | High (withstands heavy soil loads) |
| Flow Rate | Lower (corrugations create friction) | Higher (smooth interior walls) |
| Flexibility | High (bends around curves easily) | Low (requires angled fittings) |
| Best Use Case | Shallow yard drains, DIY curves | Deep trenches, under driveways |
Step 5: Backfilling and Concealing the Drain
Cover the pipe with another 8 to 12 inches of 3/4-inch washed gravel, ensuring the pipe is completely buried and protected. Leave about 3 to 4 inches of space from the top of the trench. Fold the excess landscape fabric over the top of the gravel, overlapping the edges to create a sealed 'gravel burrito.' This prevents topsoil and surface debris from washing down into the gravel and clogging the system.
Finally, cover the wrapped gravel with 2 to 3 inches of topsoil and lay sod or plant grass seed to seamlessly blend the drain into your existing lawn. Water the new sod heavily to help it establish roots and settle the soil.
Common Installation Mistakes to Avoid
- Using the Wrong Gravel: Pea gravel is too smooth and shifts easily, while crushed limestone breaks down into a paste that clogs pipes. Always use washed, angular 3/4-inch stone.
- Ignoring the Slope: Without a minimum 1% slope, water will pool inside the pipe rather than flowing to the discharge point, defeating the purpose of the drain.
- Skipping the Fabric: Exposed gravel will quickly fill with soil, roots, and debris. The geotextile fabric is the most critical component for the longevity of your system.
- Poor Discharge Planning: Dumping the drain outlet directly onto a neighbor's property or near your own foundation can lead to legal disputes and structural damage. Always route water to a safe, distant dispersal area.
Expert Insights and Authoritative Guidelines
While a French drain is an excellent subsurface solution, it must be paired with proper surface grading. According to the University of Minnesota Extension, homeowners must first ensure a 5% surface slope away from the house for the first 10 feet to prevent water from overwhelming the subsurface drain. The Extension also recommends conducting a simple percolation test before installation: dig a small test hole, fill it with water, and measure how long it takes to drain. If the water takes longer than 24 hours to drain an inch, your soil is heavily clay-based, and you may need to incorporate a dry well or a larger gravel bed to manage the slow percolation rate.
Cost Breakdown for DIY French Drains
Installing a French drain yourself can save thousands of dollars compared to hiring a professional landscaping crew. Here is a typical cost breakdown for a 50-foot DIY French drain project:
- Drain Pipe (50 ft): $40 - $60
- Washed Gravel (approx. 4 tons): $200 - $300 (plus delivery fees)
- Geotextile Fabric (1 roll): $50 - $80
- Miscellaneous (Couplers, stakes, string): $30
- Total DIY Cost: $320 - $470 (Approx. $6.50 - $9.50 per linear foot)
By comparison, hiring a professional landscaping contractor to install a French drain typically costs between $30 and $70 per linear foot, meaning a 50-foot system could cost anywhere from $1,500 to $3,500 depending on local labor rates, soil conditions, and the complexity of the discharge routing.

