
Landscaping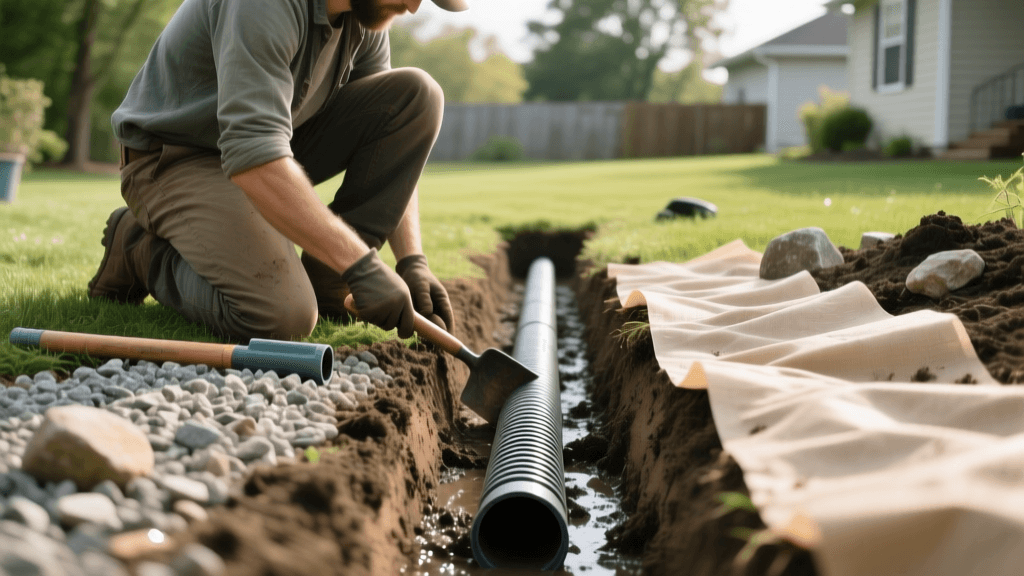
How to Install a French Drain for Wet Yard Solutions
Why Your Yard Needs a French Drain
Dealing with a perpetually soggy lawn, pooling water near your foundation, or a washed-out garden bed can be incredibly frustrating. Standing water not only kills turfgrass and ruins landscape design but also poses a severe threat to your home structural integrity. Hydrostatic pressure from saturated soil can lead to cracked foundations, flooded basements, and expensive structural repairs. When surface grading and swales are not enough to manage heavy runoff, a French drain is the ultimate hardscaping and drainage solution.
A French drain is a simple but highly effective system consisting of a gravel-filled trench and a perforated pipe that redirects groundwater and surface water away from vulnerable areas of your property. Whether you are protecting a newly installed patio, saving your basement from moisture intrusion, or simply trying to grow a healthier lawn, mastering this drainage solution is a vital landscaping skill. This comprehensive guide will walk you through the exact measurements, materials, and techniques required to install a professional-grade French drain on your property.
Comparing Yard Drainage Solutions
Before breaking ground, it is crucial to verify that a French drain is the correct tool for your specific water problem. Below is a comparison of common residential drainage systems to help you make an informed landscaping decision.
| Drainage System | Best Use Case | Estimated DIY Cost (per sq ft / linear ft) | Installation Difficulty |
|---|---|---|---|
| French Drain | Subsurface groundwater and heavy surface runoff | $10 - $25 per linear foot | Moderate to High |
| Dry Well | Collecting downspout runoff in permeable soil | $150 - $400 per unit | Moderate |
| Surface Swale | Shallow surface water redirection on a slope | $5 - $15 per linear foot | Low |
| Channel Drain | Intercepting water on flat hardscapes (driveways) | $20 - $40 per linear foot | High (requires concrete) |
Tools and Materials Required
Proper preparation is the key to a long-lasting drainage system. Gathering the right materials before you start digging will save you time and prevent costly mistakes. Expect to spend between $10 and $25 per linear foot for a DIY installation, depending on soil conditions and material choices.
- Perforated Drainage Pipe: 4-inch rigid PVC (Schedule 40) or flexible corrugated pipe. Rigid PVC is highly recommended for longevity and ease of cleaning.
- Washed Gravel: 3/4-inch crushed stone or washed river rock. Avoid pea gravel, as it does not lock together and can impede water flow.
- Landscape Fabric: Heavy-duty, non-woven geotextile fabric (minimum 4 oz per square yard). This prevents soil and roots from clogging the gravel and pipe.
- Digging Tools: Trenching shovel, flat spade, mattock, and a heavy-duty wheelbarrow.
- Measuring Tools: Line level, string, wooden stakes, and a tape measure.
- Safety Gear: Work gloves, steel-toe boots, and safety glasses.
Step-by-Step French Drain Installation Guide
Step 1: Plan the Route and Check Utilities
Water flows downhill, so your drain must follow a continuous downward slope to a suitable exit point, such as a storm drain, dry well, or a lower-elevation pop-up emitter. Before you dig a single trench, you must call 811 (the national call-before-you-dig hotline in the US) at least a few days in advance. Utility companies will come to your property and mark underground gas, water, and electrical lines for free. Never guess where utility lines are located; striking a line can be fatal and incredibly expensive.
Step 2: Dig the Trench with the Correct Slope
The most critical factor in French drain installation is the slope. If the trench is perfectly flat, water will stagnate. If it slopes backward, water will pool against your foundation. The industry standard for drainage slope is a 1 percent grade, which equates to a 1-inch drop for every 8 feet of trench length (or 1/8 inch per foot).
Drive wooden stakes at the starting point and the exit point. Tie a string between them and attach a line level. Adjust the string until it is perfectly level, then measure down from the string to mark your 1 percent slope gradient. Dig your trench to a width of 12 inches and a depth of 18 to 24 inches, constantly checking your depth against the sloped string line. In heavy clay soils, you may need to dig slightly wider to accommodate more gravel for water storage.
Step 3: Line the Trench and Add the Gravel Base
Once the trench is excavated and the slope is verified, line the entire trench with your non-woven geotextile landscape fabric. Leave at least 6 to 8 inches of excess fabric draped over the edges of the trench; you will use this to wrap the gravel later. This fabric barrier is non-negotiable. According to landscaping experts, soil infiltration is the number one cause of French drain failure. After lining the trench, shovel in a 2-inch to 3-inch base layer of 3/4-inch washed gravel. Use a hand tamper to compact this base layer, ensuring it follows your precise 1 percent slope.
Step 4: Position the Perforated Pipe
Lay your 4-inch perforated pipe on top of the gravel base. There is an ongoing debate in the landscaping community about whether the pipe holes should face up or face down. For rigid PVC pipes, best practice dictates placing the holes facing down. This allows water to rise through the gravel bed and enter the bottom of the pipe, preventing silt from falling directly into the holes and reducing the risk of clogging. Furthermore, holes-down placement provides a solid structural resting point on the gravel, preventing the pipe from shifting under the weight of the backfill.
Ensure all pipe joints are securely connected. If using corrugated pipe, use snap couplers and wrap the joints with fabric to prevent gravel from entering the seams. If your system includes a catch basin for surface water, connect it to the main line using solid (non-perforated) pipe to prevent water from leaking out before it reaches the exit point.
Step 5: Cover, Wrap, and Backfill
With the pipe in place, carefully shovel the remaining 3/4-inch washed gravel over the pipe until the gravel layer is about 3 to 4 inches below the surface grade. Do not use a mechanical tamper directly on the pipe, as this can crush corrugated pipes or dislodge PVC joints. Once the gravel is in place, take the excess landscape fabric draped over the trench edges and fold it over the top of the gravel, creating a complete fabric burrito. This overlapping seam ensures that topsoil cannot wash down into the drainage aggregate.
Finally, backfill the remaining 3 to 4 inches of the trench with native topsoil and sow grass seed or lay sod to match the surrounding lawn. If the drain is located in a garden bed, you can cover the fabric with decorative river rock or mulch instead of soil.
Expert Insights and Authoritative Guidelines
Proper drainage is not just about moving water; it is about managing the hydrology of your entire property. The University of Minnesota Extension emphasizes the importance of addressing the root cause of water accumulation rather than just treating the symptom. In their comprehensive guide on residential landscape drainage, they note that combining subsurface drains with proper surface grading yields the best long-term results.
'A French drain is highly effective for intercepting groundwater, but it must be paired with positive surface grading away from the foundation. Relying solely on a subsurface drain while allowing surface water to pond against the structure will inevitably lead to moisture issues and overwhelm the drainage capacity during heavy precipitation events.' - University of Minnesota Extension, Residential Landscape Drainage Guidelines.
This authoritative advice underscores the need to integrate your French drain into a holistic landscape design plan that includes properly extended downspouts and graded soil slopes.
Long-Term Maintenance and Care
A well-installed French drain wrapped in high-quality geotextile fabric can last 20 to 30 years with minimal maintenance. However, to ensure optimal performance, you should inspect the system annually, particularly after heavy spring thaws or autumn storms.
- Clear the Exit Point: Ensure the pop-up emitter or daylight exit is free of leaves, debris, and ice. A blocked exit will cause the entire trench to back up and flood.
- Flush the System: Every two to three years, use a garden hose or a low-pressure pressure washer to flush out the perforated pipe. Insert the hose into the access cleanout or catch basin and run water through the line to dislodge any accumulated silt or fine sediment.
- Monitor Surface Depressions: If you notice the soil or gravel above the trench settling or sinking over time, add more topsoil or gravel to maintain a smooth surface grade and prevent surface water from creating a new trenching effect.
By following these precise measurements, utilizing the correct materials, and adhering to expert grading guidelines, you can permanently eliminate wet yard issues and protect your home from water damage. Mastering the French drain installation is a cornerstone of advanced landscaping and hardscaping, providing peace of mind and a healthier, more usable outdoor living space for years to come.

