
Landscaping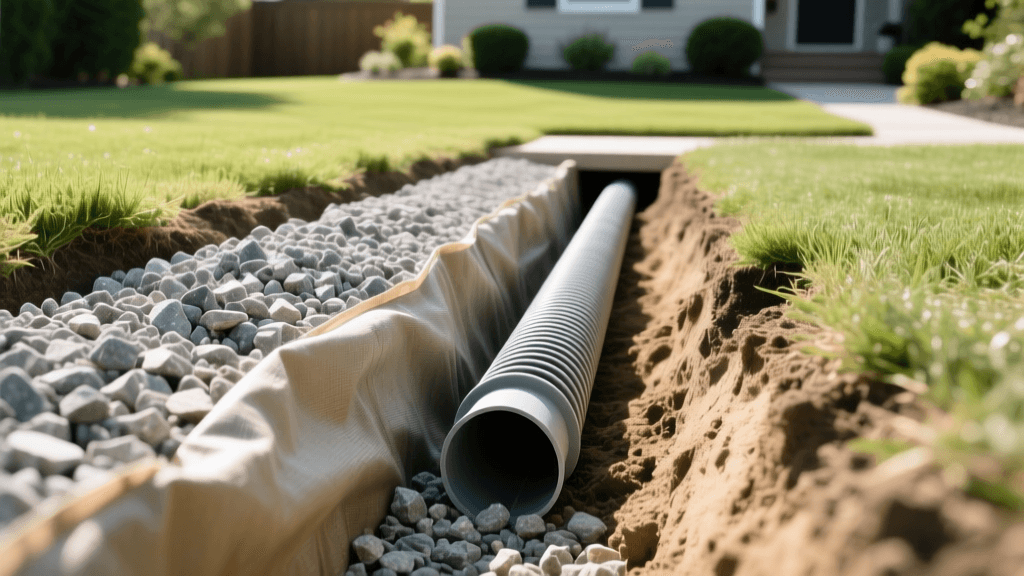
Expert Guide to Installing a French Drain for Yard Drainage
Why French Drains Are the Gold Standard for Yard Drainage
Water pooling in your yard after a heavy rainstorm is more than just a nuisance; it is a direct threat to your home's foundation, your lawn's root system, and your overall property value. When surface grading and shallow swales fail to move water away from your landscape, subsurface drainage becomes mandatory. The French drain, a concept originally popularized by Henry Flagg French in the 19th century, remains the gold standard for intercepting and redirecting groundwater and surface runoff. However, a French drain is only as effective as its installation. A poorly sloped trench or the wrong type of gravel can turn a costly drainage solution into a subterranean mud pit. In this comprehensive expert guide, we will break down the best practices, material specifications, and step-by-step installation techniques required to build a French drain that functions flawlessly for decades.
Diagnosing the Need for Subsurface Drainage
Before breaking ground, it is crucial to confirm that a French drain is the correct solution for your specific hydrology problem. French drains are designed to capture subsurface water and intercept surface water before it saturates the soil.
Signs You Need a French Drain
- Standing Water: Puddles that remain for more than 24 hours after a rainfall event indicate poor soil percolation, often caused by heavy clay content or soil compaction.
- Soggy Lawns: Grass that feels spongy underfoot or develops shallow root systems due to constant saturation.
- Foundation Seepage: Damp basements, crawl space moisture, or efflorescence (white, chalky mineral deposits) on concrete foundation walls.
- Erosion: Washouts in garden beds or mulch displacement during heavy storms.
If your primary issue is surface runoff from a neighboring property or a steep slope, a surface swale or retaining wall with integrated weep holes might be more appropriate. But for high water tables and localized saturation, the French drain is unmatched.
Material Selection: The Foundation of a Long-Lasting Drain
The longevity of your drainage system depends entirely on the materials you bury in the trench. Cutting corners here will result in system failure within just a few seasons.
Pipe Selection: Corrugated vs. Rigid PVC
| Feature | Corrugated Slotted Pipe | SDR 35 Rigid PVC (Perforated) |
|---|---|---|
| Durability | Moderate; prone to crushing under heavy loads | High; withstands significant soil and vehicular pressure |
| Flow Rate | Lower; interior ridges create friction and trap debris | High; smooth interior walls allow rapid water flow |
| Maintenance | Difficult to snake or jet clean | Easy to clean with standard sewer jetters |
| Cost | Lower upfront cost | Higher upfront cost, lower lifetime cost |
| Expert Verdict | Avoid for permanent residential landscaping | Highly recommended for all permanent installations |
Expert Tip: Always use SDR 35 (Standard Dimension Ratio) rigid PVC pipe with pre-drilled perforations. While corrugated black pipe is cheaper and easier to bend, its ribbed interior slows water flow and traps silt, leading to premature clogging.
Gravel and Aggregate
Never use pea gravel or crushed limestone with fine dust (screenings). You must use 3/4-inch washed drain rock. The washing process removes fine dirt and stone dust that would otherwise wash into the pipe and clog the perforations. The angular shape of crushed drain rock also creates larger void spaces for water to flow through compared to smooth river rock.
Geotextile Filter Fabric
Filter fabric is non-negotiable. It prevents surrounding soil from migrating into the gravel voids and choking the system. You must use non-woven geotextile fabric (typically 4 oz to 6 oz per square yard). Woven fabrics are designed for soil stabilization under driveways, not for water filtration. Non-woven fabric acts like a coffee filter, allowing water to pass through while blocking microscopic soil particles.
Step-by-Step Expert Installation Guide
Step 1: Planning, Routing, and Utility Checks
Before you dig a single shovel of dirt, call 811 to have your local utility companies mark underground gas, water, and electrical lines. Next, determine your discharge point. A French drain must daylight (exit above ground at a lower elevation), empty into a municipal storm drain (where permitted), or terminate in a dry well. If using a dry well, ensure it is sized correctly—typically a 50-gallon capacity for every 1,000 square feet of drainage area—and located at least 10 feet away from your home's foundation.
Step 2: Trenching and Slope Calculation
The trench should be a minimum of 12 inches wide and 18 to 24 inches deep, depending on the severity of the water table. The most critical aspect of trenching is the slope. Water will not move through a level pipe.
According to the Clemson University Cooperative Extension, drainage pipes require a minimum slope of 1 percent, which equates to a 1/8-inch drop per linear foot of pipe. For a 50-foot drain run, the trench must be 6.25 inches deeper at the discharge end than at the starting point.
Use a string line and a line level, or a laser level, to stake out the exact depth of the trench floor from start to finish.
Step 3: Lining the Trench
Line the excavated trench with your non-woven geotextile fabric. Leave at least 12 to 18 inches of excess fabric draped over the sides of the trench. This excess will be used to wrap over the top of the gravel later, creating a complete fabric envelope that isolates the drain from the surrounding soil.
Step 4: The Gravel Base and Pipe Placement
Add a 2-inch to 3-inch base layer of 3/4-inch washed drain rock to the bottom of the fabric-lined trench. Tamp it down lightly to create a stable bed.
Expert Tip: Holes Face Down! When laying the perforated PVC pipe, always place it with the perforations facing downward. Many DIYers mistakenly point the holes up, assuming water falls into them like a bucket. In reality, water rises from the saturated soil at the bottom of the trench. By facing the holes down, water enters the pipe from the bottom up, which significantly reduces the amount of silt and debris that gets pulled into the pipe, drastically extending the lifespan of your system.
Step 5: Backfilling and Envelope Wrapping
Once the pipe is laid and connected to your discharge point, cover the pipe with more washed drain rock until the gravel is about 3 to 4 inches below the ground surface. Fold the excess geotextile fabric over the top of the gravel, overlapping the seams by at least 12 inches. This creates a buried envelope of gravel and pipe, completely protected from topsoil intrusion.
Step 6: Topsoil and Sod Replacement
Fill the remaining 3 inches of the trench with high-quality topsoil and lay new sod or grass seed. Avoid using heavy clay soil for the top layer, as it will impede surface water from reaching the drain below.
Maintenance and Long-Term Best Practices
While a properly installed French drain is largely maintenance-free, it is wise to inspect the discharge point annually. Ensure that the exit pipe is free of debris, rodent nests, and ice dams during the winter. Every three to five years, consider hiring a professional to run a sewer camera through the pipe or flush it with a high-pressure sewer jetter to clear any accumulated biofilm or fine silt.
Furthermore, avoid planting trees or large shrubs with aggressive root systems (such as willows, poplars, or maples) within 10 feet of the drain line. Roots are naturally drawn to the moisture and oxygen-rich environment of the gravel trench and can easily infiltrate pipe joints, causing severe blockages.
Cost Estimates and ROI
The national average cost for professional French drain installation ranges from $20 to $50 per linear foot, depending on soil conditions, trench depth, and discharge complexity. For a standard 100-foot system, homeowners can expect to invest between $2,000 and $5,000. While this may seem substantial, the cost of repairing a compromised foundation, replacing ruined hardwood floors, or regrading a destroyed landscape can easily exceed $20,000. Implementing expert drainage solutions is one of the highest ROI landscaping investments a homeowner can make.

