
Tree Care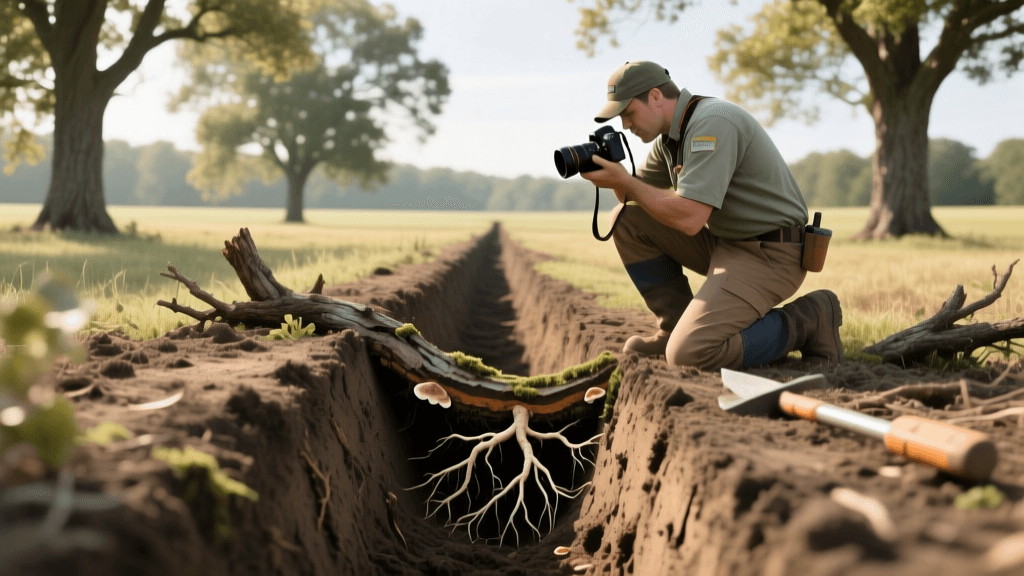
Oak Wilt Trenching and Photo Documentation Guide 2026
The Intersection of Arboriculture and Garden Photography
In 2026, the role of the garden photographer and documentarian extends far beyond capturing the aesthetic beauty of a landscape. With environmental shifts accelerating the spread of vascular tree diseases, meticulous visual documentation has become a critical tool for arborists, property owners, and municipal foresters. One of the most devastating threats to our hardwood forests and suburban canopies is oak wilt, a lethal fungal disease caused by the pathogen Bretziella fagacearum. When managing this disease, the trenching containment method is the gold standard for halting underground spread. However, executing a trench is only half the battle; properly documenting the symptoms, the intervention, and the recovery through photography is essential for insurance claims, scientific tracking, and long-term garden journaling.
This comprehensive guide merges the technical requirements of oak wilt trenching with the art and science of garden photography, providing you with a 2026-ready framework for capturing the entire containment process.
Identifying and Photographing Oak Wilt Symptoms
Before any heavy machinery arrives to dig a trench, you must establish a baseline of the infection. Oak wilt spreads in two primary ways: above ground via sap-feeding nitidulid beetles, and below ground through interconnected root grafts. Red oaks (like Texas red oak and northern red oak) are highly susceptible and can die within weeks, while white oaks may survive for years with localized branch dieback.
Capturing Veinal Necrosis and Canopy Decline
To document the disease accurately, your photography must capture both the micro and macro symptoms. According to the Texas Oak Wilt Information Partnership, the hallmark symptom in red oaks is rapid leaf browning starting at the margins and tips, often accompanied by veinal necrosis (browning of the leaf veins). White oaks typically exhibit a slower, more localized wilting pattern.
- Macro Photography: Use a dedicated macro lens (such as a 90mm or 100mm f/2.8) or a modern 2026 smartphone with an advanced macro mode. Capture the leaf veins against a neutral background. Use a portable color checker card in your frame to ensure accurate white balance, which is crucial for distinguishing between natural autumn senescence and pathogenic chlorosis.
- Canopy Wide Shots: Use a wide-angle lens (16-35mm) to capture the 'flagging' effect, where individual branches or entire sections of the canopy turn brown while the rest of the tree remains green. Shoot during the soft, diffused light of early morning to avoid harsh shadows that can obscure leaf coloration.
- Drone Mapping: For large estates or woodlots, a consumer drone equipped with an RGB camera can map the exact perimeter of the symptomatic canopy. This aerial perspective is invaluable for planning the trenching buffer zone.
The Trenching Containment Method: A 2026 Overview
Once the infection center is identified, the focus shifts to containment. Because Bretziella fagacearum travels through the vascular system and crosses between adjacent trees via naturally grafted roots, physical separation is required. The University of Minnesota Extension emphasizes that mechanical trenching is the most reliable method to sever these root grafts and protect healthy, uninfected oaks.
Trenching Specifications and Equipment
To be effective, a trench must be dug entirely around the infected tree(s), encompassing all symptomatic oaks and a buffer zone of at least one to two rows of healthy, high-value oaks. The trench must sever all roots, which typically requires a depth of 48 to 60 inches, depending on local soil profiles and bedrock depth.
In 2026, professional tree care companies utilize specialized vibratory plows and heavy-duty rock saws to achieve this depth cleanly. The cost for professional trenching averages between $18 and $28 per linear foot, varying based on soil composition, root density, and regional labor rates. In areas with shallow bedrock, a rock saw is mandatory, and the trench may need to be backfilled with a specific soil mix or lined with a heavy-mil plastic barrier to prevent roots from eventually growing back across the gap.
Documenting the Trenching Process
As a garden documentarian, your job during the trenching phase is to create an indisputable visual record of the intervention. This documentation is frequently required by municipal forestry boards to prove compliance with local oak wilt ordinances, and by insurance companies to justify tree removal and landscape restoration claims.
The Visual Logging Timeline
- Pre-Dig Site Assessment: Photograph the marked trench line using high-visibility marking paint. Capture the string lines and GPS waypoints if your arborist is using 2026 RTK-GPS mapping tools to ensure the buffer zone is mathematically precise.
- Active Trenching: Capture the vibratory plow in action. Use a fast shutter speed (1/1000s or higher) to freeze the motion of the soil being displaced. Safety is paramount; always use a telephoto lens (70-200mm) to maintain a safe distance from the heavy machinery.
- Depth Verification: This is the most critical photograph for your records. Once a section of the trench is open, have the arborist place a marked measuring tape or a 5-foot leveling rod into the trench. Photograph the tape measure clearly showing the 48-to-60-inch depth. Ensure the date, time, and GPS metadata are embedded in the image file.
- Backfilling and Restoration: Document the backfilling process and any immediate soil stabilization or seeding applied to the trench line to prevent erosion.
Photography and Documentation Checklist
Use the following table to ensure your visual documentation covers every necessary angle for both arboricultural review and personal garden journaling.
| Documentation Phase | Photography Type | Recommended Gear / Settings | Primary Purpose |
|---|---|---|---|
| Symptom Identification | Macro Leaf Shots | 100mm Macro, f/5.6, ISO 400, Color Checker | Confirm veinal necrosis for lab/arborist ID |
| Canopy Assessment | Wide / Mid-Range | 24-70mm, f/8, Polarizing Filter | Show extent of flagging and dieback |
| Site Planning | Aerial / Drone | Drone (4K RGB), Top-Down Orthomosaic | Map buffer zone and mark trench line |
| Trench Verification | Depth Measurement | 35mm or 50mm, f/4, Flash or Reflector | Prove 48-60 inch depth for compliance |
| Long-Term Monitoring | Time-Lapse / Trail Cam | Weatherproof Time-Lapse Camera, Intervalometer | Track buffer zone health over the 2026 season |
Post-Trenching Monitoring and Time-Lapse Photography
The work does not end when the trench is backfilled. The UW-Madison Extension notes that monitoring the buffer zone for at least two to three years post-trenching is vital, as the fungus can sometimes persist or bypass incomplete root severance. This is where long-term garden photography becomes a powerful scientific tool.
Set up a weatherproof time-lapse camera or a specialized trail camera aimed at the buffer zone trees. Configure the intervalometer to capture one high-resolution image every 12 hours during the growing season (May through September). By compiling these images into a time-lapse video at the end of the 2026 growing season, you can visually track the leaf-out, canopy density, and overall vigor of the protected oaks. Any sudden wilting or browning in the buffer zone will be immediately apparent in the footage, allowing for rapid secondary intervention, such as localized propiconazole trunk injections.
Organizing Your Digital Assets
Proper metadata management is just as important as the photography itself. Use software to embed IPTC metadata into your images, including keywords like 'Oak Wilt', 'Trenching', 'Bretziella fagacearum', the specific GPS coordinates, and the arborist's certification number. Store these files in a cloud-based garden journal or a dedicated property management folder. In the event of a dispute with a neighbor regarding the spread of the disease, or a claim with your home insurance provider, a meticulously organized, timestamped, and GPS-verified photographic record is your strongest asset.
Conclusion
Combating oak wilt requires swift, decisive action and a deep understanding of tree biology. By integrating professional-grade photography and meticulous documentation into the trenching containment method, you elevate your garden care from simple maintenance to advanced arboricultural stewardship. Whether you are protecting a beloved heritage oak or managing a multi-acre woodland, the visual records you create in 2026 will serve as an invaluable resource for the health of your landscape for decades to come.

