
Landscaping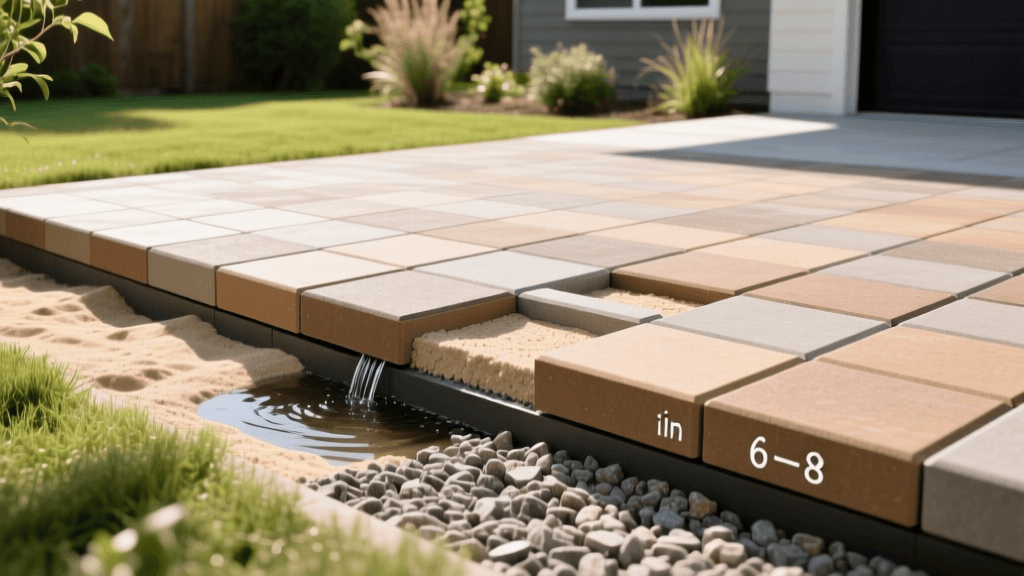
Designing a Permeable Paver Patio for Better Yard Drainage
Transforming Yard Drainage Issues Into Stunning Outdoor Spaces
For many homeowners, a beautiful outdoor living space is constantly undermined by one persistent enemy: poor drainage. Traditional hardscaping methods, such as poured concrete or standard brick patios laid on solid mortar, create impervious surfaces. When it rains, water sheets off these surfaces, pooling in low spots, eroding garden beds, and potentially threatening your home's foundation. However, modern landscape design offers an elegant, sustainable solution: the permeable paver patio. By integrating permeable hardscaping into your landscape design, you can create a sophisticated outdoor entertainment area that simultaneously acts as a passive stormwater management system. This guide will walk you through the planning, design, and structural requirements of installing a permeable paver patio that solves your yard's drainage woes while elevating your curb appeal.
The Science of Permeable Hardscaping
Unlike traditional pavers that are butted tightly together and sealed with polymeric sand, permeable pavers are specifically designed with wider joints. These joints are filled with small, uniformly graded crushed stone rather than fine sand. The water flows through these gaps into a specially engineered, open-graded aggregate base beneath the surface. This base acts as a subterranean reservoir, temporarily holding stormwater and allowing it to slowly percolate back into the native soil. According to the United States Environmental Protection Agency (EPA), permeable pavements can reduce stormwater runoff volume by up to 80 percent in residential applications, significantly reducing the burden on municipal storm drains and filtering out pollutants naturally through the soil layers.
Site Assessment and the Percolation Test
Before you sketch out your patio design or purchase materials, you must understand your soil's natural drainage capacity. A permeable patio relies on the subgrade (native soil) to eventually absorb the water stored in the aggregate base. To test this, conduct a simple percolation test:
- Step 1: Dig a test hole in your proposed patio area that is 12 inches deep and 6 inches wide.
- Step 2: Fill the hole with water and let it drain completely to saturate the surrounding soil.
- Step 3: Refill the hole with water and place a ruler in the center.
- Step 4: Measure how many inches the water level drops in one hour.
If the water drops at a rate of 1 inch or more per hour, your soil has excellent drainage. If it drops between 0.5 and 1 inch, it is moderate. If it drops less than 0.5 inches per hour, you have heavy clay soil, which will require a significantly deeper aggregate base or the installation of an underground perforated drain pipe to move excess water away from the patio reservoir.
Designing the Sub-Base: The Hidden Foundation
The success of a permeable patio lies entirely in its base. The structural design consists of three main layers: the subgrade (native soil), the base reservoir (large crushed stone), and the bedding layer (smaller crushed stone). A non-woven geotextile fabric is often placed between the subgrade and the base to prevent soil particles from migrating up into the stone reservoir and clogging the system.
The depth of your base reservoir must be tailored to your soil type and the expected load. While a patio only needs to support foot traffic and light furniture, the water volume dictates the depth. Below is a planning chart for base depths based on soil percolation rates:
| Native Soil Type | Percolation Rate | Base Reservoir Depth | Bedding Layer Depth |
|---|---|---|---|
| Sandy / Loam | Fast (> 1.0 in/hr) | 6 to 8 inches | 2 inches |
| Mixed / Average | Moderate (0.5 - 1.0 in/hr) | 8 to 12 inches | 2 inches |
| Heavy Clay | Slow (< 0.5 in/hr) | 14 to 18 inches | 2 inches |
Note: For heavy clay soils, consider integrating a 4-inch perforated PVC drain pipe at the lowest point of the base reservoir, day-lighting it to a lower area of your yard or a dry well.
Selecting Paver Styles for Your Landscape Design
Permeable pavers come in a variety of materials and aesthetics, allowing you to match your home's architectural style. When planning your design, consider the visual weight of the pavers, the color palette, and the joint width required for permeability.
| Material Type | Aesthetic Profile | Est. Material Cost (per sq. ft.) | Design Best Use |
|---|---|---|---|
| Permeable Concrete Pavers | Clean, modern, uniform | $4.00 - $8.00 | Contemporary patios, geometric layouts |
| Natural Stone (Spaced) | Rustic, organic, high-end | $12.00 - $25.00 | Cottage gardens, woodland borders |
| Tumbled Brick | Classic, traditional, warm | $6.00 - $11.00 | Colonial homes, courtyard dining |
| Plastic Grid + Gravel/Grass | Soft, eco-friendly, textured | $3.00 - $6.00 | Overflow seating, rustic pathways |
Layout, Slope, and Spatial Planning
A common misconception is that permeable patios must be perfectly level to allow water to soak in. In reality, landscape design principles dictate that all hardscapes should have a slight slope to manage overflow during torrential downpours when the base reservoir reaches maximum capacity. The industry standard is a slope of 1/8 inch per foot (approximately a 1% grade) directed away from your home's foundation.
When planning your layout, use stakes and string lines with a line level to map the perimeter. If your yard has a severe natural slope, you will need to incorporate retaining walls or terraced garden beds to create a flat plane for the patio. Integrating permeable pavers with adjacent rain gardens or bioswales is a hallmark of advanced sustainable landscape design, creating a cohesive system where overflow water is directed into deep-rooted native plants that thrive on periodic inundation.
Budgeting and Installation Timing
Planning a hardscaping project requires a realistic budget. While the pavers themselves are only one part of the cost, the excavation and aggregate materials make up a significant portion. For a standard 200-square-foot patio, expect to spend between $1,500 and $2,500 on materials (including pavers, geotextile fabric, crushed stone, and edge restraints). Professional installation typically ranges from $10 to $20 per square foot, bringing a 200-square-foot project to $2,000 - $4,000 in labor.
Timing is crucial. Excavating and laying aggregate during dry weather is highly recommended. If the native subgrade becomes a muddy quagmire during excavation, it can compromise the structural integrity of the base and cause the geotextile fabric to fail. Plan your project for late spring or early autumn when rainfall is generally more predictable and temperatures are comfortable for strenuous labor.
Long-Term Maintenance for Maximum Permeability
To ensure your patio continues to function as a drainage solution, maintenance is required. Over time, wind-blown dirt, decomposing leaves, and organic debris can accumulate in the stone joints, reducing permeability. Plan to sweep the patio regularly with a stiff bristle broom. Once a year, use a wet-dry shop vacuum to pull out fine sediment from the joints, and top them off with fresh, clean crushed stone (typically 1/8-inch or 3/16-inch washed gravel). Avoid using pressure washers, as the high-velocity water can blast the bedding stone out of the joints and erode the base layer below.
Conclusion
Designing a permeable paver patio is a masterclass in functional landscape architecture. It allows homeowners to reclaim muddy, unusable yards and transform them into elegant outdoor living spaces that work in harmony with the local ecosystem. By carefully assessing your soil, engineering a robust aggregate base, and selecting materials that complement your home's aesthetic, you can build a patio that stands the test of time while responsibly managing stormwater runoff.

