
Landscaping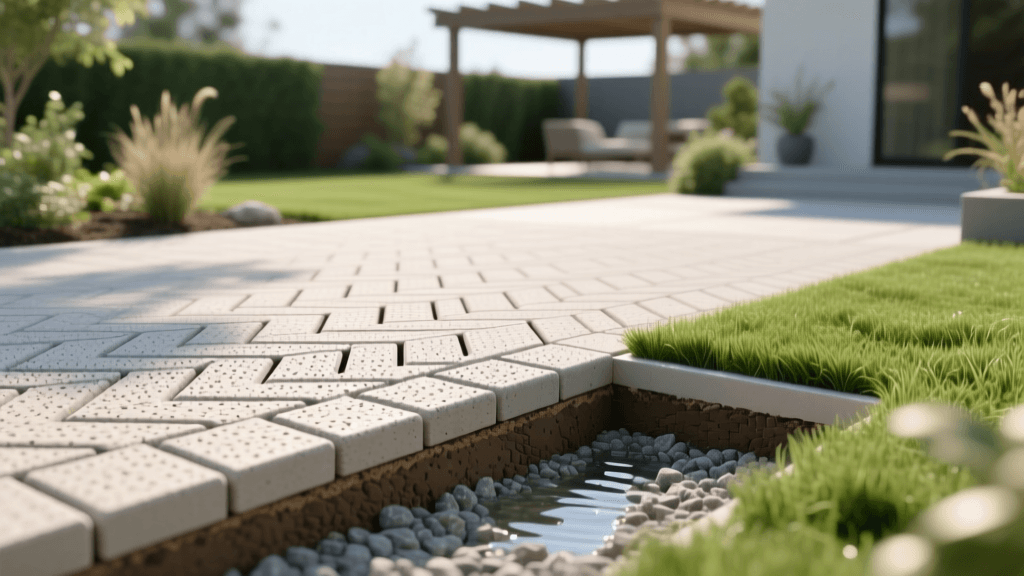
Permeable Paver Patio Design: Planning, Costs, and Drainage Guide
Transforming Your Outdoor Space with Permeable Pavers
When planning an outdoor living space, homeowners often focus heavily on aesthetics, furniture layouts, and plant pairings. However, one of the most critical yet frequently overlooked aspects of landscape design is water management. Traditional concrete slabs or densely packed patios often create massive runoff issues, sending stormwater flooding into neighboring yards, overwhelming municipal sewer systems, or eroding your carefully planned garden beds. Enter the permeable paver patio: a sophisticated hardscaping solution that marries high-end design with exceptional environmental functionality.
Permeable pavers are designed with wider joints than traditional pavers, and they are installed over a specialized, open-graded stone base. This system allows rainwater to pass through the surface and percolate naturally into the soil below. In this comprehensive guide, we will explore how to plan, design, and budget for a permeable paver patio that elevates your curb appeal while solving complex drainage issues.
Why Choose Permeable Pavers for Your Patio?
The decision to use permeable hardscaping goes far beyond simply avoiding puddles. It is a proactive approach to sustainable landscaping. By allowing water to infiltrate the ground where it falls, you reduce the burden on local stormwater infrastructure and help filter out urban pollutants before they reach local waterways.
According to the United States Environmental Protection Agency (EPA), permeable pavements significantly reduce stormwater runoff, filter out urban pollutants, and recharge local groundwater aquifers. Furthermore, North Carolina State Extension guidelines recommend a minimum of 6 inches of No. 57 stone for the base reservoir, increasing to 12 inches in areas with poor-draining clay soils to ensure adequate water storage during heavy rain events.
By integrating this EPA-recommended technology into your backyard or front courtyard, you are investing in a landscape that works in harmony with the local ecosystem.
Phase 1: Site Assessment and Layout Planning
Before purchasing a single paver, you must thoroughly assess your site. Permeable patios require specific conditions to function correctly.
Evaluating Slope and Soil Type
While the base reservoir holds a significant amount of water, the patio still requires a slight slope to prevent surface pooling during torrential downpours. Aim for a minimum slope of 1% to 2% (a drop of 1 to 2 inches for every 10 feet of patio length) directing water away from your home's foundation. Additionally, test your native soil's percolation rate. If you have heavy clay, you will need a deeper stone reservoir base to hold water temporarily while it slowly infiltrates the dense subgrade.
Mapping Sun, Shade, and Traffic Flow
Observe how the sun moves across your yard. If your patio will be in full afternoon sun, consider lighter-colored concrete pavers to reduce the urban heat island effect. For shaded areas under mature trees, permeable pavers are an excellent alternative to solid concrete, as they allow vital rainwater to reach the tree's extensive root systems without suffocating them.
Phase 2: Engineering the Sub-Base for Drainage
The secret to a successful permeable patio lies entirely beneath the surface. Unlike traditional patios that use a compacted gravel and sand base, a permeable system relies on open-graded, crushed stone. The angular edges of the stone lock together for structural stability while leaving void spaces (typically 40% of the volume) for water storage.
| Layer | Material Specification | Recommended Depth | Primary Purpose |
|---|---|---|---|
| Subgrade | Compacted Native Soil | Variable | Structural foundation and final infiltration zone |
| Reservoir Base | ASTM No. 57 Crushed Stone | 6 to 12 inches | Primary water storage, drainage, and load-bearing |
| Bedding Course | ASTM No. 8 Crushed Stone | 2 inches | Leveling layer and immediate paver support |
| Surface Joints | ASTM No. 8 or No. 9 Stone | Surface to Base | Locks pavers in place while allowing water entry |
Never use sand or polymeric sand in the joints or bedding layers of a permeable system. Sand will clog the voids, effectively turning your expensive permeable patio into an impermeable concrete slab.
Phase 3: Choosing Your Paver Material
Modern permeable pavers come in a variety of materials, colors, and shapes. The aesthetic you choose should complement your home's architectural style and surrounding garden beds.
| Material | Avg Cost (per sq ft) | Durability | Best Design Application |
|---|---|---|---|
| Concrete Pavers | $4.00 - $8.00 | High | Modern patios, geometric patterns, large entertainment zones |
| Clay Brick | $6.00 - $12.00 | Very High | Traditional, rustic, or colonial layouts, historic home accents |
| Natural Stone | $10.00 - $20.00+ | Exceptional | Luxury estates, organic garden integration, high-end courtyards |
When selecting concrete pavers, look for products specifically engineered with spacer bars or lugs on the sides. These built-in spacers automatically create the precise 1/8-inch to 1/4-inch gaps required for water infiltration when the pavers are placed tightly together.
Design Ideas: Integrating with the Landscape
A patio should not exist in a vacuum; it must transition seamlessly into the broader landscape design. Here are a few actionable design ideas to elevate your permeable hardscaping project:
- The Rain Garden Border: Instead of routing the patio's overflow to a storm drain, design a shallow depression adjacent to the patio edge and plant it with moisture-loving native species. Excellent choices include Swamp Milkweed (Asclepias incarnata), Blue Flag Iris (Iris versicolor), and Joe-Pye Weed. This creates a stunning biological filter and a beautiful focal point.
- Contrasting Borders: Use a contrasting color or material for the patio border. For example, if the main field of the patio is a light gray concrete paver, use a dark charcoal clay brick laid in a soldier course (perpendicular to the edge) to frame the space and provide a clean visual boundary.
- Integrating Green Joints: For low-traffic areas or secondary walkways leading off the main patio, consider widening the joints to 1 inch and planting creeping thyme or Irish moss. This softens the hardscape and increases the green footprint of your yard.
Budgeting and Timeline: What to Expect
Planning a hardscaping project requires a realistic understanding of costs and time. Permeable paver systems are generally 20% to 30% more expensive than traditional paver installations. This price increase is due to the deeper excavation required, the higher volume of specialized crushed stone needed for the reservoir base, and the meticulous attention to detail required during the stone-filling process.
Cost Breakdown
For a standard 400-square-foot patio, expect to pay between $15 and $25 per square foot for professional installation, bringing the total project cost to roughly $6,000 to $10,000. If you opt for premium natural stone, costs can easily exceed $30 per square foot.
Project Timeline
Excavation and base preparation are the most time-consuming phases. For a 400-square-foot patio, a professional crew will typically spend two to three days excavating 12 to 18 inches of soil, laying geotextile fabric (if required by local codes to prevent soil migration), and compacting the stone base layers. The actual laying of the pavers and sweeping in the joint stone usually takes an additional two days. Plan for a one-week timeline from breaking ground to placing your patio furniture.
Maintenance Rules for Longevity
To ensure your permeable patio continues to drain effectively for decades, you must adopt specific maintenance habits. The primary enemy of permeable pavement is organic debris. As leaves, twigs, and dirt break down, they can clog the stone joints.
Twice a year, sweep the patio with a stiff bristle broom. If you notice water pooling on the surface during heavy rains, it is time to clean the joints. Use a specialized outdoor vacuum or a shop-vac to suck out the top inch of debris from the joints, and then top them off with fresh, clean ASTM No. 8 or No. 9 crushed stone. Avoid using pressure washers on high settings, as this can blast the joint stone out of the voids and into the reservoir base below, potentially causing drainage issues deep within the system.
Final Thoughts on Sustainable Hardscaping
Designing a permeable paver patio is a commitment to both exceptional outdoor living and environmental stewardship. By carefully planning your layout, engineering a robust stone reservoir base, and selecting materials that complement your home, you can create a stunning outdoor sanctuary. Not only will you enjoy a beautiful, flood-free patio for entertaining and relaxation, but you will also take pride in knowing your landscape is actively protecting local waterways and nurturing the soil beneath your feet.

