
Landscaping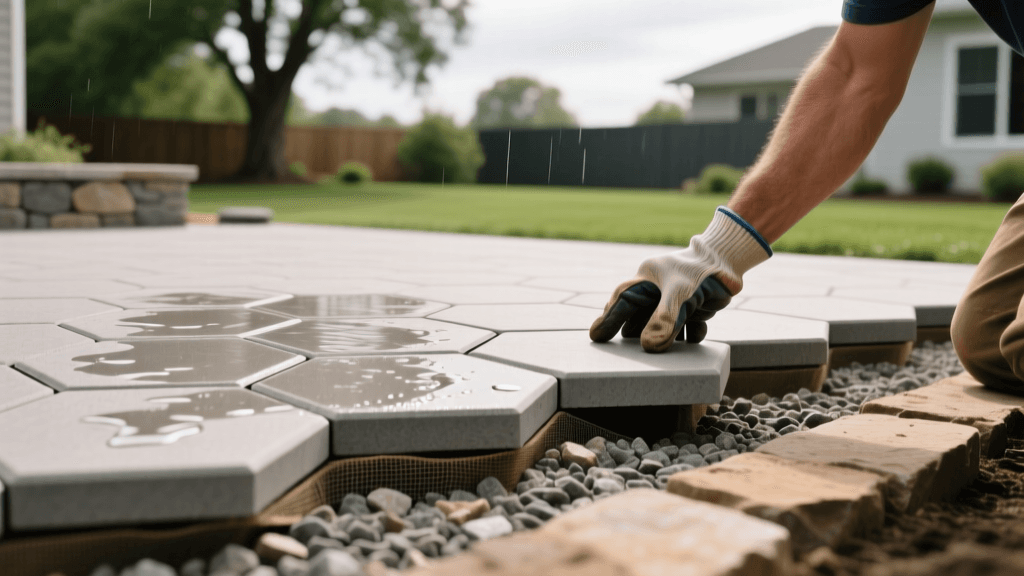
Best Practices for Permeable Paver Patio Installation
When designing an outdoor living space, managing stormwater runoff is often an afterthought. However, as municipalities implement stricter impervious surface regulations, homeowners and landscape architects are turning to Permeable Interlocking Concrete Pavers (PICP). Unlike traditional patios that shed water into overwhelmed storm drains, permeable paver systems capture, filter, and slowly infiltrate rainwater back into the local water table.
According to the United States Environmental Protection Agency (EPA), permeable pavements are a premier green infrastructure best management practice (BMP) that significantly reduces runoff volume, mitigates urban heat island effects, and filters out pollutants such as heavy metals, hydrocarbons, and excess nutrients.
This comprehensive guide details the expert best practices for designing and installing a permeable paver patio that is structurally sound, aesthetically pleasing, and ecologically beneficial.
Understanding the Anatomy of a Permeable Patio
A common misconception is that the pavers themselves do all the work. In reality, a permeable patio is a complex, multi-layered engineered system. The surface course provides the structural wearing surface, while the underlying aggregate layers act as a temporary reservoir, storing water until it can infiltrate the native soil. If any layer is improperly specified or installed, the entire system can fail, leading to ponding water, heaving, or structural collapse.
Material Selection and ASTM Standards
To ensure longevity and proper infiltration, landscape contractors must adhere to strict material specifications. Never use standard concrete pavers or traditional masonry sand for a permeable project.
- Pavers: Select pavers specifically manufactured for permeable applications, conforming to ASTM C1781. These pavers feature built-in spacer bars or specialized edge designs that maintain uniform, wide joints for water entry.
- Sub-Base Aggregate: The primary reservoir layer requires clean, washed, open-graded aggregate, typically ASTM No. 57 stone (0.5 to 1 inch). The lack of fine particles ensures a high void ratio (usually around 40%), maximizing water storage.
- Bedding and Joint Aggregate: The bedding layer and the joints between pavers must be filled with smaller, clean, washed aggregates like ASTM No. 8 (0.18 to 0.375 inch) or No. 9 stone.
Expert Warning: Never use polymeric sand, stone dust, or fine masonry sand. These materials will immediately clog the joints, rendering the patio entirely impervious and voiding manufacturer warranties.
Soil Evaluation and Base Depth Requirements
Before breaking ground, you must determine the infiltration rate of your native soil. North Carolina State University Extension strongly recommends conducting a simple percolation test to measure how quickly water drains through the soil profile. Clay-heavy soils drain slowly and require a much deeper aggregate reservoir to hold stormwater during heavy rain events, whereas sandy soils allow for rapid infiltration and shallower bases.
The following table outlines expert recommendations for sub-base depths based on native soil composition:
| Native Soil Type | Percolation Rate (in/hr) | Sub-Base Reservoir Depth | Expert Notes |
|---|---|---|---|
| Sandy Loam | > 2.0 | 8 to 10 inches | Excellent natural drainage; standard base depth applies. |
| Loam / Silt | 0.5 to 2.0 | 10 to 14 inches | Moderate drainage; ensure 1% slope for overflow management. |
| Heavy Clay | < 0.5 | 14 to 18+ inches | Poor drainage; consider adding an underdrain pipe to daylight. |
Step-by-Step Installation Best Practices
Step 1: Excavation and Slope Planning
Excavate the site to the required depth, accounting for the paver thickness, bedding course, base, and sub-base reservoir. Even though the system is permeable, expert installers still grade the subgrade at a minimum 1% to 2% slope away from the home foundation. This provides an overflow mechanism during extreme, 100-year storm events where the reservoir might temporarily reach capacity.
Step 2: Geotextile Fabric Placement
Line the excavated subgrade with a non-woven geotextile fabric. This critical layer separates the clean aggregate reservoir from the native soil, preventing fine dirt particles from migrating up into the stone voids over time. Ensure the fabric overlaps at the seams by at least 12 inches and wraps up the sides of the excavation to create a contained bathtub effect.
Step 3: Sub-Base and Base Compaction
Lay the ASTM No. 57 sub-base stone in 4-inch to 6-inch lifts (layers). Compact each lift using a heavy, vibratory plate compactor or a smooth-drum roller. Open-graded aggregates do not compact in the traditional sense of achieving a high Proctor density; rather, the goal is to achieve particle interlock and a stable, unyielding platform. Follow this with a 2-inch layer of ASTM No. 57 or No. 8 base stone, compacted to create a smooth transition to the bedding course.
Step 4: Bedding Course and Paver Laying
Spread a 1.5-inch to 2-inch layer of ASTM No. 8 bedding stone. Do not compact this layer; simply screed it using steel pipes and a straight edge to ensure a perfectly level surface. Begin laying the permeable pavers according to the manufacturer's pattern, ensuring the spacer bars are tightly butted together. Cut edge pavers using a hydraulic splitter or a diamond-blade wet saw equipped with a GFCI-protected outlet to prevent silica dust inhalation and water hazards.
Step 5: Joint Filling and Final Compaction
Once all pavers are laid, spread the jointing aggregate (ASTM No. 8 or No. 9) across the surface. Use a push broom to sweep the stone deeply into the joints. Next, run a vibratory plate compactor over the entire patio.
Crucial Expert Tip: You must attach a thick urethane or rubber pad to the bottom of the compactor. Running a bare steel plate over concrete pavers will severely scratch, chip, and ruin the surface finish. The vibration settles the joint stone deep into the voids. Repeat the sweeping and compacting process until the joints are completely filled to the top of the pavers.
Cost Breakdown: What to Budget
Installing a permeable paver patio is an investment in both your property value and local watershed health. While material costs are slightly higher than traditional patios, the elimination of certain drainage infrastructure can offset expenses. Here is a typical cost breakdown for a professional installation in the United States:
- Permeable Pavers (ASTM C1781): $4.00 to $7.00 per square foot.
- Open-Graded Aggregates (No. 57, No. 8): $1.50 to $2.50 per square foot.
- Geotextile Fabric and Edge Restraints: $1.00 to $1.50 per square foot.
- Excavation and Haul-Away: $2.00 to $4.00 per square foot (highly dependent on soil type and local dump fees).
- Professional Labor: $8.00 to $14.00 per square foot.
- Total Estimated Cost: $16.50 to $29.00 per square foot.
Note: Many municipalities offer stormwater fee rebates or tax incentives for installing permeable surfaces, which can reduce the net cost by 10% to 20%.
Expert Maintenance Protocols
A permeable patio is not an install-and-forget project. To maintain the infiltration rate, the joints must remain free of debris, leaves, and sediment.
- Annual Vacuuming: Use a commercial outdoor vacuum sweeper or a specialized regenerative air vacuum once a year, preferably in late spring, to extract accumulated dirt and organic matter from the top inch of the joint stones. Refill the joints with fresh ASTM No. 8 or No. 9 aggregate as needed.
- Avoid Sealers: Never apply acrylic or polyurethane sealers to permeable pavers. Sealers create an impermeable film that defeats the entire purpose of the system.
- Winter Care: Permeable pavers generally require less de-icing salt because water drains through the joints rather than freezing on the surface. However, avoid using sand for traction, as it will permanently clog the voids. If you must use a chemical melt, opt for calcium magnesium acetate (CMA), which is less corrosive to concrete and safer for the surrounding landscape beds.
Conclusion
By adhering to these expert best practices, you can construct a permeable paver patio that serves as a stunning outdoor living space while acting as a vital piece of green infrastructure. Proper material selection, rigorous sub-base preparation, and dedicated maintenance will ensure your landscape investment performs flawlessly for decades, protecting your home from water damage and safeguarding local waterways.

