Tree Care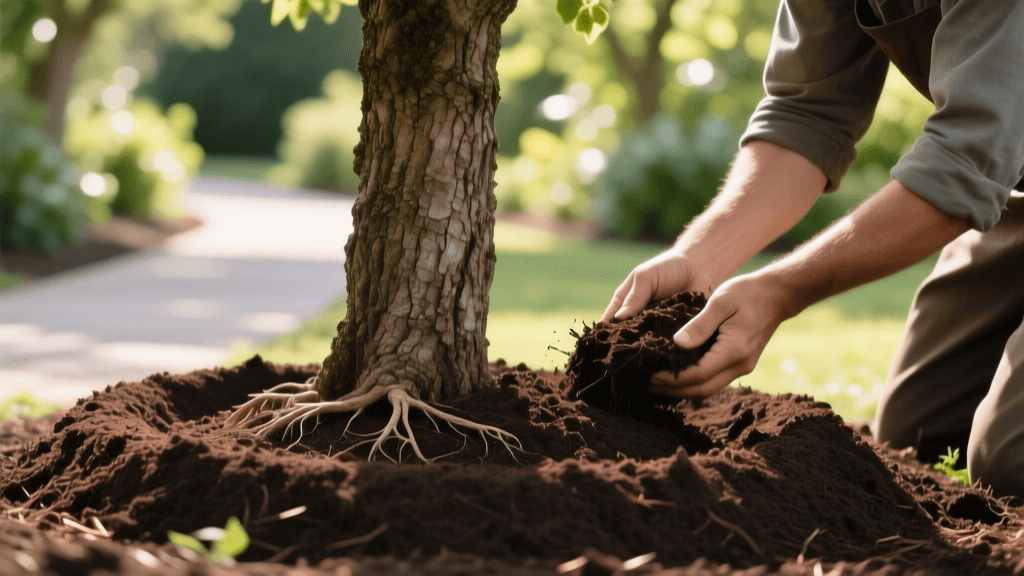
Proper Tree Mulching Techniques: Avoid Volcano Mulching
The Hidden Dangers of Improper Tree Mulching
Mulching is one of the most beneficial practices for tree health, yet it remains one of the most misunderstood and improperly executed tasks in landscape management. When applied correctly, mulch regulates soil temperature, retains vital moisture, suppresses competitive weeds, and slowly adds organic matter to the soil profile. However, when applied incorrectly, it can become a slow-acting death sentence for your most valuable landscape assets.
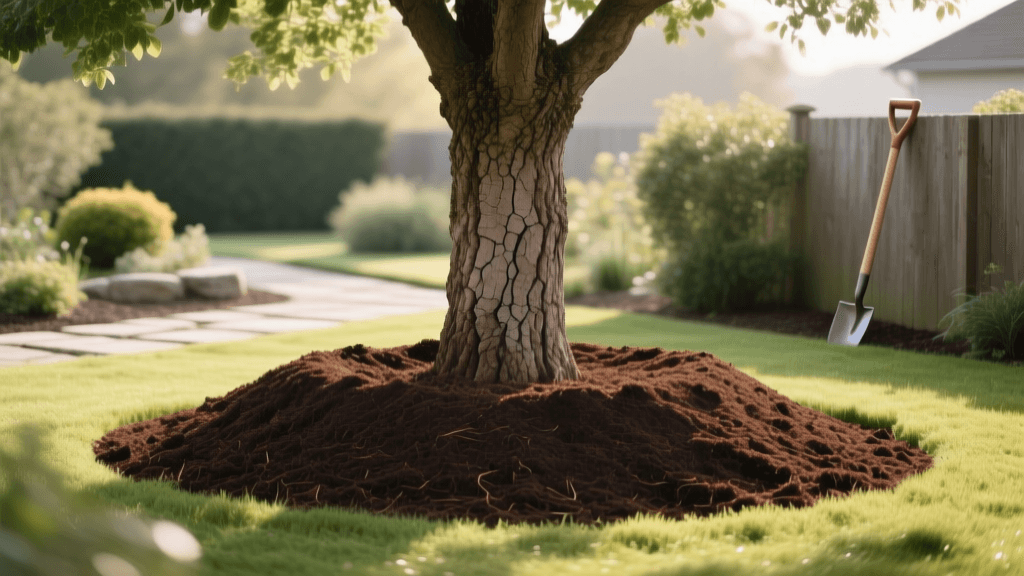
The most notorious of these errors is 'volcano mulching'—the practice of piling mulch high against the trunk of a tree, resembling a volcano. While it may look neat and intentional to the untrained eye, arborists and horticulturists universally condemn this practice. To ensure the longevity and structural integrity of your trees, it is crucial to adopt expert mulching best practices that prioritize the tree's biological needs over superficial aesthetics.
The Biological Purpose of Mulch
In a natural forest ecosystem, trees are surrounded by a deep, undisturbed layer of decaying leaves, twigs, and organic debris. This natural duff layer feeds the soil food web, maintains consistent moisture levels, and protects the delicate feeder roots located in the top 12 inches of the soil. In residential and commercial landscapes, this natural layer is routinely removed by raking and mowing. Proper mulching is our way of mimicking this forest floor environment, creating a transitional zone that buffers the tree from the harsh, compacted conditions of urban soils.
Step-by-Step Expert Mulching Technique
To achieve the maximum benefits of mulch without introducing fatal risks, follow this precise, expert-approved methodology.
Step 1: Establish the Mulch Ring Radius
The days of small, two-foot mulch rings are over. For newly planted trees, the mulch ring should extend at least to the drip line (the outer edge of the tree canopy). For established trees where expanding to the drip line is impractical due to turfgrass or hardscaping, establish a minimum clearance radius of 3 to 5 feet from the trunk. This reduces competition from grass roots, which are aggressive and will easily outcompete young tree roots for water and nutrients.
Step 2: Expose the Root Flare
Before laying down any new mulch, you must locate the root flare—the area at the base of the trunk where the trunk widens and transitions into the structural roots. If the tree is already buried under old mulch or soil, carefully use an air spade or a gentle hand trowel to excavate the area. The root flare must be fully visible and exposed to the air. Burying the root flare leads to trunk girdling roots and basal rot.
Step 3: Apply the 'Donut' Method
When spreading the mulch, maintain a strict 2 to 3-inch gap between the mulch and the actual trunk of the tree. Think of the mulch ring as a donut, where the tree trunk sits in the empty center hole. Piling mulch directly against the bark keeps the tissue perpetually moist, inviting fungal pathogens, wood-decaying organisms, and boring insects. Furthermore, the dark, warm environment of a mulch volcano encourages secondary roots to grow into the mulch rather than the soil. These roots eventually wrap around the trunk (girdling roots), effectively strangling the tree's vascular system over a period of 5 to 15 years.
Step 4: Control the Depth
The ideal depth for organic mulch is 2 to 4 inches. If you are using a finer mulch, like composted leaf mold, stick to 2 inches. For coarser materials, like large wood chips, you can push closer to 4 inches. Never exceed 4 inches. Excessive mulch depth restricts oxygen exchange to the soil. Tree roots require oxygen for cellular respiration; a thick, matted layer of wet mulch creates an anaerobic environment that suffocates feeder roots and promotes the growth of toxic anaerobic bacteria.
Mulch Material Comparison Chart
Selecting the right material is just as important as the application method. Below is a comparison of common mulching materials used in professional arboriculture, including estimated costs and best use cases.
| Mulch Type | Pros | Cons | Est. Cost (Per Cubic Yard) |
|---|---|---|---|
| Arborist Wood Chips | Excellent moisture retention, resists compaction, often free from local tree services. | Can be bulky, may temporarily tie up surface nitrogen during initial breakdown. | $0 - $15 |
| Shredded Hardwood | Mats together well on slopes, breaks down steadily to improve soil structure. | Can form a water-repellent crust if left unturned, frequently over-applied. | $30 - $45 |
| Pine Bark Nuggets | Long-lasting, aesthetically pleasing, slightly acidifies alkaline soils. | Washes away easily on slopes, decomposes very slowly, provides fewer nutrients. | $40 - $55 |
| Dyed Mulch (Red/Black) | Uniform color, retains visual appeal for a long time. | Often made from recycled pallets, lacks nutritional value, dye can leach. | $35 - $50 |
| Rubber / Inorganic | Does not decompose, no weed seeds. | Traps heat, releases microplastics, offers zero biological benefit to soil. | $60 - $90 |
Seasonal Timing and Maintenance Best Practices
When to Mulch
The optimal time to apply or refresh mulch is in mid-to-late spring, after the soil has had a chance to warm up from the winter freeze. Applying a thick layer of mulch too early in the spring traps the winter cold in the soil, delaying root growth and the emergence of beneficial soil microbes. In regions with extreme summer heat, a fresh application in early spring ensures the root zone is protected before the peak transpiration period begins.
Refreshing vs. Replacing
A common mistake among homeowners and landscaping companies is adding a fresh 2-inch layer of mulch every single year without assessing the existing layer. This leads to the dreaded 'mulch buildup' over time. Instead of adding new mulch annually, use a steel rake to break up and fluff the existing, matted mulch. This restores its porosity and often reveals that the depth is still adequate. Only add a light top-dressing (1 inch or less) if the existing layer has decomposed to less than 2 inches.
Authoritative Insights on Mulching
According to the University of Massachusetts Amherst Extension, 'Mulch should never be piled against the trunk of a tree. The root flare must be visible. Mulch piled against the trunk can cause bark decay, provide a habitat for rodents, and lead to the development of girdling roots.' Their research highlights that the aesthetic desire for uniform, heavily mulched landscape beds must be secondary to the physiological requirements of the tree's root collar.
Expert Note: The International Society of Arboriculture (ISA) strongly advocates for the use of coarse, arborist wood chips over dyed or heavily processed commercial mulches. Arborist chips, which include a mix of wood, bark, and leaves, break down more naturally and provide a broader spectrum of nutrients to the soil food web while resisting compaction and fungal matting.
Advanced Tips for Problem Soils
If you are dealing with heavy, poorly draining clay soils, you must be even more conservative with your mulch depth. In clay soils, limit your mulch layer to 2 inches to prevent excessive moisture retention, which can lead to root rot (Phytophthora). Conversely, in highly alkaline soils, utilizing slightly acidic mulches like pine bark or oak leaf mold can help gently buffer the soil pH over time, making essential micronutrients like iron and manganese more available to the tree roots. For sandy soils that drain too quickly, a thicker 4-inch layer of finely shredded hardwood will act as a crucial sponge, holding water in the root zone for longer periods.
Common Mistakes to Avoid
- Using Landscape Fabric: Placing plastic or woven weed barrier under organic mulch blocks water infiltration, prevents gas exchange, and stops the organic matter from integrating into the soil. Skip the fabric; a proper 3-inch layer of mulch naturally suppresses weeds.
- Ignoring Pest Habitats: Volcano mulch creates a warm, moist winter haven for voles and mice. These rodents will chew on the tree's bark and cambium layer beneath the mulch, often girdling and killing the tree over winter without the owner noticing until spring.
- Mulching Too Close to Hardscape: Keep mulch at least 6 inches away from wooden fences, siding, or decks to prevent moisture accumulation and termite bridging.
- Applying Fresh, Uncomposted Wood Chips: Fresh wood chips can generate immense heat during the initial decomposition phase, potentially scorching the lower trunk and shallow roots. Always use aged or partially composted chips near the root flare.
Summary of Expert Rules
Mastering the art and science of tree mulching requires a shift in perspective. By abandoning the harmful volcano mulching trend and embracing the biological realities of the root flare, soil oxygenation, and moisture dynamics, you can dramatically extend the lifespan and vitality of your landscape trees. Remember the golden rules: keep the root flare exposed, maintain a 3-inch gap at the trunk, never exceed 4 inches in depth, and prioritize coarse, natural organic materials. Implement these expert best practices this season, and your trees will reward you with vigorous growth, robust canopy development, and enduring resilience against environmental stressors.