
Tree Care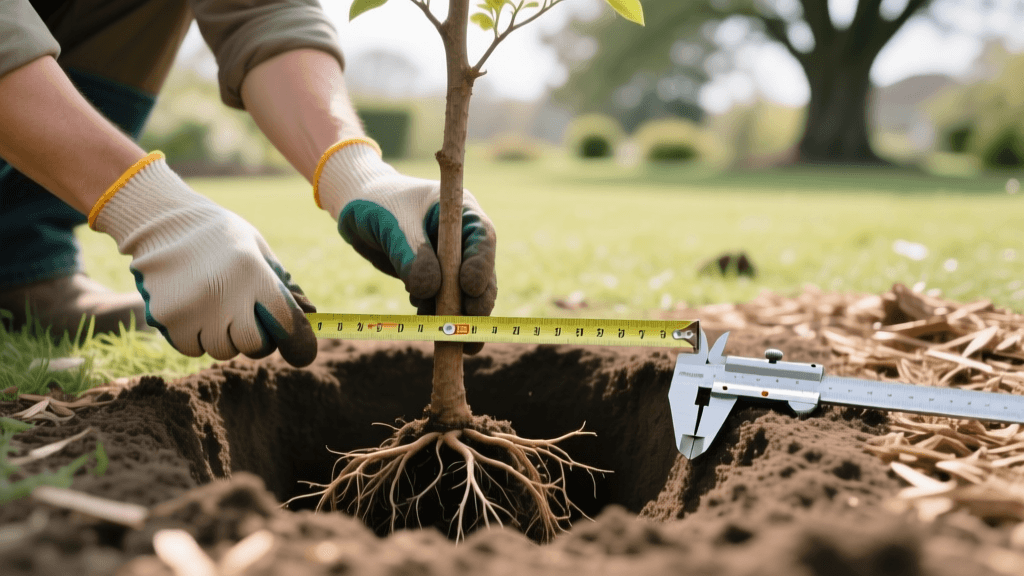
Root Flare Planting Depth: 2026 Photo Documentation Guide
The Intersection of Arboriculture and Visual Documentation
In the modern era of landscape management, planting a tree is no longer just about digging a hole and hoping for the best. As of 2026, the most successful gardeners and landscape architects treat tree installation as a highly documented scientific process. The intersection of arboriculture and garden photography has given rise to a vital practice: visually documenting the planting hole dimensions and the exact placement of the root flare. Why does this matter? Because the leading cause of premature tree decline and structural failure in urban and suburban environments is improper planting depth. By creating a meticulous photographic archive of your tree planting process, you not only ensure that you are following the correct width and depth guidelines, but you also create a permanent visual record for future health assessments, warranty claims, and property insurance purposes.
This guide will walk you through the precise arboricultural standards for tree planting hole width and depth, with a special emphasis on locating and elevating the root flare. Simultaneously, we will explore the garden photography techniques required to capture, measure, and archive these critical stages using the latest 2026 smartphone and camera technology.
Arboricultural Standards: Hole Width, Depth, and the Root Flare
Before you even pick up your camera, you must understand the science of the planting hole. The days of digging a deep, narrow hole are long gone. According to the University of Minnesota Extension, the geometry of your planting hole dictates the tree's ability to establish a lateral root system and anchor itself against high winds.
The Width Guideline
The planting hole must be wide enough to encourage outward root growth. The universal standard is that the hole should be two to three times the width of the root ball. If you are planting a tree with a 24-inch root ball, your hole should be 48 to 72 inches in diameter. This wide, shallow bowl shape allows the delicate new feeder roots to easily penetrate the surrounding native soil. From a photography standpoint, capturing the sheer scale of this wide hole requires stepping back and using a wide-angle lens to include the surrounding landscape context.
The Depth Guideline and the Root Flare
Depth is where most planting mistakes occur. The hole should never be deeper than the height of the root ball itself. In fact, it is highly recommended to dig the hole slightly shallower than the root ball so that the tree rests on undisturbed soil at the bottom, preventing it from sinking over time. The ultimate goal is to ensure the root flare—the area where the trunk widens and transitions into the structural roots—is positioned one to two inches above the final grade level. The Arbor Day Foundation emphasizes that burying the root flare leads to girdling roots, trunk rot, and severe oxygen deprivation.
Identifying and Exposing the Root Flare for the Camera
Nursery-grown trees are often buried too deeply in their containers or burlap sacks to protect them from frost and drying out during transport. Therefore, before you can document the root flare, you must expose it. This is a critical step that requires both physical labor and macro photography.
Use a gentle stream of water or a hand trowel to carefully remove the top layers of soil from the root ball until you see the first structural roots flaring outward from the trunk. The bark texture changes at the root flare; it transitions from the smoother, darker bark of the trunk to the rougher, lighter, and more fibrous texture of the roots. Documenting this transition zone with a macro lens is the ultimate proof that you have found the true root flare. According to Penn State Extension, failing to remove the excess soil from the top of the root ball before planting is a primary culprit in landscape tree mortality. Your photographic record should clearly show the soil line of the nursery pot versus the newly exposed, true root flare.
2026 Photography Gear and Techniques for Garden Documentation
To properly document the dimensions of the planting hole and the position of the root flare, you need more than just a casual snapshot. You need scale, clarity, and context.
- LiDAR and ToF Sensors: Most flagship smartphones in 2026, such as the latest iPhone and Samsung Galaxy Ultra models, feature advanced LiDAR and Time-of-Flight sensors. Use your phone's native measuring app to scan the planting hole. You can overlay a digital depth and width map onto your photograph, providing exact dimensional proof of your 3-to-1 width-to-depth ratio.
- Scale References: Always place a physical object of known size in the frame. A brightly colored folding ruler, a standard brick, or a dedicated photographic scale bar placed at the bottom of the hole provides immediate visual context for the depth. For the width, lay a 100-foot fiberglass tape measure across the diameter of the hole.
- Lighting and Contrast: Soil can be notoriously difficult to photograph because it lacks contrast. The best time to document the interior of a planting hole is during the golden hour (shortly after sunrise or before sunset) when the low angle of the sun casts long shadows, highlighting the texture of the soil walls. Alternatively, an overcast day provides soft, even lighting that eliminates harsh shadows and accurately represents soil color.
- Color Calibration: If you are documenting soil horizons or root health, include a small gray card or color checker in the corner of your frame. This allows you to correct the white balance in post-processing, ensuring the soil and root colors are scientifically accurate.
The Ultimate Tree Planting Photo Shot List
To ensure your garden archive is comprehensive, follow this structured shot list. This table maps the arboricultural requirement to the specific photographic documentation needed at each stage of the installation.
| Installation Stage | Arboricultural Standard | Required Photo Subject | Photography Technique |
|---|---|---|---|
| Site Preparation | Mark the 2-3x width radius | Marked circle with spray paint | Top-down drone shot or high-angle pole shot |
| Excavation | Verify depth is shallower than root ball | Tape measure from grade to hole floor | Profile shot with LiDAR depth overlay |
| Root Ball Prep | Expose the true root flare | Macro shot of trunk-to-root transition | Macro lens with ring flash for bark texture |
| Placement | Root flare 1-2 inches above grade | Level across hole with ruler to flare | Eye-level profile shot showing soil grade line |
| Backfilling | Use native soil, no amendments | Pile of native backfill soil | Color-calibrated shot with gray card |
| Final Grade | Slope soil away from trunk | Finished mulch ring (3 inches max) | Wide-angle shot showing full tree and mulch ring |
Capturing the Profile Shot
The most important photograph in your entire archive is the profile shot taken immediately after the tree is placed in the hole but before backfilling. Position your camera at ground level, a few feet away from the tree. Frame the shot so that the surrounding grade, the edge of the planting hole, the root ball, and the exposed root flare are all visible. Place a rigid, brightly colored measuring tape vertically against the root ball, with the zero mark resting exactly at the bottom of the hole. This single image proves that the hole was not dug too deep and that the root flare is correctly elevated above the surrounding soil line.
Archiving Your Garden Documentation
A photograph is only useful if it can be retrieved years later when the tree is fully established or if a dispute arises with a landscape contractor. In 2026, cloud-based garden management and archiving have become seamless. When you upload your planting photos to your preferred cloud storage or garden journaling app, ensure that you preserve the EXIF metadata. This metadata automatically embeds the exact GPS coordinates, the date, the time, and the camera settings into the image file.
Create a dedicated digital folder for each tree, named with the botanical name, the common name, and the planting date (e.g., 'Quercus_rubra_Northern_Red_Oak_2026-04-12'). Inside this folder, include not only your photographs but also a text document noting the soil type, the exact dimensions of the hole, and the nursery source. By treating your garden photography as a rigorous scientific archive, you elevate your landscape management from simple guesswork to a documented, professional-grade practice. Your future self, and the trees you plant today, will thank you for the meticulous care taken in both the soil and the digital darkroom.

