
Tree Care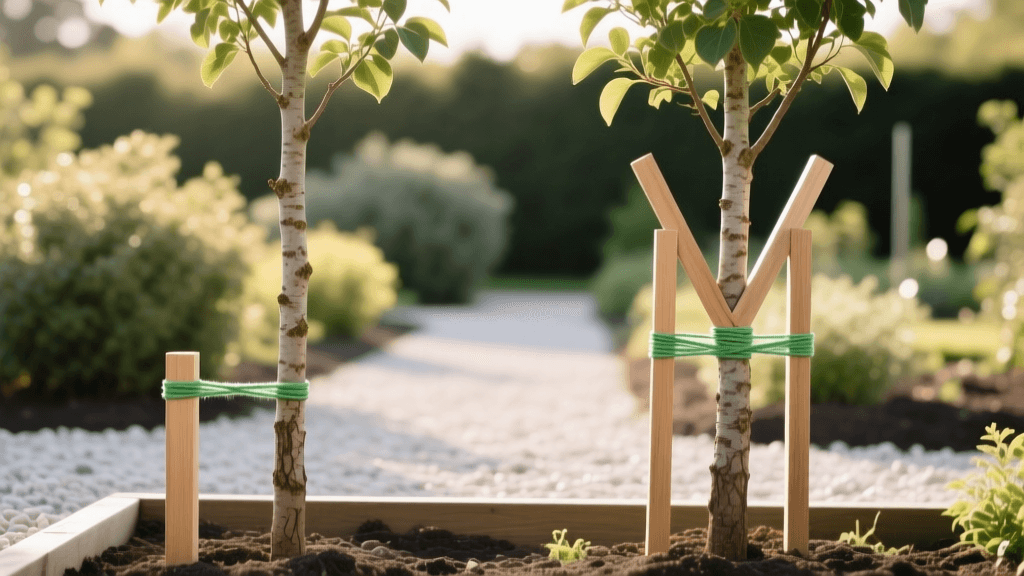
Single vs Double Tree Staking 2026: Visual Documentation Guide
The Intersection of Arboriculture and Visual Documentation
As we navigate the 2026 growing season, the modern horticulturist is no longer just a planter and pruner; they are a curator of living archives. Garden photography and botanical documentation have evolved from simple snapshot memories into rigorous, data-driven practices. One of the most critical, yet visually complex, tasks in young tree care is staking. Improper staking can ruin both the physiological health of the tree and the aesthetic composition of your garden landscape. By merging arboricultural best practices with structured photographic documentation, you can track trunk caliper expansion, monitor stake effectiveness, and create stunning time-lapse records of your trees maturing from vulnerable saplings into anchored landscape pillars.
Why Stake? The Physiology of Trunk Taper
Before setting up your camera rig, it is vital to understand the science of tree anchorage. Trees require mechanical stress—specifically the swaying caused by wind—to develop "reaction wood" and a proper trunk taper. A trunk that is rigidly immobilized by stakes will grow tall and spindly, lacking the basal flare necessary to support its future canopy. According to the Morton Arboretum, staking should only be used when absolutely necessary, such as for top-heavy containerized trees, bare-root stock with insufficient root mass, or in extremely high-wind microclimates. The goal of staking is not to prevent all movement, but to prevent the root ball from shifting in the soil while allowing the upper trunk to flex. Documenting this flex through photography is a brilliant way to ensure your ties are not too restrictive.
Single Stake vs. Double Stake: The 2026 Arborist Consensus
When you determine that a young tree requires support, the next decision is whether to use a single stake or a double stake configuration. The choice depends on the tree's caliper, the prevailing wind direction, and the soil composition. From a photographic standpoint, each setup casts different shadows and creates distinct visual lines in your garden compositions.
Single Staking: The Minimalist Approach
Single staking involves driving one sturdy post into the ground on the windward side of the tree (the side from which the prevailing wind blows). The tie is placed low enough to anchor the root ball but high enough to allow the top two-thirds of the tree to sway freely. This method is ideal for smaller bare-root trees or those planted in sheltered courtyards. Photographically, a single stake is less obtrusive. By placing the stake on the north side of the tree (in the Northern Hemisphere), you ensure that the stake remains in the shadow of the canopy during the golden hour, keeping your sunset and sunrise garden portraits clean and uncluttered.
Double Staking: The High-Wind Solution
Double staking utilizes two stakes placed outside the root ball, usually parallel to each other or in a V-shape facing the prevailing wind. The tree is secured using a crossbar or flexible ties connecting both stakes to the trunk. This is the preferred method for larger, container-grown trees with heavy canopies, or for plantings in open, exposed plains. The University of Minnesota Extension notes that double staking provides superior root ball stabilization in loose or sandy soils. While double stakes introduce more vertical lines into your garden frame, they offer excellent opportunities for symmetrical, structured botanical photography, especially when utilizing macro lenses to capture the intersection of the organic trunk and the geometric ties.
Comparison Chart: Single vs. Double Stake Configurations
| Feature | Single Stake | Double Stake |
|---|---|---|
| Ideal Tree Type | Bare-root, small caliper (<2 inches) | Containerized, heavy canopy, large caliper |
| Wind Exposure | Sheltered or moderate, unidirectional | High wind, exposed areas, multidirectional |
| Soil Type | Loam, clay (good natural grip) | Sandy, loose, or heavily amended soils |
| Trunk Flex | High (excellent for taper development) | Moderate (restricts lower trunk slightly) |
| Photographic Impact | Low visual clutter; easy to hide in shadows | High visual structure; creates framing lines |
Setting Up Your Photographic Documentation Grid
To accurately document the success of your staking method over the 2026 season, you must establish a fixed photographic grid. Trees grow in three dimensions, and a shifting camera angle will render your visual data useless for measuring caliper expansion or lean.
1. Establish Ground Markers: Drive two copper pins or weather-proof ground screws into the soil exactly 4 feet and 8 feet away from the base of the tree, aligned with the staking axis. These serve as your tripod footprint. Every time you photograph the tree, your front tripod leg must rest precisely on these markers.
2. The Scale Reference: Never photograph a staked tree for documentation without a scale reference. In 2026, the standard for botanical macro-photography is the use of a rigid, matte-black arborist caliper ruler placed gently against the trunk near the tie point. This allows you to measure trunk thickening month-over-month when reviewing your images on a calibrated monitor.
3. Lighting for Stake Analysis: While golden hour light is beautiful for garden portfolios, it is terrible for documenting staking tension. Harsh directional light creates deep shadows that hide girdling (when the tie cuts into the bark). For your monthly documentation audits, shoot on overcast days or use a portable diffusion panel. Soft, even light reveals the subtle indentations in the bark caused by overly tight EPDM rubber ties or jute straps.
Time-Lapse Rigging for Windthrow and Flex Analysis
One of the most exciting advancements in garden documentation is the use of solar-powered, weather-sealed 4K time-lapse cameras. By mounting a dedicated intervalometer camera on a nearby fence or permanent post, you can capture the micro-movements of the tree during spring gales and summer thunderstorms.
Set your intervalometer to capture one frame every 10 minutes during daylight hours. When compiled, this time-lapse will reveal the "whip" of the canopy and the flex of the trunk. If the time-lapse shows the trunk bending sharply at the exact point of the tie while the root ball remains perfectly still, your stake is doing its job. However, if the time-lapse reveals the soil cracking around the base of the stake, or the entire root plate lifting slightly on the leeward side, you are witnessing early-stage windthrow, indicating that your single stake is insufficient and a double-stake or guy-wire system must be implemented immediately.
Aesthetic Considerations: Staking Materials in the Lens
As a garden photographer, the materials you choose for staking will heavily influence the visual harmony of your landscape images. The days of using bright white PVC pipes or unsightly wire-and-hose contraptions are behind us. In 2026, arborists and landscape designers favor materials that either blend seamlessly into the environment or age beautifully.
- Dark Green Fiberglass Stakes: These are incredibly strong, flexible, and virtually disappear against the backdrop of spring foliage and summer shadows. They are the top choice for photographers who want the tree to remain the sole focal point.
- Raw Cedar or Black Locust Posts: For a more rustic, naturalistic garden design, untreated wood stakes offer beautiful texture. As they weather to a silvery-grey, they complement the bark of maturing trees. Use a shallow depth of field (f/2.8) to blur the wooden stake in the background while keeping the trunk tie in sharp focus.
- Biodegradable Jute and EPDM Rubber Ties: Avoid zip-ties and wire at all costs. Wide, flat EPDM rubber straps in dark brown or forest green not only protect the tree's cambium layer but also photograph as soft, organic embraces rather than harsh, synthetic bindings.
Seasonal Photo Audits: What to Look For
Your photographic archive serves as an early warning system for tree health. When reviewing your monthly image sets, look for the following critical indicators:
The Girdling Check: Zoom in on the tie points. If the bark is bulging over the edges of the strap, the tie is too tight or the tree has outgrown it. Loosen the strap immediately to prevent phloem disruption.
The Taper Audit: Compare the base of the trunk in your May photos to your September photos. A healthy tree will show a distinct widening at the soil line (the root flare). If the trunk remains perfectly cylindrical like a pole, the stakes are too rigid and are preventing the development of reaction wood.
The Hardware Degradation: Wooden stakes can rot at the soil line, and metal brackets can rust. High-resolution macro photos taken at ground level will reveal fungal growth or wood softening on stakes before they fail during a storm.
Conclusion
Mastering the balance between single and double tree staking is a fundamental skill in arboriculture, but elevating that skill through rigorous garden photography transforms you from a mere gardener into a landscape scientist. By utilizing fixed camera grids, understanding the interplay of light and staking shadows, and leveraging time-lapse technology to monitor wind dynamics, you ensure your young trees survive their vulnerable early years. Furthermore, you build a stunning, multi-year visual portfolio that celebrates the resilience and growth of your garden. For more data on tracking plant life cycles and seasonal changes, consider aligning your photographic records with the protocols established by the USA National Phenology Network, contributing your backyard documentation to a broader scientific understanding of urban forestry in 2026 and beyond.

