
Gardening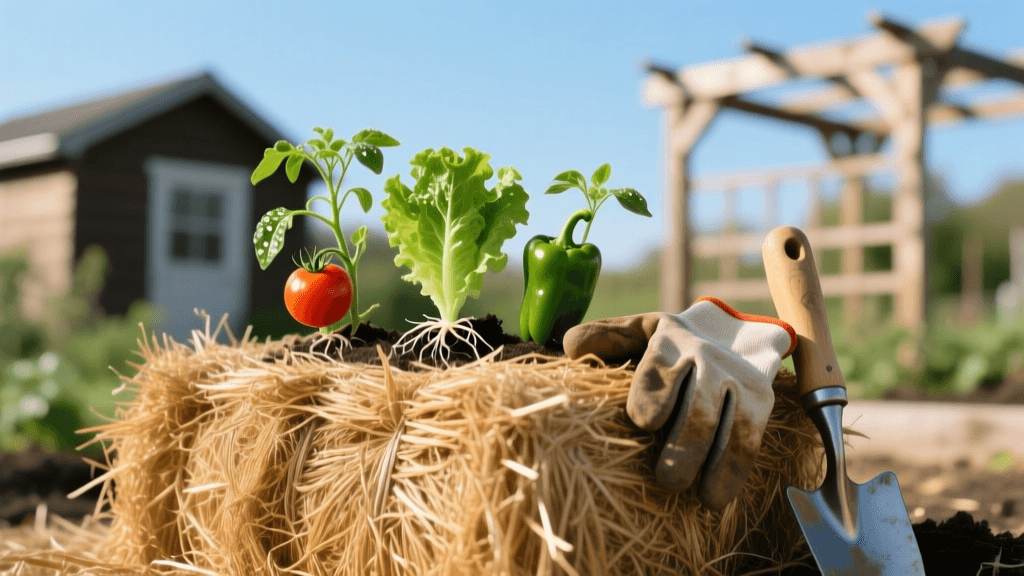
Viral Straw Bale Gardening: Grow Veggies Without Soil
The Viral Sensation Taking Over GardenTok
If you have spent any time scrolling through gardening content on TikTok, Instagram Reels, or Pinterest over the last few years, you have likely seen the viral straw bale gardening trend. Content creators are showcasing massive, sprawling tomato plants, heavy bell peppers, and vibrant squash vines growing directly out of golden blocks of straw. It looks like a magic trick, but it is actually a highly effective, scientifically backed horticultural method that is revolutionizing how home gardeners approach food production. For urban homesteaders, renters, and anyone with poor native soil or bad knees, this no-dig method is the ultimate viral gardening hack.
What is Straw Bale Gardening?
At its core, straw bale gardening is a unique form of container gardening where the container itself is the growing medium. Instead of filling a raised bed with expensive soil, you use a tightly bound bale of straw. As the straw decomposes over the growing season, it creates a rich, warm, and highly aerated environment for plant roots. The decomposition process is driven by thermophilic (heat-loving) bacteria, which break down the complex carbon structures of the straw and release essential nutrients like nitrogen, phosphorus, and potassium directly to the plant roots.
According to the experts at Straw Bale Gardens, this method was popularized by Joel Karsten, who turned a childhood farm chore into a global gardening movement. The technique is particularly celebrated because it entirely eliminates the need for tilling, weeding, and amending heavy clay or rocky native soils.
Straw vs. Hay: The Golden Rule
The most common mistake beginners make when attempting this viral trend is confusing straw with hay. This single error can ruin your entire season.
- Straw: This is the dry, hollow stalk left over after a grain crop (like wheat, oats, or barley) has been harvested. It is yellow or golden, contains very few seeds, and is primarily composed of carbon. This is what you must use.
- Hay: This is a grass or legume (like alfalfa or timothy) cut while still green and leafy, specifically used to feed livestock. Hay is packed with viable weed seeds and high nitrogen. If you use hay, your garden will quickly become a viral fail, overrun by aggressive weeds.
Cost and Materials Breakdown
One of the primary reasons this method trends so heavily is its affordability. Here is a realistic cost breakdown for a standard 5-bale setup:
- Straw Bales: $8 to $15 each (sourced from local farm supply stores, garden centers, or directly from local farmers).
- High-Nitrogen Fertilizer: $15 for a bag of organic blood meal (12-0-0) or synthetic urea (46-0-0) to feed the decomposing bacteria.
- Sterile Potting Mix: $10 for a standard bag to create planting pockets.
- Drip Irrigation Tape: $20 for a basic soaker hose kit.
- Total Estimated Cost: $85 to $120 for a complete, high-yield garden that would cost hundreds of dollars to build using traditional cedar raised beds and bulk soil.
The Crucial 12-Day Conditioning Schedule
You cannot simply buy a bale of straw, stick a tomato plant in it, and expect it to thrive. The bale must be "conditioned" or pre-composted. If you plant too early, the rapid decomposition will generate internal temperatures exceeding 140°F, effectively cooking your plant roots. According to guidelines published by Penn State Extension, a strict 12-day conditioning schedule is mandatory to cultivate the right bacterial colonies and stabilize the internal temperature.
| Days | Action Required | Details & Measurements |
|---|---|---|
| Days 1-3 | Heavy Watering | Water the bales thoroughly until water runs out the bottom. Keep them wet to wake up the bacteria. |
| Days 4-6 | Water + Nitrogen | Water deeply, then sprinkle 1/2 cup of blood meal or 1/4 cup of urea per bale. Water it in. |
| Days 7-9 | Water + Nitrogen | Water deeply, then apply 1/4 cup of blood meal or 1/8 cup of urea per bale. The bales will feel hot. |
| Day 10 | Water Only | Wash the bales thoroughly with water only. Do not add more fertilizer. |
| Day 11 | Temperature Check | Water lightly. Insert a long probe thermometer. The internal temp should be dropping close to ambient. |
| Day 12 | Planting Day! | If the bale is below 100°F internally, it is safe to plant your seeds or transplants. |
Planting Techniques: Pockets vs. Slits
Once your bales are conditioned and the temperature is safe, it is time to plant. The viral videos often skip the mechanics of how to actually get the plant into the tightly bound straw. There are two primary methods depending on what you are growing:
1. The Pocket Method (For Transplants)
For crops like tomatoes, peppers, eggplants, and squash, you will use the pocket method. Use a hand trowel to pry apart the straw and create a hole about 6 inches deep and 6 inches wide. Fill this void with roughly 2 quarts of sterile, high-quality potting mix. Plant your transplant directly into the potting mix. The soil acts as a buffer and provides immediate moisture retention while the plant's roots eventually penetrate the decomposing straw.
2. The Slit Method (For Seeds)
For direct-sown crops like beans, peas, carrots, or radishes, use the slit method. Take a sharp knife or a specialized bale dibber and cut a horizontal slit across the top of the bale. Pull the slit open, fill it with a thin line of potting soil, and sow your seeds according to the packet's depth instructions. Close the slit gently and water it in.
Irrigation and Maintenance
Straw is incredibly well-draining, which is great for preventing root rot but terrible for moisture retention during the heat of summer. Hand-watering straw bales with a hose is inefficient; the water simply channels through the hollow stalks and runs out the bottom before the core is saturated.
The most successful viral gardeners use automated drip irrigation. Lay a soaker hose or drip tape directly across the top of the bales, weaving it between the plants. Secure it with landscape staples or bent wire hangers. According to The Old Farmer's Almanac, consistent moisture is the key to unlocking the nutrient release within the bale. Because straw lacks the cation exchange capacity of heavy soils, you will also need to apply a liquid organic fertilizer (like fish emulsion or kelp meal) every two weeks once the plants begin flowering and fruiting.
Best Crops and Companion Planting
Not every crop thrives in a straw bale. The best candidates are heavy feeders that love the warm, nitrogen-rich environment of a decomposing bale.
- Tomatoes: The undisputed kings of the straw bale. Plant one indeterminate tomato per bale and provide a tall trellis or heavy-duty cage.
- Peppers and Eggplants: You can fit two plants per bale. They love the radiant heat the bale provides at night.
- Cucumbers and Winter Squash: Allow them to trail down the sides of the bale, which keeps the fruit off the ground and away from soil-borne pests.
- Companion Planting: Tuck a few marigold seeds into the edges of the bale to deter nematodes, or plant basil near your tomatoes to maximize space and deter hornworms.
Avoid: Tall, top-heavy crops like corn (which will blow over in the wind) or perennial crops like asparagus and rhubarb, which require permanent, undisturbed root systems.
Troubleshooting Common Viral Gardening Fails
While the internet makes it look effortless, there are a few common pitfalls to watch out for. First, never place your bales directly on a wooden deck or a concrete patio without a heavy-duty tarp underneath; the decomposition process will stain surfaces and trap moisture, leading to rot. Second, if you notice a thick layer of white or gray mold forming on the outside of the bale, do not panic. This is mycelium, a beneficial fungus that is actively breaking down the carbon. It is a sign of a healthy, active ecosystem.
End of Season: The Ultimate Zero-Waste Hack
By the end of the autumn harvest, your once-tight, golden bales will look like slumped, dark mounds of rich compost. This is where the zero-waste magic happens. Cut the binding twine, break the bale apart, and spread the decomposed straw across your existing garden beds as a nutrient-dense winter mulch, or add it to your traditional compost bin. By next spring, it will have broken down into beautiful, dark humus, completing the cycle and leaving you with improved soil for whatever viral gardening trend you decide to try next.

