
Tree Care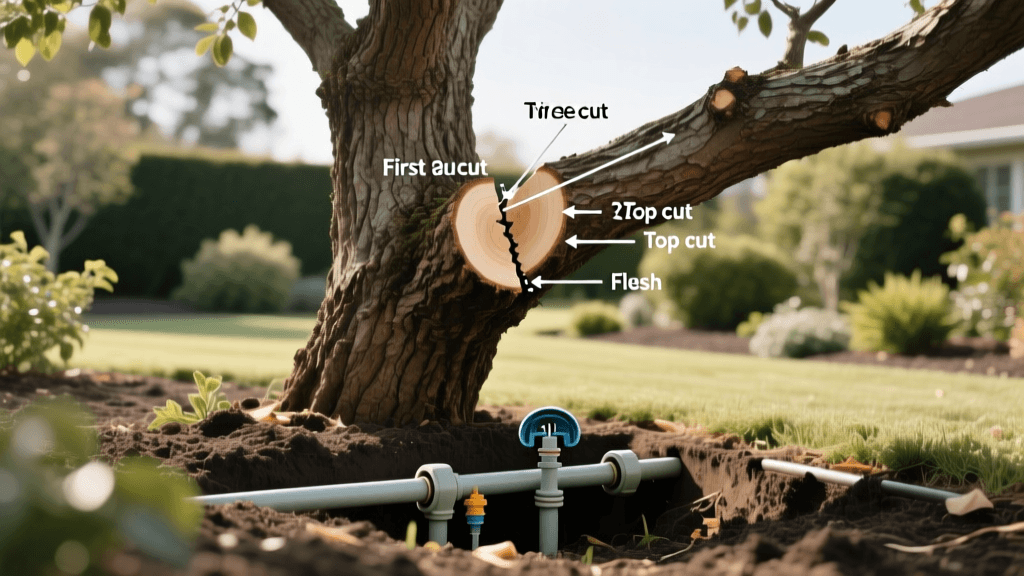
Three-Cut Pruning Near Sprinkler Systems: 2026 Guide
The Intersection of Tree Care and Irrigation Infrastructure
In the modern landscape of 2026, your yard is a highly integrated ecosystem. Trees and sprinkler systems share the same soil profile, the same airspace, and the same maintenance schedule. When a large, heavy branch needs to be removed from a mature shade tree, the stakes are incredibly high. A miscalculated drop can easily crush a $150 smart rotary sprinkler head, snap a PVC lateral line, or completely shatter a subsurface valve box. This is where the three-cut pruning method becomes an essential skill for any homeowner or landscape manager.
The three-cut method is the arboricultural standard for removing large limbs safely. By breaking the removal process into three distinct cuts, you eliminate the risk of bark tearing down the trunk and, more importantly for irrigation managers, you gain total control over the trajectory and drop zone of the heavy wood. According to the Arbor Day Foundation, proper pruning not only preserves tree health but also prevents catastrophic structural failures that could devastate surrounding landscape infrastructure.
In this comprehensive 2026 guide, we will break down the exact mechanics of the three-cut pruning method and explain how to execute it safely around your pop-up rotors, drip lines, and smart irrigation controllers.
Why Bark Tearing Destroys More Than Just Trees
If you attempt to remove a heavy branch with a single cut, the weight of the wood will often cause the branch to snap prematurely before the saw finishes the cut. This results in a 'bark tear,' where the heavy limb rips a long strip of bark down the trunk of the tree. This exposes the cambium layer to pests, fungal infections, and severe moisture loss.
From an irrigation perspective, a falling, uncontrolled branch is a wrecking ball. When a branch tears and falls unpredictably, it is highly likely to land directly on your irrigation zones. In 2026, with the widespread adoption of high-efficiency MP Rotators and precision subsurface drip irrigation (SDI), replacing damaged infrastructure requires specialized labor and parts. Preventing the bark tear ensures the branch falls exactly where you plan it, keeping your irrigation heads safe.
Step-by-Step: The Three-Cut Pruning Method
To safely remove a branch that is 3 inches or thicker, follow these three precise cuts. Always wear ANSI-approved eye protection and cut-resistant chaps.
Cut 1: The Undercut (The Safety Notch)
Measure about 6 to 12 inches away from the tree trunk (the branch collar). Using a pruning saw, cut upward from the underside of the branch. You only need to cut about one-third of the way through the branch's diameter. This undercut acts as a mechanical stop. If the branch begins to split as it falls, the tear will stop at this notch, preventing it from ripping down into the trunk.
Cut 2: The Relief Cut (Removing the Weight)
Move about 2 to 3 inches further out on the branch (away from the tree) from your first undercut. Cut completely through the branch from the top down. The heavy outer portion of the branch will fall away safely. Because you made the undercut first, the bark will not tear. You can now safely direct this heavy piece of wood away from your sprinkler heads, drip emitters, and valve boxes.
Cut 3: The Finishing Cut (The Collar Cut)
Now that the heavy weight is gone, you can make the final, precise cut to remove the remaining stub. Locate the 'branch collar'—the swollen, wrinkled area where the branch meets the trunk. Make a clean, smooth cut just outside this collar. Do not cut flush against the trunk, and do not leave a long stub. The Penn State Extension emphasizes that cutting just outside the collar allows the tree's natural defense mechanisms to seal the wound effectively, preventing rot that could eventually compromise the tree's structural integrity over your irrigation lines.
Protecting Your Sprinkler Infrastructure During the Drop
Even with the three-cut method, a 40-pound piece of oak or maple wood is going to hit the ground. If you are pruning directly over an irrigation zone, you must take proactive steps to protect your hardware.
- Map Your Lines: Before you start the saw, use a 2026 digital utility locator or review your original landscape plans to identify exactly where your lateral PVC lines and valve boxes are buried.
- Cover the Rotors: Use heavy-duty rubber sprinkler head covers or simply place a thick piece of plywood over pop-up heads and rotary nozzles in the immediate drop zone.
- Shut Off the Zone: Use your smart controller app (such as Rachio 4 or Hunter Hydrawise) to completely disable the specific zone you are working in. If a branch happens to sever a riser, you do not want the system to trigger a geyser while you are standing there with a chainsaw.
- Pad the Valve Boxes: If a heavy limb must be lowered near a valve box, pad the plastic lid with a thick layer of mulch or a specialized arborist rigging mat to absorb the shock of the impact.
Post-Pruning Irrigation Adjustments for 2026
Removing a massive branch or reducing a tree's canopy significantly alters the microclimate of your landscape. This directly impacts how your sprinkler system should operate for the remainder of the season.
Adjusting for Increased Sunlight and Evaporation
When you remove large, shade-casting branches, the turfgrass or understory plants beneath the tree will suddenly receive significantly more direct sunlight. This increases the evapotranspiration (ET) rate in that specific zone. If your smart irrigation controller relies on local weather data, it may not account for this sudden, localized shift from deep shade to partial sun. You will need to manually increase the watering duration for that specific zone by 10% to 15% to prevent the newly sun-exposed grass from drying out.
Recalibrating Drip Emitters
If you are using subsurface drip irrigation or point-source emitters at the base of the tree, remember that the tree's water requirements have just changed. A reduced canopy means fewer leaves to support, which temporarily lowers the tree's overall water demand while it recovers from the pruning wound. According to the EPA WaterSense program, optimizing smart controllers to match the exact water needs of your landscape is crucial for conservation. Reduce the drip emitter run-time by 5% for the first three weeks post-pruning, then gradually return to normal as the tree pushes new growth.
2026 Equipment Guide: Pruning & Irrigation Protection
Having the right tools ensures clean cuts and protected infrastructure. Below is a comparison of the top-rated arborist and irrigation protection gear for the 2026 season.
| Equipment / Tool | Primary Purpose | 2026 Est. Cost | Best For |
|---|---|---|---|
| Silky Gomboy 240 | Clean, precise finishing cuts | $72 | Branches up to 4 inches thick |
| Stihl GTA 26 | Cordless mini chainsaw for relief cuts | $199 | Fast removal of heavy limbs |
| Rain Bird Rotor Guard | Physical shield for pop-up sprinklers | $14 (per pair) | Protecting heads from falling debris |
| Arborist Rigging Mat | Shock absorption for hardscapes & valve boxes | $85 | Lowering heavy wood safely |
| Digital Line Locator | Mapping subsurface drip and PVC lines | $145 | Preventing root/line damage during cleanup |
Final Thoughts on Canopy and Water Management
The three-cut pruning method is not just about tree health; it is a vital risk-management strategy for your landscape's irrigation infrastructure. By taking the time to make an undercut, a relief cut, and a precise collar cut, you ensure that heavy wood is removed safely and predictably. Combined with modern smart irrigation adjustments and physical protective gear, you can maintain a stunning, healthy tree canopy in 2026 without sacrificing the integrity of your underground watering systems. Always prioritize safety, map your lines before you cut, and let your smart controller do the heavy lifting when it comes to post-pruning water management.

