
Tree Care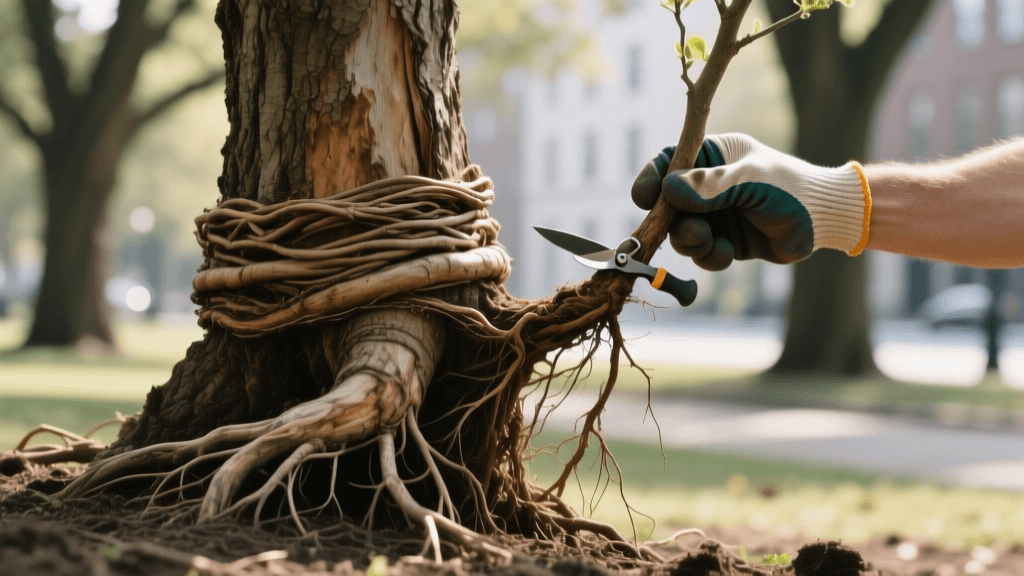
2026 Guide: Girdling Root Treatment & Root Flare Pruning
Understanding Girdling Roots and the Root Flare
Girdling roots are one of the most insidious threats to urban and suburban trees. Unlike pests or diseases that attack from the outside in, girdling roots choke the tree from within its own foundation. A girdling root is any root that wraps around the trunk or other major roots, effectively cutting off the flow of water, nutrients, and carbohydrates through the vascular system. Over time, this strangulation leads to canopy dieback, structural instability, and eventually, tree death.
The critical zone for identifying and treating this issue is the root flare—the area at the base of the trunk where the trunk widens and transitions into the root system. In a healthy tree, the root flare should be visible above the soil line, resembling the base of a wine glass. When trees are planted too deeply or buried under 'mulch volcanoes,' the root flare is suffocated, and roots often grow upward and inward, circling the trunk in search of oxygen before turning downward, creating a girdling effect.
Identifying Girdling Roots: Signs and Symptoms
Before you can apply root pruning methods, you must accurately diagnose the problem. According to University of Minnesota Extension, girdling roots often present above-ground symptoms that mimic drought stress or vascular diseases. Look for the following indicators in 2026:
- Canopy Dieback: Thinning leaves, particularly on one side of the tree or in the upper crown.
- Early Autumn Coloration: Leaves turning yellow or red weeks earlier than surrounding trees of the same species.
- Abnormal Trunk Taper: A trunk that goes straight into the ground like a telephone pole, lacking the natural outward flare at the base.
- Visible Surface Roots: Roots visibly wrapping around the base of the trunk or breaking through the soil surface and mulch.
- Flattened Trunk Sides: As a girdling root expands, it presses against the trunk, creating a noticeable flat or indented side on the lower trunk.
To confirm the presence of girdling roots, you must carefully excavate the soil around the base of the tree to expose the root flare. This diagnostic step is non-negotiable before any pruning begins.
Timing Your Root Pruning Intervention
Timing is everything when it comes to root pruning. The physiological state of the tree dictates how well it will compartmentalize the pruning wounds and recover from the stress of root loss. The universally recommended window for treating girdling roots is during the dormant season, specifically late winter to very early spring, just before bud break.
Why is this timing critical? During late winter, the tree's energy reserves are stored safely in the root system. When spring arrives, the tree pushes that stored energy upward to heal wounds and produce new growth. If you prune roots in late summer or early fall, the tree is actively trying to store energy for winter. Removing roots at this time depletes reserves, leaves open wounds vulnerable to root-rot pathogens, and severely hampers the tree's ability to survive the winter freeze.
Proper timing allows the tree to utilize the upcoming spring growth flush to rapidly generate callus tissue over the root pruning cuts, sealing the wound against decay organisms.
Step-by-Step Treatment and Root Pruning Methods
Treating girdling roots requires precision, the right tools, and a solid understanding of tree biology. Here is the professional methodology for root flare excavation and root pruning in 2026.
Step 1: Safe Excavation of the Root Flare
Never use a steel shovel or pickaxe to dig around the trunk; you risk severing vital structural roots and introducing decay. For minor surface inspections, a hand trowel and a soft-bristled brush are sufficient. However, for comprehensive root flare excavation, professional arborists use an AirSpade (a pneumatic excavation tool that uses compressed air to fracture soil without damaging roots). If you are a homeowner, carefully use a hand trowel and a garden hose to gently wash away soil until the entire root flare and the top 12 inches of the radiating roots are exposed.
Step 2: Assessing the Root Hierarchy
Not all circling roots must be removed. You must distinguish between structural roots (thick, load-bearing roots radiating outward) and girdling roots (roots wrapping around the trunk or crossing over structural roots). If a root is small (less than 2 inches in diameter) and wrapping around the trunk, it should be removed. If a massive structural root is girdling the trunk, removing it could compromise the tree's stability. In such cases, an ISA-certified arborist may recommend partial shaving of the root rather than complete severance, or cabling the canopy to mitigate windthrow risk.
Step 3: Making the Pruning Cuts
When removing a girdling root, the goal is to make clean, precise cuts that the tree can quickly compartmentalize. Never tear or rip the root.
- Tool Selection: For roots under 1.5 inches, a sterilized bypass lopper or a high-quality folding saw like the Silky GomBoy 240 is ideal. For thicker roots in tight spaces, modern battery-powered tools like the Milwaukee M18 Fuel Hackzall equipped with a 9-inch pruning blade offer immense control and clean cuts without the exhaust of gas tools.
- Cut Placement: Make the cut just outside the point where the girdling root originates or where it crosses a major structural root. Do not cut flush against the trunk if the root originates from the trunk; leave a tiny collar to allow for callus formation, similar to branch pruning.
- Sanitation: Always sterilize your blades between cuts using a 70% isopropyl alcohol solution or a 10% bleach solution to prevent the spread of soil-borne pathogens like Phytophthora.
Step 4: The 'Window' Technique
Sometimes a girdling root dives under the trunk and emerges on the other side. In these cases, arborists use the 'window' method. Instead of pulling the root out from under the trunk (which can damage the bark on the underside of the trunk), you make two clean cuts to remove a section of the girdling root, leaving the dead segment under the trunk to harmlessly decay over time.
2026 Tools and Costs for Girdling Root Treatment
Whether you are tackling a minor surface root issue or hiring a professional for a severe case, understanding the current landscape of tools and costs is essential. Below is a comparison of methods and estimated 2026 pricing.
| Method / Tool | Target Root Size | 2026 Estimated Cost | Best Use Case |
|---|---|---|---|
| Hand Trowel & Silky Folding Saw | < 1.5 inches | $45 - $85 (DIY Tools) | Small trees, minor surface roots, shallow flares |
| Milwaukee M18 Hackzall & Trowel | 1.5 - 4 inches | $180 - $300 (DIY Tools) | Thick secondary roots, tight spaces, fast clean cuts |
| Stihl GTA 26 Battery Pruner | < 2 inches | $160 - $200 (DIY Tools) | Precision cuts on smaller kinked roots near the trunk |
| Professional AirSpade Excavation | All sizes / Deep | $175 - $250 / hour | Severe girdling, deeply buried flares, large mature trees |
As noted by The Morton Arboretum, if more than 25% of the root system requires removal, or if the tree is exceptionally large, hiring an ISA-certified arborist is strongly advised to prevent catastrophic structural failure.
Aftercare and Prevention
Once the girdling roots are pruned and the root flare is exposed, proper aftercare is vital. Do not push the soil back over the root flare. The flare must remain exposed to the air. Apply a 2-to-3-inch layer of organic wood chip mulch over the exposed root zone, but keep the mulch at least 3 inches away from the actual trunk bark to prevent moisture buildup and rot. Water the tree deeply during dry spells in the first growing season to help it overcome the shock of root loss.
To prevent girdling roots in future plantings, always inspect the root ball of nursery trees before planting. Wash away the top layer of soil to find the true root flare, and use a sharp pruning saw to shave off any circling roots on the outside of the root ball. Research from UMass Amherst Extension highlights that correcting root defects at the time of planting is infinitely more successful and less expensive than attempting to surgically correct them a decade later. By prioritizing proper planting depth and early root flare inspection, you ensure your trees develop strong, radiating root systems capable of supporting a healthy canopy for decades to come.

