
Tree Care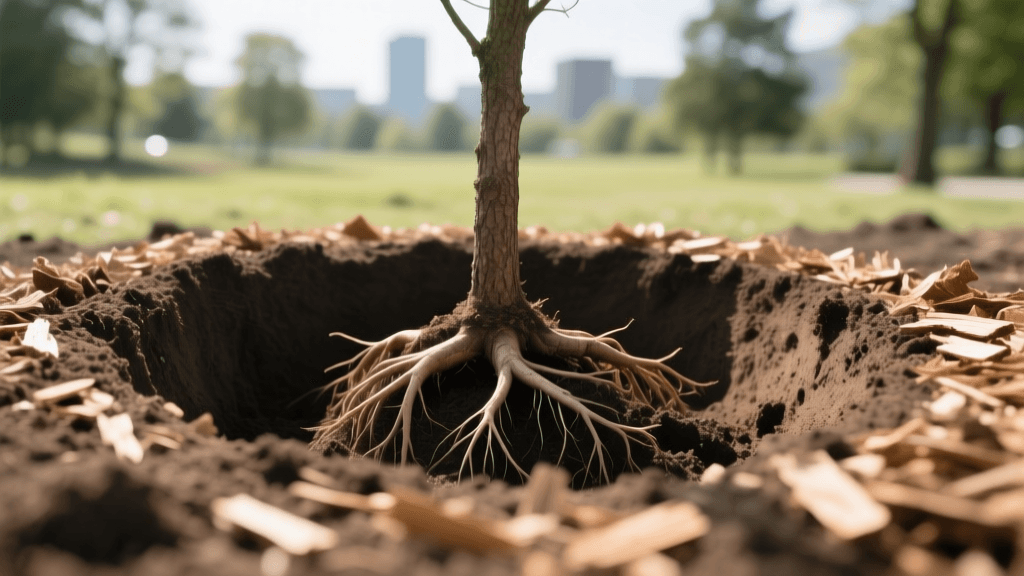
Root Flare Depth and Tree Planting Mulch Guide 2026
Introduction to Tree Planting and the Root Flare
Welcome to the 2026 tree planting season. Whether you are adding shade trees to your landscape or establishing a new privacy border, buying a healthy specimen is only ten percent of the work. The remaining ninety percent relies entirely on proper planting techniques and strategic mulching methods. In recent years, arborists have noted a massive increase in tree decline directly linked to improper planting depth and suffocating mulch rings. As climate patterns in 2026 bring heavier spring rains followed by severe summer droughts, understanding the synergy between your planting hole dimensions, the root flare, and your chosen mulching materials is more critical than ever.
The root flare, also known as the trunk flare, is the area at the base of the tree where the trunk transitions into the root system. It should resemble the bell-bottom of a pair of pants, widening as it meets the soil. When this vital anatomical feature is buried or smothered by improper mulching, the tree is starved of oxygen, leading to girdling roots, trunk rot, and eventual death. This comprehensive guide will walk you through the exact width and depth guidelines for your planting hole, how to properly expose the root flare, and the best mulching methods to ensure your tree thrives for decades.
Digging the Perfect Tree Planting Hole: Width Guidelines
One of the most common mistakes homeowners make is digging a hole that is too deep and too narrow. Current arboriculture standards for 2026 emphasize wide, shallow planting holes. The roots of most trees grow outward, not downward, with the vast majority of the absorbing roots located in the top 12 to 18 inches of soil.
To encourage rapid lateral root establishment, your planting hole should be two to three times wider than the diameter of the root ball or container. For example, if your tree's root ball is 20 inches across, your hole should be 40 to 60 inches in diameter. This wide footprint loosens the surrounding soil, making it easier for new roots to penetrate and expand. Furthermore, the sides of the hole should be sloped gently outward, creating a shallow bowl shape rather than a steep cylinder. This prevents water from pooling at the bottom of the hole and drowning the roots.
Planting Hole Depth and the Root Flare Rule
Depth is where most planting errors occur. The golden rule of tree planting is that the root flare must sit at or slightly above the surrounding grade level. To determine the correct depth, you must first measure the root ball. According to the Arbor Day Foundation, the hole should only be as deep as the root ball itself, and often slightly shallower to account for soil settling.
If you dig the hole too deep and place the tree in it, the root flare will be buried. Buried root flares suffer from hypoxia (oxygen deprivation). The bark on the trunk is not designed to be constantly damp and buried; when covered by soil or mulch, it breaks down, inviting fungal pathogens and boring insects. To prevent this, dig your hole one to two inches shallower than the height of the root ball. This ensures that once the tree is placed and the soil settles, the root flare remains proudly exposed above the grade.
Identifying and Exposing the Root Flare
In modern commercial nursery practices, trees are frequently planted too deeply in their containers to reduce watering frequency and stabilize them during transport. As a result, the root flare is often buried under three to five inches of nursery soil. Before you even think about placing the tree in the ground, you must excavate the top of the root ball.
Use a hand trowel or a gentle stream of water to carefully remove the top layers of soil until you find the first major lateral roots branching out from the trunk. This is your true root flare. Removing this excess soil is non-negotiable. If you plant the tree with the nursery soil still covering the flare, you are effectively planting the tree too deep, regardless of how carefully you measured the hole. Once the flare is exposed, measure from the bottom of the root ball to the flare to determine your exact planting depth.
Mulching Methods: Protecting the Root Flare
From a mulching perspective, the planting hole is only half the battle. How you apply mulch around the newly planted tree will dictate its moisture retention, soil temperature, and overall health. The most notorious and damaging landscaping trend is 'volcano mulching'—piling mulch high against the trunk of the tree. This practice is lethal. It keeps the trunk bark perpetually moist, leading to rot, and forces roots to grow upward into the mulch, eventually girdling and strangling the tree.
Instead, utilize the Donut Method. Mulch should be applied in a wide, flat ring around the tree, resembling a donut. The mulch should start three to five inches away from the trunk, leaving the root flare completely exposed to the air. The mulch layer should be two to four inches deep, extending out to the drip line if possible, but at least covering the width of the planting hole. This method suppresses weeds, retains vital soil moisture during 2026's summer heatwaves, and slowly breaks down to feed the soil microbiome, all without suffocating the trunk.
Best Mulching Materials for Tree Establishment
Choosing the right mulch material is essential for regulating the soil environment around your newly exposed root flare. Inorganic mulches like rubber or dyed mulches are highly discouraged by experts at The Morton Arboretum due to poor aeration and potential chemical leaching. Organic mulches are the gold standard, as they mimic the natural forest floor.
| Mulch Material | Pros | Cons | Ideal Depth |
|---|---|---|---|
| Composted Wood Chips | Excellent moisture retention, sustainable, promotes beneficial fungi. | Can tie up nitrogen if mixed into the soil (keep on surface). | 3 to 4 inches |
| Shredded Hardwood Bark | Interlocks well, resists washing away on slopes, breaks down steadily. | Can form a crust if applied too thickly, blocking water. | 2 to 3 inches |
| Pine Straw | Lightweight, allows excellent water penetration, great for acid-loving trees. | Breaks down quickly, requires frequent replenishment, blows away in wind. | 3 to 5 inches |
| Fresh Arborist Chips | Often free from local tree services, excellent weed suppression. | Can harbor artillery fungus, may temporarily deplete surface nitrogen. | 4 inches |
| Dyed Mulches (Avoid) | Uniform aesthetic color. | Poor soil biology, potential chemical runoff, repels water when dry. | N/A |
For the best results in 2026, source locally composted wood chips or arborist chips. Ensure the chips are aged or composted if using around young, sensitive transplants to prevent nitrogen robbery at the soil line.
Step-by-Step Planting and Mulching Schedule
Follow this actionable checklist to guarantee your tree's root flare is properly positioned and mulched:
- Call Before You Dig: Always contact your local utility locating service (like 811 in the US) a few days before digging to avoid striking underground lines.
- Excavate the Root Ball: Gently brush away the top 2-4 inches of nursery soil to expose the root flare and the first lateral roots.
- Dig the Hole: Dig a hole 2-3 times wider than the root ball, but 1-2 inches shallower than the root ball's height.
- Position the Tree: Place the tree in the center. Verify that the root flare is sitting 1-2 inches above the surrounding grade.
- Backfill with Native Soil: Use the soil you just dug out to backfill the hole. According to Penn State Extension, amending the backfill soil is no longer recommended, as it creates a 'bathtub effect' that traps water and discourages roots from expanding into native soil.
- Water Thoroughly: Water the root ball and backfill deeply to eliminate large air pockets.
- Apply the Mulch Donut: Apply a 3-inch layer of composted wood chips in a wide ring, keeping the mulch at least 3 inches away from the trunk to leave the root flare completely exposed.
Conclusion
Proper tree planting is an investment in the future of your landscape. By adhering to the width and depth guidelines for the planting hole and rigorously defending the root flare from suffocating soil and mulch, you set your tree up for a lifetime of vigor. Combine these precise planting techniques with the donut mulching method and high-quality organic materials, and your trees will be deeply rooted, resilient, and ready to weather the environmental challenges of 2026 and beyond.

