
Landscaping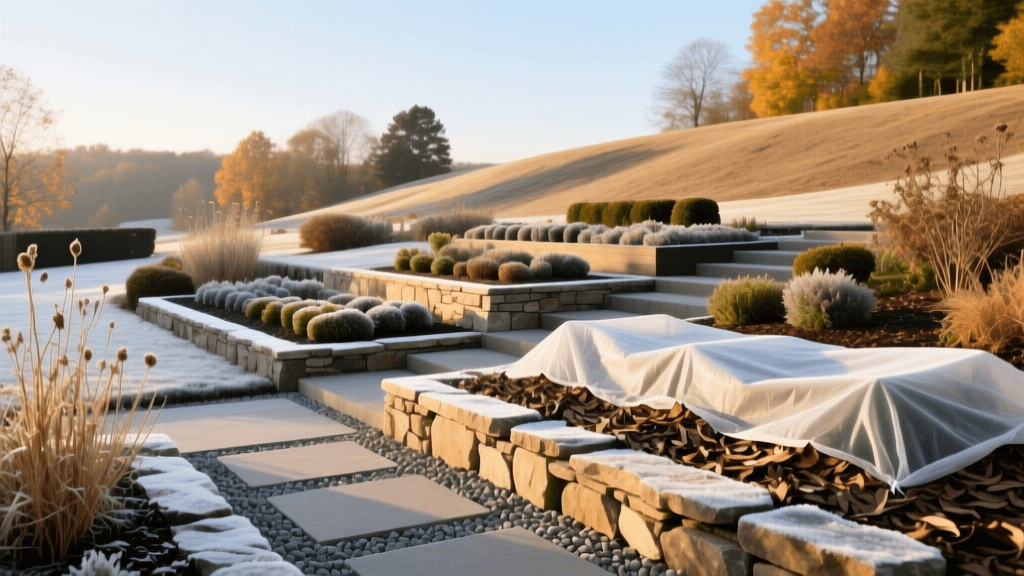
How to Winterize Hardscapes and Perennial Garden Beds
The Critical Window: Timing Your Fall Landscape Winterization
When it comes to seasonal maintenance and the long-term health of your landscaping, timing is everything. Winterizing your hardscapes and perennial beds is not a task to be completed in late summer, nor should it be delayed until the first blizzard is on the radar. The ideal window for winterization is after the first hard frost—when nighttime temperatures consistently dip below 28°F (-2°C)—but before the ground freezes solid. In most northern and transitional zones, this falls between late October and mid-November.
During this period, perennial plants have entered dormancy, drawing nutrients down into their root systems, and the soil is still workable enough to amend garden beds or repair hardscape joints. Monitoring your local soil temperature with a simple $10 digital soil thermometer is the most accurate way to hit this critical window. Aim to begin your winterization protocols when soil temperatures at a 4-inch depth consistently read below 40°F.
Hardscape Health: Defending Patios, Walkways, and Retaining Walls
Hardscaping represents a significant financial investment in your property, often costing between $15 and $50 per square foot depending on materials. The primary enemy of hardscape health in the winter is the freeze-thaw cycle. When water penetrates porous materials or settles in joint spaces, it expands by up to 9% upon freezing, leading to frost heave, spalling, and structural cracking.
Paver Patios and Walkways
For interlocking concrete pavers and natural flagstone, joint integrity is your first line of defense. Over the summer, organic debris and foot traffic degrade the jointing sand.
- Action: Sweep out degraded sand and organic matter from the joints to a depth of at least 1 inch.
- Product: Apply a high-quality polymeric sand (such as Alliance Gator Sand or Techniseal). Polymeric sand contains water-activated polymers that bind the sand grains together, creating a flexible but solid barrier against water penetration and weed growth.
- Cost & Coverage: A 50-pound bag costs between $40 and $60 and covers approximately 100 to 150 square feet, depending on joint width.
- Sealing: After the sand cures (usually 24-48 hours), apply a penetrating silane/siloxane sealer. Unlike film-forming acrylics that can trap moisture and cause white efflorescence, penetrating sealers repel water while allowing the stone to breathe. Expect to pay $60 to $90 per gallon, covering roughly 150 square feet.
Retaining Walls and Drainage
Retaining walls face immense hydrostatic pressure during winter snowmelts and heavy rains. If the backfill drainage fails, the freezing water can push the wall outward, causing catastrophic structural failure.
- Action: Inspect and clear all weep holes at the base of the wall. Use a wire brush and a shop vacuum to remove dirt, leaves, and sediment.
- Verification: Run a garden hose behind the wall near the perforated drain pipe to ensure water exits freely through the weep holes. If drainage is sluggish, the French drain may be clogged with silt and require professional hydro-jetting ($150-$300).
Hardscape Winterization Matrix
| Hardscape Element | Primary Winter Threat | Preventative Action | Estimated Cost |
|---|---|---|---|
| Paver Patios | Frost heave, joint erosion | Re-apply polymeric sand | $40-$60 per 50lb bag |
| Retaining Walls | Hydrostatic pressure buildup | Clear weep holes & French drains | $15-$30 (tools/labor) |
| Natural Stone | Spalling from moisture freeze | Apply siloxane penetrating sealer | $60-$90 per gallon |
| Wooden Decks | Rot, warping, splintering | Clean and apply water repellent | $30-$50 per gallon |
Essential Hardscape Winterization Toolkit
To execute these hardscape maintenance tasks efficiently, ensure you have the following tools on hand:
- Stiff-Bristle Push Broom: For sweeping polymeric sand into deep paver joints without displacing the base.
- Plate Compactor: If you are re-leveling frost-heaved pavers, a rented plate compactor ($60-$90 per day) is essential for re-establishing a uniform base.
- Leaf Blower with Vacuum Function: Crucial for removing damp, decomposing leaves from gravel paths and retaining wall caps where raking is ineffective.
- Masonry Weep Hole Brush: A specialized, narrow wire brush designed to clear sediment from 1-inch PVC weep holes without damaging the surrounding mortar or stone.
Perennial Bed Health: Soil Protection and Root Insulation
While hardscapes require structural defense, the health of your garden beds relies on thermal regulation and soil biology preservation. Winter is not a dead season for soil; microbial activity continues at a reduced rate, and the physical structure of the soil is highly susceptible to compaction and erosion.
The Debate: To Cut Back or Leave Standing?
Modern sustainable landscaping practices heavily favor leaving perennial stems and ornamental grasses standing through the winter.
- Ecological Health: Hollow stems provide overwintering habitats for native solitary bees and beneficial insects. Seed heads from coneflowers (Echinacea) and black-eyed Susans (Rudbeckia) provide crucial winter forage for finches and chickadees.
- Plant Health: The standing foliage acts as a natural windbreak, trapping insulating snow cover over the plant crown.
- Exceptions: You must cut back and destroy (do not compost) foliage from plants that suffered from severe fungal diseases, such as powdery mildew on bee balm (Monarda) or botrytis on peonies. Leaving diseased tissue guarantees a reinfection cycle next spring.
Strategic Fall Mulching
Mulch is the ultimate insulator for perennial root zones, but the application method dictates its success.
- Material Selection: Use aged, shredded hardwood bark or composted leaf mold. Avoid whole leaves, which can mat down and suffocate the soil, and avoid dyed mulches, which offer no nutritional value to the soil food web.
- Application Depth: Apply a 2 to 3-inch layer over the root zones of perennials and shrubs.
According to the Cornell University Cooperative Extension, applying protective mulch too early in the fall can delay soil freezing and invite rodent nesting, while applying it too late leaves shallow-rooted perennials vulnerable to frost heave. Wait until the top inch of soil has frozen before applying winter mulch.
Soil Health: Fall Amendments and Cover Crops
The health of your landscape is fundamentally tied to soil biology. Fall is the superior time to amend garden beds because the freeze-thaw action of winter naturally incorporates organic matter into the soil profile, and it gives beneficial mycorrhizal fungi time to establish symbiotic relationships with plant roots before the spring growth flush.
- Soil Testing: Before adding any amendments, conduct a comprehensive soil test through your local university extension office (typically $15-$25). This will provide exact pH and macronutrient levels.
- Compost Top-Dressing: Apply a 1-inch layer of premium organic compost (OMRI-listed) over your perennial beds. This feeds the soil microbiome throughout the winter.
- Cover Crops for Annual Beds: If you have empty vegetable or annual cutting garden beds, sow a cover crop like winter rye or hairy vetch in early September. These crops prevent winter soil erosion, suppress early spring weeds, and can be turned into the soil in early spring as green manure, adding vital nitrogen and organic bulk back into the landscape ecosystem.
Winterizing Water Features and Irrigation Systems
Water left in landscaping plumbing is a guaranteed recipe for cracked pipes and ruined pumps.
- Irrigation Blow-Outs: Do not rely on manual drain valves alone. Hire a licensed irrigation professional to perform a compressed air blow-out of your sprinkler zones. The cost typically ranges from $50 to $150 for a standard residential system. Ensure the contractor uses a compressor that delivers high volume (CFM) rather than just high pressure (PSI), keeping the pressure below 50 PSI for polyethylene pipes to prevent shattering.
- Pondless Waterfalls and Fountains: Remove the submersible pump, clean the impeller, and store it indoors in a bucket of water to prevent the seals from drying out and cracking. Drain the basin completely and cover it with a heavy-duty, UV-resistant tarp secured with landscape staples to keep out autumn leaves and winter debris.
Conclusion: Investing in Spring Vitality
Seasonal maintenance and health in landscaping are inextricably linked. The actions you take during a two-week window in late fall dictate the structural integrity of your hardscapes and the vigor of your spring blooms. By clearing drainage pathways, applying breathable sealants, managing soil insulation, and respecting the ecological dormancy of your garden beds, you protect your financial investment and cultivate a resilient, thriving landscape year after year.

