
Landscaping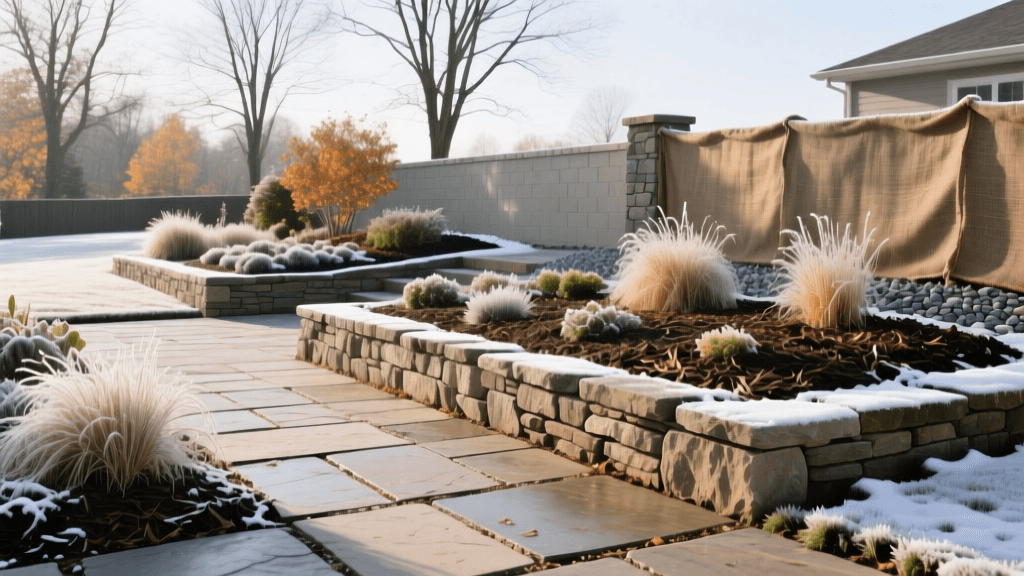
Winterizing Hardscapes and Garden Beds Against Frost
The Hidden Threat of Freeze-Thaw Cycles
As the vibrant colors of autumn fade and the first crisp frosts settle over the landscape, homeowners must shift their focus from active gardening to essential seasonal maintenance. The transition into winter poses a severe threat to both the structural integrity of your hardscapes and the biological health of your garden beds. The primary culprit is the freeze-thaw cycle. When water penetrates porous materials like concrete, natural stone, or compacted soil and subsequently freezes, it expands by approximately nine percent. This expansion generates immense internal pressure, leading to spalling, cracking, and heaving that can cost thousands of dollars to repair.
Proper seasonal maintenance and health-focused winterization are not merely about aesthetics; they are critical investments in the longevity of your outdoor living spaces. By taking proactive steps in late fall, you can protect your landscape architecture, preserve soil biology, and ensure a vibrant, problem-free revival in the spring. This comprehensive guide details the exact steps, products, and timing required to winterize your property effectively.
Winterizing Your Hardscape Investment
Sealing Pavers and Natural Stone
Unsealed pavers and natural stone are highly susceptible to water infiltration. Before the ground freezes, it is imperative to clean and seal these surfaces. Begin by sweeping away all organic debris and washing the surface with a specialized paver cleaner to remove efflorescence and organic stains. Allow the hardscape to dry completely for at least 48 hours.
For optimal protection, avoid film-forming acrylic sealers that can trap moisture and become slippery. Instead, opt for a penetrating silane-siloxane sealer, such as Siloxa-Tek 8500. These sealers react chemically with the silica in concrete and stone to form a hydrophobic barrier beneath the surface, allowing the material to breathe while repelling liquid water and deicing salts. Apply the sealer using a low-pressure pump sprayer when ambient temperatures are consistently above 40 degrees Fahrenheit. A standard gallon covers roughly 250 square feet and costs between 50 and 70 dollars, a minor expense compared to replacing frost-heaved pavers.
Stabilizing Joints and Retaining Walls
Hardscape joints are the weakest link in any paved surface. If the polymeric sand or jointing material has degraded over the summer, water will pool in the crevices and freeze, pushing the pavers apart. Inspect all joints in late autumn. Remove any loose debris and refill with high-quality polymeric sand, such as Techniseal. Mist the sand lightly with a hose to activate the binding polymers, creating a flexible, water-resistant seal that deters weed growth and ant colonies.
Retaining walls face the dual threat of freeze-thaw expansion and hydrostatic pressure. Ensure that the weep holes at the base of the wall are completely clear of soil, mulch, and debris. Use a stiff wire brush and a wet-dry vacuum to clean them out. If your retaining wall relies on a French drain behind the block system, verify that the daylight exit point is free of obstructions so that winter meltwater and heavy autumn rains can escape freely.
Protecting Irrigation and Water Features
Trapped water in irrigation lines is a guaranteed recipe for cracked PVC pipes and destroyed sprinkler heads. Merely turning off the water supply is insufficient; the lines must be blown out using an air compressor. Industry standards dictate using a compressor capable of delivering at least 10 cubic feet per minute (CFM) at a safe pressure of 50 to 80 PSI. Higher pressures can melt plastic pipes due to friction heat, while lower volumes will fail to evacuate all the water. For fountains and pondless water features, drain the basins completely, remove the pumps, and store them indoors in a bucket of water to prevent the seals from drying out and cracking.
Garden Bed Health: Soil and Perennial Protection
Strategic Winter Mulching
One of the most common landscaping mistakes is applying winter mulch too early. Mulch acts as an insulator, and if applied while the soil is still warm, it delays the natural dormancy process of perennials and traps excess moisture, which can lead to crown rot and fungal diseases. According to guidelines from the Cornell University Cooperative Extension, winter mulch should only be applied after the ground has experienced a hard freeze—typically when the top inch of soil is frozen solid following several consecutive nights below 28 degrees Fahrenheit.
Once the ground is frozen, apply a two-to-three-inch layer of organic mulch. Shredded hardwood bark, pine needles, and straw are excellent choices. This layer prevents the soil from repeatedly thawing and refreezing during late-winter warm spells, a phenomenon that causes frost heaving, which can push shallow-rooted perennials entirely out of the ground. Crucially, keep the mulch at least three inches away from the base of tree trunks and shrub crowns to prevent rodent damage and bark rot, a harmful practice commonly known as volcano mulching.
Pruning and Debris Management
While the instinct to tidy up the garden completely is strong, a health-focused approach requires selective pruning. Leave the seed heads of native perennials like Echinacea, Rudbeckia, and Sedum standing throughout the winter. They provide crucial forage for overwintering birds and their hollow stems serve as vital habitats for native solitary bees. Only remove foliage that exhibits signs of disease, such as powdery mildew on phlox or severe rust on hollyhocks. Dispose of diseased material in municipal composting facilities, where high commercial temperatures will destroy the pathogens, rather than in your home compost pile.
Soil Amendment and Cover Cropping
Fall is the optimal time to address soil health. Conduct a soil test through your local university extension office to determine pH and nutrient deficiencies. If your soil requires lime to raise the pH or elemental sulfur to lower it, apply these amendments in late fall. The natural freeze-thaw action and winter precipitation will help incorporate these minerals into the topsoil over the dormant months. For bare garden beds, consider planting a winter cover crop like winter rye or hairy vetch, or simply apply a thick layer of shredded fallen leaves to protect the soil microbiome from erosion and extreme temperature fluctuations.
Seasonal Maintenance Schedule and Cost Breakdown
To help you budget and plan your autumn landscaping tasks, refer to the comprehensive maintenance table below. Costs are estimated for DIY execution on an average residential property.
| Maintenance Task | Ideal Timing | Estimated DIY Cost | Recommended Products or Tools |
|---|---|---|---|
| Paver and Stone Sealing | Early Fall (Above 40F) | 50 to 150 dollars | Siloxa-Tek 8500, Pump Sprayer |
| Joint Sand Stabilization | Mid-Fall (Dry Conditions) | 30 to 60 dollars | Techniseal Polymeric Sand |
| Weep Hole Clearing | Late Fall (Pre-Freeze) | 0 to 20 dollars | Wire Brush, Shop-Vac |
| Irrigation Blowout | Mid-to-Late Fall | 50 to 100 dollars | 10 CFM Compressor, Brass Fittings |
| Perennial Mulching | After First Hard Freeze | 30 to 60 dollars per cubic yard | Shredded Hardwood Bark, Pine Needles |
| Soil Amendment | Late Fall (Post-Test) | 10 to 40 dollars | Organic Compost, Pelletized Lime |
Expert Insights on Landscape Winterization
The importance of timing and material selection cannot be overstated when dealing with seasonal landscape health. According to the Penn State Extension, hardscape spalling and masonry degradation in northern hardiness zones are primarily driven by rapid temperature drops in saturated materials. Their research underscores the necessity of penetrating sealers over topical coatings, as topical coatings frequently fail by trapping moisture inside the stone, exacerbating freeze-thaw damage from the inside out.
Proper drainage is the single most important factor in the longevity of any hardscape structure. No amount of sealing can compensate for poor grading or clogged weep holes that allow hydrostatic pressure to build up behind retaining walls during the winter thaw. - Penn State Extension, Landscape Architecture Guidelines
Furthermore, turfgrass and soil health experts emphasize that autumn leaf management should shift from complete removal to mulching. Using a mulching mower to shred fallen leaves directly into the turf and garden beds returns vital organic matter and micronutrients to the soil, feeding the fungal networks and earthworms that maintain soil structure throughout the winter.
Final Thoughts on Seasonal Landscape Health
Winterizing your hardscapes and garden beds is a rigorous but deeply rewarding process that bridges the gap between seasonal maintenance and long-term landscape health. By understanding the mechanics of freeze-thaw cycles, utilizing the correct chemical and organic barriers, and respecting the biological needs of your soil and perennials, you protect your financial investment and foster a resilient ecosystem. Take the time this autumn to clean, seal, mulch, and amend your property, and you will be greeted by a pristine, thriving landscape when the spring thaw finally arrives.

