
Landscaping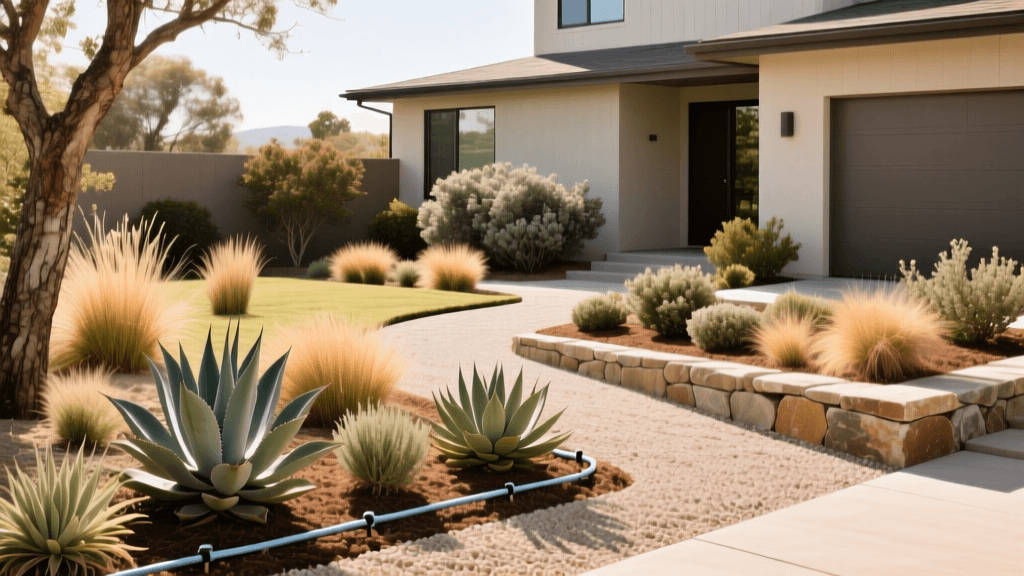
Xeriscape Front Yard Design: Planning a Drought-Tolerant Landscape
Introduction to Xeriscape Front Yard Design
As water conservation becomes a critical priority for homeowners across the globe, the concept of xeriscaping has moved from a niche environmental trend to a mainstream landscaping necessity. Coined in 1981 by Denver Water, the term xeriscape comes from the Greek word 'xeros', meaning dry. However, a common misconception is that xeriscaping equates to a barren, rocky, and lifeless yard. In reality, a well-planned xeriscape front yard is a vibrant, ecologically balanced, and visually stunning landscape that thrives with minimal supplemental water. When you design and plan a drought-tolerant front yard correctly, you can reduce outdoor water usage by 50 to 75 percent while dramatically boosting your home's curb appeal. This comprehensive guide will walk you through the essential design principles, practical planning steps, and material selections required to transform your front yard into a sustainable oasis.
The Core Philosophy: Hydrozoning Your Landscape
The foundation of any successful xeriscape design is a technique known as hydrozoning. Hydrozoning involves grouping plants with similar water, sunlight, and soil requirements together in specific zones. This prevents the common mistake of overwatering drought-tolerant plants just to keep a neighboring thirsty plant alive. When planning your front yard, divide your space into three distinct hydrozones:
- Zone 1: The Oasis Zone - Located near the front entryway, porch, or primary focal points. This area receives the most attention and supplemental water. Use moderate-water plants, vibrant seasonal color, and lush textures here to create a welcoming entrance.
- Zone 2: The Transition Zone - The middle ground of your yard. Plants here require only occasional deep watering once established. This zone bridges the visual gap between the lush oasis and the wilder edges of the property.
- Zone 3: The Minimal Zone - The perimeters, parkways, and areas furthest from the house. These areas rely almost entirely on natural rainfall. Plant hardy, native, and highly drought-tolerant species here that require zero supplemental irrigation once their root systems are established.
Step 1: Site Analysis and Turf Removal
Before purchasing a single plant, you must analyze your site and remove existing water-wasting turfgrass. Map out the sun exposure in your front yard by tracking how many hours of direct sunlight each area receives. Most drought-tolerant plants, such as succulents and Mediterranean herbs, require a minimum of six to eight hours of direct sun. For turf removal, avoid using chemical herbicides that can linger in the soil and harm future plantings. Instead, opt for solarization or sheet mulching. Sheet mulching involves mowing the grass as short as possible, laying down overlapping layers of plain corrugated cardboard, and topping it with three to four inches of organic compost. Over three to four months, the grass will decompose, enriching the soil with organic matter while effectively killing the turf.
Step 2: Soil Amendment and Preparation
Drought-tolerant plants generally despise 'wet feet' and require excellent drainage. If your front yard has heavy clay soil, water will pool and rot the roots of your new xeriscape plants. Conduct a percolation test by digging a hole 12 inches deep and 12 inches wide, filling it with water, and timing how long it takes to drain. If it takes longer than four hours to drain, you must amend the soil. For clay soils, incorporate coarse builder's sand and expanded shale at a ratio of 30 percent amendment to 70 percent native soil. Products like PermaTill Expanded Shale or Espoma Organic Soil Acidifier (if you are planting acid-loving natives) are excellent choices. The cost for soil amendments typically ranges from $15 to $30 per 40-pound bag, and you should plan to till the soil to a depth of at least 8 to 12 inches to ensure proper root penetration.
Step 3: Hardscaping and Mulch Selection
Hardscaping provides the structural backbone of your front yard design. Permeable pathways allow rainwater to infiltrate the soil rather than running off into the street. Decomposed granite (DG) is a premier choice for xeriscape pathways. For a durable DG pathway, excavate a trench 4 inches deep, lay down a geotextile weed barrier, add a 2-inch base of crushed gravel, and top it with a 2-inch layer of DG. Compact the DG with a plate compactor and apply a liquid stabilizer to prevent erosion.
Mulch is equally critical in a xeriscape design, as it reduces soil evaporation, suppresses weeds, and regulates soil temperature. However, not all mulches are suitable for every plant. Below is a comparison chart to help you select the right mulch for your hydrozones:
| Mulch Type | Water Retention | Cost per Sq Ft | Best Use Case |
|---|---|---|---|
| Shredded Bark | High | $0.15 - $0.30 | Zone 1 Oasis, trees, and shrubs |
| Decomposed Granite | Low | $0.40 - $0.70 | Pathways, patios, and Mediterranean plants |
| River Rock (3/4 inch) | Very Low | $0.50 - $0.90 | Dry creek beds, drainage swales |
| Crushed Gravel | Low | $0.30 - $0.60 | Zone 3 Minimal, succulents, and cacti |
Step 4: Plant Selection and Placement
Choosing the right plants is where your design truly comes to life. Focus on native species and adapted non-natives that thrive in your specific USDA Hardiness Zone. When planning your plant layout, account for the mature size of the plant to avoid overcrowding, which restricts airflow and invites fungal diseases. Here are four exceptional drought-tolerant plants to anchor your front yard design:
- Agave parryi (Parry's Agave): A stunning structural succulent with striking silver-blue leaves. Requires full sun and zero supplemental water once established. Space plants at least 3 feet apart to accommodate their mature 2-foot width and eventual flowering stalks.
- Salvia greggii (Autumn Sage): Perfect for the Transition Zone, this shrub produces vibrant red, pink, or white blooms from late spring through fall, attracting hummingbirds. Space plants 2 feet apart and prune lightly in early spring.
- Muhlenbergia capillaris (Pink Muhly Grass): An ornamental grass that creates a breathtaking, glowing pink haze in the autumn. Plant in masses of three or five for maximum visual impact, spacing them 3 feet apart in full sun.
- Yucca rostrata (Beaked Yucca): A dramatic, tree-like focal point for the Oasis or Minimal zone. Its spherical canopy of blue-green leaves thrives in harsh heat and poor soil. Provide a 6-foot radius to allow for its slow but majestic growth.
Irrigation Planning: Drip Systems over Sprinklers
Even drought-tolerant plants require regular watering during their first one to two years of establishment. However, traditional overhead sprinklers waste massive amounts of water to evaporation and wind drift. For a xeriscape, you must install a drip irrigation system. Drip irrigation delivers water directly to the root zone at a slow, measurable rate. Use products like Rain Bird XFD drip tubing or Netafim Techline with built-in emitters spaced 12 inches apart. For individual specimen plants like Agave or Yucca, run 1/4-inch tubing with 1 GPH (gallon per hour) or 2 GPH button emitters. Set your irrigation timer to water deeply but infrequently. In the heat of summer, water for 45 to 60 minutes twice a week. In the winter, reduce watering to just once a month, or turn the system off entirely if you receive adequate rainfall.
Estimated Costs and Project Timeline
Budgeting is a critical component of landscape planning. For a standard 500-square-foot front yard conversion, here is a realistic cost breakdown for a DIY installation:
- Design and Planning: $0 (DIY) to $500 (Professional software or basic consultation)
- Turf Demolition and Removal: $1.00 to $2.00 per square foot (Renting a sod cutter and dumpster fees)
- Soil Preparation and Amendments: $150 to $300
- Hardscaping and Mulch Materials: $400 to $800 (Including DG, gravel, and weed barrier)
- Plants (15 to 25 specimens): $500 to $1,500 (Depending on nursery pot sizes; 1-gallon pots are most cost-effective)
- Drip Irrigation Kit: $200 to $400 (Including timer, tubing, emitters, and fittings)
Total Estimated Cost: $1,250 to $3,500. In terms of timing, a dedicated DIYer working over the weekends can complete the demolition, soil prep, and hardscaping in two weekends. Planting and irrigation installation will take a third weekend. The entire planning and execution phase can comfortably fit into a one-month timeframe if materials are sourced in advance.
Expert Insights on Sustainable Landscaping
The academic and horticultural communities strongly advocate for the shift away from traditional turf lawns in arid and semi-arid regions. The Colorado State University Extension, a pioneer in xeriscape research, emphasizes the importance of proper planning over mere plant selection.
"Xeriscape does not mean 'zero-scape' or a barren landscape of rocks and cacti. It is a comprehensive approach to landscape design that integrates seven core principles, starting with planning and design, and ending with appropriate maintenance. When executed correctly, a xeriscape is a lush, colorful, and dynamic environment that respects local water resources while providing immense aesthetic and ecological value." - Colorado State University Extension
Conclusion
Planning a xeriscape front yard is an investment in both your property's aesthetic future and the environment. By embracing hydrozoning, selecting the right permeable hardscapes, and choosing resilient native plants, you can create a stunning landscape that stands up to drought conditions and drastically reduces your water bill. Take the time to map your sun exposure, test your soil, and design with intention. The result will be a beautiful, low-maintenance front yard that sets a new standard for neighborhood curb appeal.

